Generally, we want our online applications to be freely connected to the internet without any hindrances. But sometimes certain situations can arise where we would need to disable the internet access of specific programs.
In these situations, we can block the program with Windows Firewall. But, many users don’t know how to block a program in Firewall. In this article, we have given step by step instructions on how to block specific programs in Firewall on Windows 10.
Also, check out this article on what to do when DNS server is not responding.
Why Block Internet Access For A Program?
Contents
It might seem weird to block the internet access of a program for some users. After all, when we download an online app, we want it to be connected to the internet. But in some situations, blocking certain program’s access to the internet can help the users.
You can block the internet access of those apps that you don’t want to auto-update. Also, blocking internet access on those apps that are filled with annoying ads, can block the ads. There are various other instances where this can be of use.
How To Block A Program In Firewall?
Now, coming back to the topic, to block specific programs In Firewall, follow the steps given below:
- Open the Windows search bar by pressing the Windows + S keys.
- Type Windows Defender Firewall and select the appropriate option.
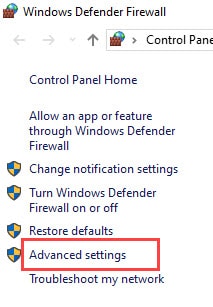
- Now, on the left panel, select the Advanced settings option. The Windows Defender Firewall with Advanced Security console will open on your screen.
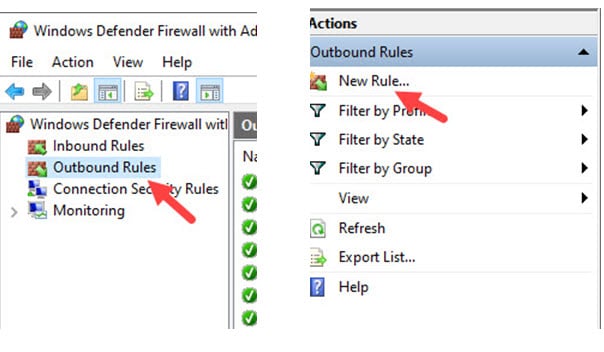
- Select the Outbound Rules option on the left panel and on the right Actions panel select the New Rules option. The New Outbound Rule Wizard will open on your screen.
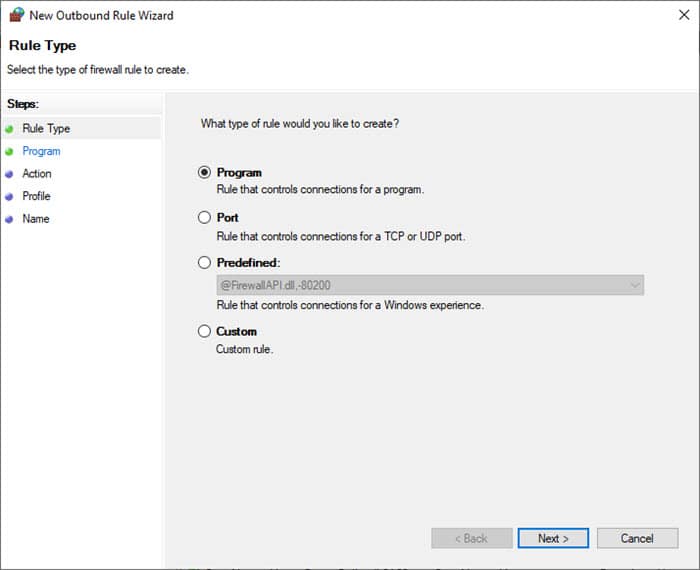
From here you will be able to create a new rule to control connections of programs.
- Click on the Program option and select the Next option.
Now, you can either select to apply this rule for all programs or one specific program.
- Select the This program path option and Browse to the path of the specific program you want to block and click on Next.
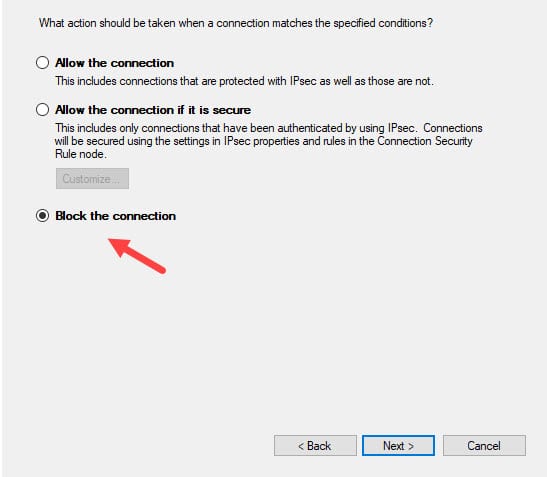
- Click on the Block the connection option and click on Next again.
- Now, you can specify where this rule will apply, or in other words when will this application is to be blocked from the internet. After you have done it, click on Next.
- Finally, enter the name of the Rule and click on Finish.
Disable A Program Temporarily
If you don’t want to block the program but disable it temporarily, then follow the steps given below:
- Open the Windows Defender Firewall again.
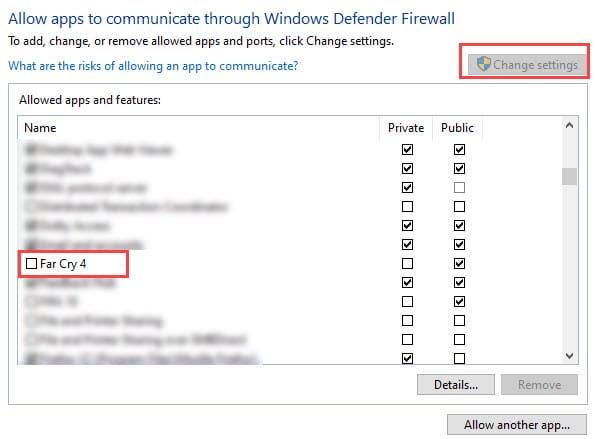
- Select the Allow an app or feature through Windows Firewall located on the left panel and then click on the Change settings option.
- The Allowed apps console will be on your screen. Locate the app you want to disable in the Allowed app list.
If the app you want to disable isn’t listed, then select the Add option and locate that program. - Now, uncheck the box beside the targeted program and click on OK to save the changes. The programs that have the boxes unchecked will be blocked temporarily.
How To Allow Program Through The Firewall?
To allow a program through the Firewall, that has been disabled, you just need to check the boxes beside the app in the Allowed apps console that was mentioned above. By checking all the boxes, the app will be allowed through the program.
Wrapping Up
So, there you have it. Now you know how to block a program in Firewall on Windows 10. Also, in the end we have mentioned how to allow an app through Firewall, so don’t forget to check that out. Leave your comments below sharing your views on this article.
Leave a Reply