Has your screen shifted to the right? Many users have reported this in the forums, so you are not alone. This issue is unusual and can be related to both Windows 10 and the monitor. Here I have discussed what you need to do when your Windows 10 screen shifted to the right.
Why Did Windows 10 Screen shift To The Right?
Contents
Many factors can be involved in the shifting of your screen. Here are some potential factors that can trigger this issue:
- Outdated or corrupted graphics drivers: Corrupted or outdated graphics drivers can trigger display issues such as screen shifting.
- Incorrect Resolution: Have you changed your resolution before this issue arrived? The selected resolution can be incompatible with your monitor, triggering this issue.
- Wrong monitor configuration: If your monitor configuration was changed recently, the wrong configuration may have been applied.
- Faulty Monitor: This can also be a faulty monitor issue.
- Corrupted system files: If the system files get corrupted, it can trigger such issues.
My Computer Screen Is Shifted To The Right How Do I Fix It?
Now that you know the causes of this error, it is time to fix it. Follow the troubleshooting mentioned here and you should be able to fix this issue.
Solution 1: Troubleshoot Your Graphics Drivers
Whenever you face issues with the display, like having Windows 10 screen shift, the first thing you must check is the graphics drivers. Corrupted or outdated graphics drivers can trigger a multitude of issues, including this one. First, update your graphics drivers and if that doesn’t work, try reinstalling it.
To update your graphics drivers, follow the steps given below:
- Press the Windows + R keys to open the Run utility.
- Type devmgmt.msc and press Enter to open the Device Manager.
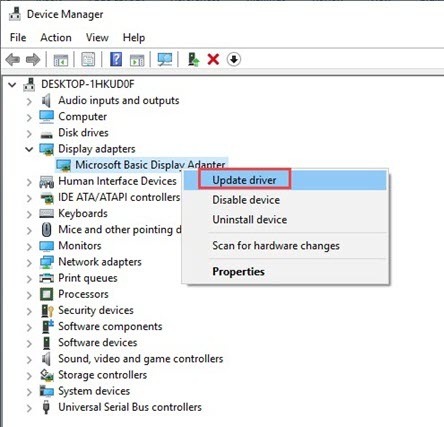
- Expand the Display adapters option.
- Right-click on the graphics drivers driver.
- Select the Update driver option from the right-click context menu.
- Click on the Search automatically for drivers option and follow the instructions on your screen to finish the process.
- After the update is complete, restart the computer.
Check whether the issue remains. If yes, then try uninstalling and reinstalling the graphics drivers. To uninstall the audio drivers, follow the steps given below:
- Open the Device Manager again.
- Right-click on the graphics driver and select the Uninstall device option.
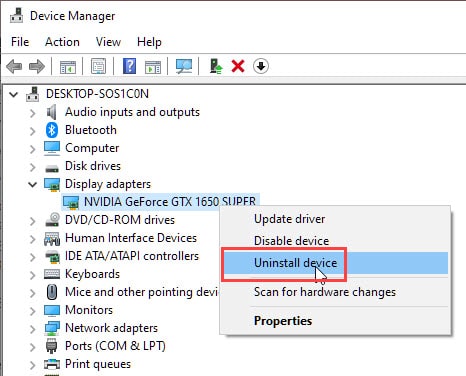
- Follow the instructions on your screen to finish uninstalling.
- Finally, restart your PC.
Solution 2: Run SFC And DISM Scans
Windows 10 screen shifting to the right can also be caused by corrupted system files. Try running the System File Checker tool and the DISM tool and see whether the screen is re-adjusted.
- Open the Run utility again.
- Type cmd and press Ctrl + Shift + Enter to open an elevated Command Prompt.
- Type the following command and press Enter:
sfc /scannow
- Wait for the scan to finish as it will take around 20-30 minutes. Do not close the Command Prompt prematurely.
- Restart the computer.
- Now, open the elevated command prompt again.
- Type the following commands and press Enter after finishing each one:
a) Dism /Online /Cleanup-Image /CheckHealth
b) Dism /Online /Cleanup-Image /ScanHealth
c) Dism /Online /Cleanup-Image /RestoreHealth
Wait for the commands to finish running and then restart the computer.
Solution 3: Restore To A Previous System Point
If system restore is enabled on your PC and you have saved a previous restore point before this issue appeared, then you can restore to it. By restoring to a previous system point, you should be able to get rid of this error.
This will also show you whether the issue is Windows related or monitor related. To restore to a previous system point, follow the steps given below:
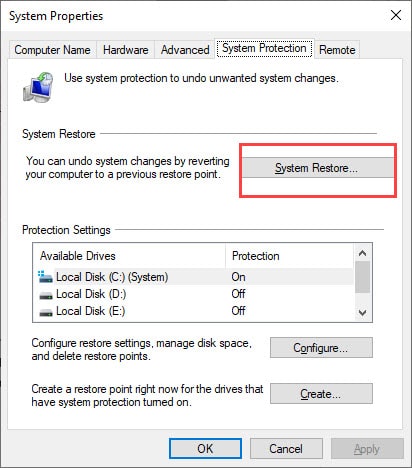
- Type Create a restore point in the start menu and select the top result. The System Properties will open on your screen.
- In the System Protection tab, select the System Restore option.
- Click on the restore point made before this error appeared and follow the on-screen information to restore your PC to that state.
Solution 4: Change Screen Resolution
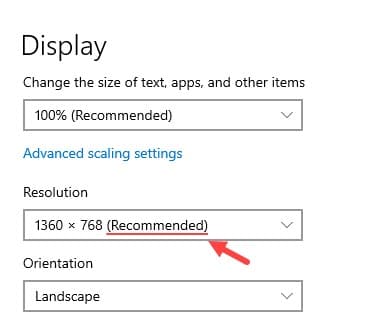
Have you recently changed the screen resolution? Did the issue start since then? Even if you haven’t, check whether the recommended screen resolution is selected on your PC. To change your screen resolution, follow the steps given below:
- Press the Windows + I keys to open the Settings app.
- Select the System option.
- Click on the Display option next.
- In the Display resolution section, change the resolution to the Recommended value.
- Select the Keep Changes option.
Solution 5: Check Your Graphics Card Panel
Whether you are using integrated graphics or dedicated graphics, the control panel of the graphics will be available for customization. You can adjust screen position in Windows 10 using this panel. To do it, follow the steps given below:
Nvidia Control Panel:
- Right-click on Desktop and select the Nvidia Control Panel option.
- On the left panel of the opened window, locate the Display option and expand it.
- Select the Adjust desktop size and position option.
- Click on the Position tab and click on the arrows until the display is aligned correctly.
- Select the Apply option to save the changes.
Solution 6: Change The Monitor Refresh Rate
The next thing you can try is changing the monitor refresh rate. Changing the monitor refresh rate can adjust screen position in Windows 10. To change the monitor refresh rate, follow the steps given below:
- Press the Windows + I keys to open the Settings app.
- Select the System option.
- Click on the Display option next.
- Locate and click on the Advanced display settings option. It should be in the Multiple displays section.
- Select the monitor in question (relevant only if you have a multi-monitor setup) and click on the Display adapter properties for Display option in the Display Information section. This will open the Properties of the monitor on a separate window.
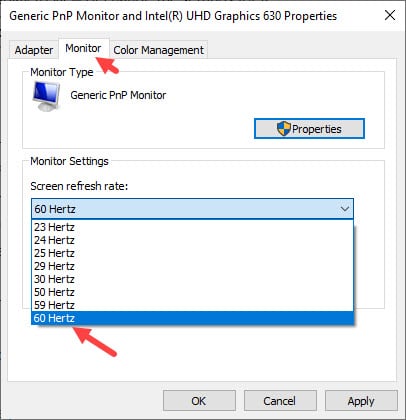
- Click on the Monitor tab.
- In the Monitor settings, select the Screen refresh rate drop-down menu.
- Select a different refresh rate from what was previously selected. Click on Apply and OK to save the changes.
Solution 7: Adjust Screen Position Windows 10 Using The Monitor Physical Keys
Did you try changing the monitor configuration before your Windows 10 screen shifted? Maybe someone else did on your monitor? Whichever the case, improper monitor configuration can be a cause of this issue. In this situation, you will have to change the monitor configuration, depending on the shifting of the screen, to fix it.
First, try auto-adjusting the screen from the monitor menu. Press the menu button on your monitor. Select the Size And Position option, or something similar. Your monitor can even directly open the display settings. Find the display auto-adjust option and select it. For some monitors, this is a dedicated button on the monitor rather than in the menu.
If auto-adjusting doesn’t work, you will have to manually adjust the horizontal and vertical screen.
Wrapping Up
So, there you have it. Now you know how to fix the Windows 10 screen shifted issue. If you have any questions related to this topic, ask them in the comment section below.

Thanks for this helpful article and the YouTube link also. It’s working fine. But could you provide some more fixes for graphics issues?
This is a very helpful article. I have been trying to solve the problem for hours and finally did thanks to you
Thank you very much