There are many ways to delete the temporary and junk files in Windows 10. It is extremely important that you delete the junk and temporary files so that the memory doesn’t become clogged up. This will obviously slow your PC. Unfortunately, many users are unable to delete temporary files on Windows 10.
If you are also facing a similar issue, then don’t worry as in this article I have discussed what to do when Windows 10 won’t delete temporary files.
What To Do When Windows 10 Won’t Delete Temporary Files?
Contents
If you are unable to delete temporary files from your PC, then don’t panic as there are many ways to delete temporary files, and one of them is statistically bound to work. Here are the ways you can delete temporary files.
Solution 1: Manually Delete The Temporary Files
The first thing you can try is to manually delete the temporary files. To do it, follow the steps given below:
- Press the Windows + R keys to open the Run utility.
- Type temp in the search box and press Enter.
- Select all the files in that folder using the Ctrl + A shortcut key and delete them using the Delete key.
- Now, open the Run utility again.
- Type %temp% in the search box and press Enter.
- Again select all the files in that folder and delete them.
- Again open the Run utility.
- Type prefetch in the search box and press Enter.
- Select all and delete.
Remember that deleting normally, as mentioned above, will move the files to the Recycle Bin. So, you will have to clear the Recycle Bin next to remove the temporary files completely from your PC. You can also use the Shift + Delete shortcut to directly delete the files without sending them to the Recycle Bin.
Solution 2: Use Disk Cleanup Tool
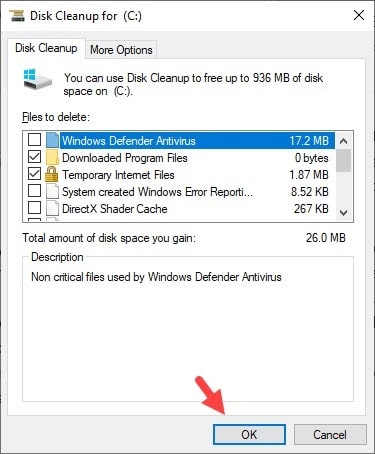
Disk clean up tool is an in-built application of Windows that finds and deletes junk files and temporary files. When you are unable to delete the temporary files manually, try running the Disk Cleanup Tool and let it delete the temporary files. To run the Disk Cleanup Tool, follow the steps given below:
- Type Disk Cleanup in the Search box and click on the top result.
- In the Disk Cleanup Drive selection window, make sure that you select System drive from the drop-down menu.
- Click on OK to start the scan. Wait for your PC to start scanning.
- Check the files you want to remove and click on OK.
- Wait for the temporary files to get deleted.
Solution 3: Use Command Prompt
One of the ways to delete temp files is using the del command line. If the disk clean up tool also doesn’t work, then you can try using the del command line for deleting the temporary files. To use the del command line, follow the steps given below:
- Press the Windows + R keys to open the Run utility.
- Type cmd in the search box and press Ctrl + Shift + Enter to open an elevated command prompt.
- Now, type the following command and press Enter:
del /q/f/s %TEMP%* - Wait for the command to be executed and close the Command Prompt.
Now, check if the still the Temporary files won’t delete.
Solution 4: Update Windows
Bugs are common in Windows and keeping Windows updated is one way to patch bugs. It is possible that because of such a bug, Windows 10 won’t delete temporary files. If your Windows is outdated, then it is likely the reason for the bug to exist. Update your PC and see whether this bug gets patched or not. To update Windows 10, follow the steps given below:
- Right-click on the Start menu.
- Select the Settings option. This will open the Settings app.
- Click on the Update & Security option.
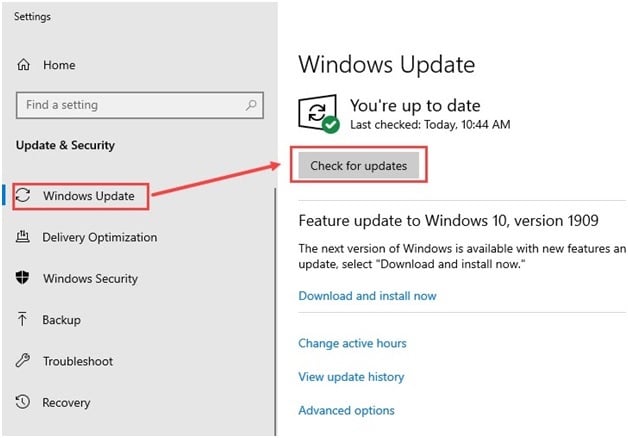
- Now, select the Windows Update option.
- Click on the Check for updates option. Windows will start checking for updates. If any new version is available, download and install them.
- Restart your PC to complete the update.
After Windows 10 is up to date, check if still temporary files won’t delete.
Solution 5: Use Storage Sense
Storage Sense is an amazing utility that can be used to clear temporary files, junk files, and even clear the Recycle bin periodically. To use Storage Sense, follow the steps given below:
- Press the Windows + I keys to open the Settings app.
- Click on the System option.
- Next, select the Storage option.
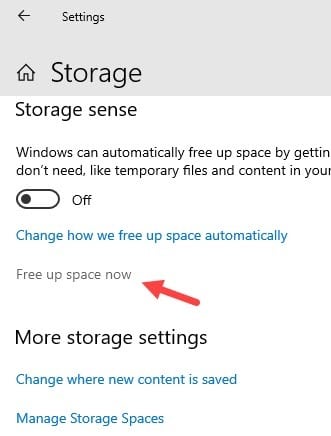
- In the Storage Sense section, turn on the toggle located just under it.
- Click on the Free up space now option. The PC will start scanning for all useless files.
- Check the files you want to delete, remember to check the Temporary files box and click on the Remove files option.
- Wait for Storage Sense to finish deleting temporary files.
Solution 6: Delete Everything In SoftwareDistribution Folder
Some users have reported that the files in the SoftwareDistribution directory can prevent Windows 10 from deleting temporary files. This is a folder that holds the Windows update files. As per reports, deleting the files in the SoftwareDistribution directory can fix this issue. To do that, follow the steps given below:
- First, you will have to make sure that Windows isn’t downloading any updates. You can check that by checking for available updates as mentioned in solution 4. If no updates are available, then you are good to go.
- Press the Windows + R keys to open the Run utility.
- Type %WINDIR%\SoftwareDistribution\Download in the search box and press Enter.
- Select every file in the directory and delete them.
Now, check if you can delete the Temporary files again. Use the above solutions to check that.
Solution 7: Remove Malicious 3rd Party Applications
Have you recently installed any 3rd party applications? And whether this issue started after installing that application. Malicious applications can prevent Windows from conducting their work correctly. Also, applications like Skype and Spotify are known to trigger this issue for some users. To remove these malicious applications, follow the steps given below:
- Open the Run utility again.
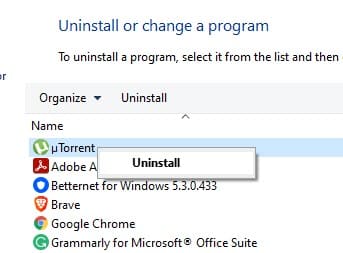
- Type appwiz.cpl and press Enter to open the Programs and Features panel.
- Locate the malicious and incompatible applications and right-click on them.
- Select the Uninstall option.
- Follow the on-screen instructions to complete the process.
Solution 8: Delete Temporary Files In Safe Mode
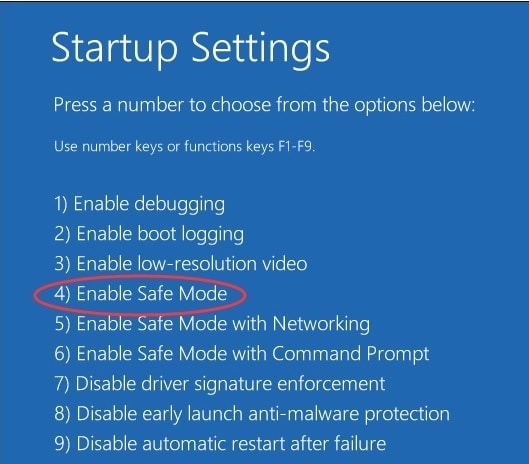
If none of the above solutions fix this issue, try deleting the temporary files in the Safe Mode. To open the Safe Mode, follow the steps given below:
- Open the Start menu and select the Power option.
- Press and hold the Shift key and click on the Restart option. Your PC will boot in the Repair Options.
- Click on the Troubleshoot option.
- Select the Advanced Options.
- Click on the Startup option and select the Restart option.
- Now, press the F4 keys to boot in Safe Mode.
Wrapping Up
So, there you have it. Now you know what to do when Windows 10 won’t delete temporary files. The above solutions should help you fix this issue. If you have any questions regarding this article, ask them in the comment section below.
Leave a Reply