Over the years of using Windows 10, one thing pretty common and consistent is network errors.
Network errors are a torment to users as we are heavily dependent on being online nowadays.
Even a moment of unavailability affects plenty of users’ work. Windows has a network troubleshooter that can be run to detect and fix the network issue.
In one such instance, the troubleshooter may report that the cause of the network failure is the default gateway not available. The network troubleshooter is unable to fix this error on its own and it requires the users manual troubleshooting to fix it.
In this article, I have discussed what you need to do when you face the default gateway is not available error. The following troubleshooting procedure should be followed carefully in order to fix it.
Also read:
- Local Area Connection Doesn’t Have A Valid IP Configuration Error – How To Fix ?
- Private Internet Access Can’t Connect To Internet – How To Fix ?
What Causes The Default Is Gateway Not Available Error?
Contents
Network issues are quite common in Windows 10 and can’t connect to default gateway is one of them. There can be various reasons why you may face this issue, and here are some causes that we know:
- Outdated or corrupted network drivers: Most network issues in Windows 10 can be connected to the network drivers. Outdated or corrupted drivers are well-known causes of network-related issues and this can be a similar case here.
- The Auto Logon Feature: Plenty of users have reported that the auto-logon feature, or in other words Windows logging in automatically is the cause of this issue. I couldn’t find any reason to link both of these together with other than the various reports of users.
- Power Conservation Features: Windows 10 has some power conservation features that allow the OS to shut drivers in order to save power. There is a possibility that this is the reason why you can’t connect to default gateway.
- Corrupted System files: Corrupted system files are known for causing plenty of systems and network-related errors.
- 3rd party Antivirus: 3rd party antivirus, particularly McAfee here, is well known to prevent the computer from network access when it considers it a “threat”. In other words, when an antivirus starts preventing users from accessing the internet entirely, it has become a nuisance and needs to be removed.
Troubleshooting Default Gateway Not Available Error
After you have read the causes of this error, it is time to troubleshoot it. Here I have mentioned the troubleshooting procedure that you need to follow in order to fix this issue. Remember to read the steps carefully before executing them to avoid making mistakes.
Solution 1: Run SFC And DISM Scans
Corrupted system files can also be responsible for this issue. Try running the SFC scan to fix the corrupted system files and the DISM scan to fix the Windows image. To do it, follow the steps given below:
- Open the Startup Repair options.
- Select the Troubleshoot option.
- Click on the Advanced options button.
- Select the Command Prompt option. This will open the Command Prompt on your screen.
- Type the following command and press Enter after finishing it:
sfc /scannow
- Wait for the scan to finish. It will take some time so do not close it prematurely.
- After the scan finishes, restart the computer.
- Now, open the Command Prompt again.
- Type the following commands and press Enter after finishing each one:
a) Dism /Online /Cleanup-Image /CheckHealth
b) Dism /Online /Cleanup-Image /ScanHealth
c) Dism /Online /Cleanup-Image /RestoreHealth - Wait for the scan to finish and then restart.
If this doesn’t solve the issue, then try the next solution.
Solution 2: Troubleshoot Network Drivers
Corrupted or problematic network drivers are known to cause many network-related errors. This can also be the case for this situation. Reinstall the network drivers and see if that fixes this issue. To reinstall the network drivers, follow the steps given below:
- Open the Run utility again.
- Type devmgmt.msc in the search box and press Enter to open the Device Manager.
- Expand the Network adapter tree.
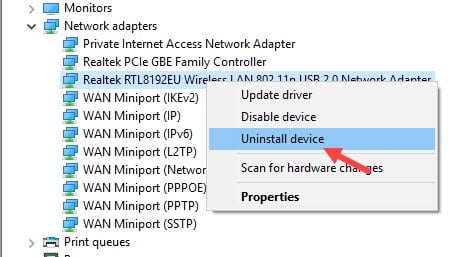
- Right-click on the adapter causing this issue for you and select the Uninstall option.
- Follow the on-screen instructions to complete the process.
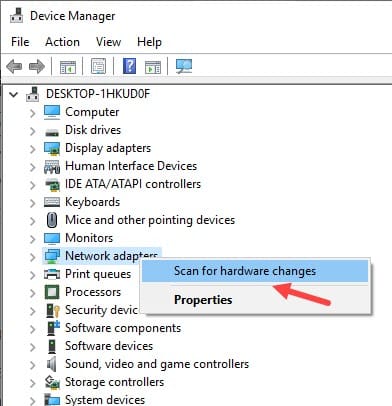
- Now, right-click on the Network Adapters option.
- Select the Scan for hardware changes option.
- Windows will now scan for the uninstalled network driver and reinstall it automatically.
Now, check if the issue persists. If yes, then try updating the network driver. To do it, follow the steps given below:
- Open the Device Manager again.
- Expand the Network adapter tree.
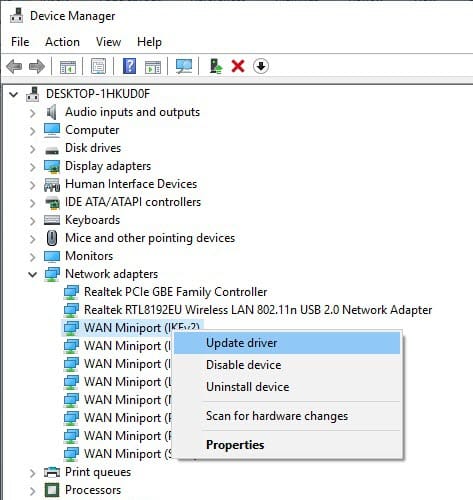
- Right-click on the adapter causing this issue for you and select the Update Driver option.
- Click on the Search automatically for drivers option.
- Follow the on-screen instructions to complete the process.
If updating the driver also doesn’t work, then try changing the network driver. To do it, follow the steps given below:
- Open the Device Manager again.
- Expand the Network adapter tree.
- Right-click on the adapter causing this issue for you and select the Update Driver option.
- Click on the Browse my computer for driver software option.
- Select the model of the driver. Choose the driver model that is the same as the name of the driver in the device manager.
- Click on Next and follow the instructions on your screen to complete the process.
Solution 3: Flush, Register, Release, And Renew IP
Corruption in the DNS cache can also cause this error. In this scenario, clearing the DNS cache and resetting the IP should fix this problem. To flush, register, release, and renew the IP, follow the steps given below:
- Press the Windows + Rkeys to open the Run command.
- Type cmd and press Ctrl + Shift + Enter keys.
Select Yes in the pop-up dialogue to open an elevated Command Prompt. - Type the following commands:
ipconfig /flushdns and press Enter.
ipconfig /registerdns and press Enter.
ipconfig /release and press Enter.
ipconfig /renew and press Enter.
netsh int ip reset and press Enter. - Now, restart your computer.
Now, check if you still can’t connect to default gateway. This solution should fix this issue if it was caused by corruption in the DNS cache.
Solution 4: Disable Power Conservation Option
Power conservation options of Windows 10 can disable drivers for saving power. So, it is possible that the network drivers are getting disabled due to this. To fix this, follow the steps given below:
- Open the Run utility again.
- Type devmgmt.msc in the search box and press Enter to open the Device Manager.
- Expand the Network adapter tree.
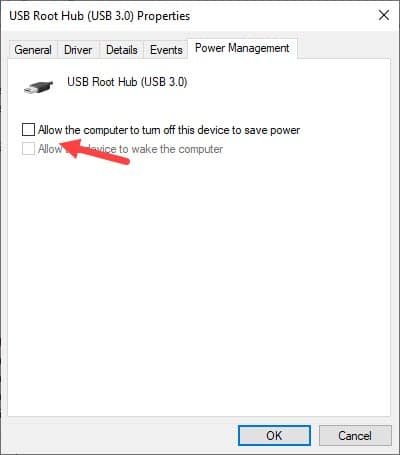
- Right-click on the adapter causing this issue for you and select the Properties option.
- Select the Power Management tab and uncheck the Allow the computer to turn off this device to save power box.
- Click on Apply and Ok to save the changes.
Solution 5: Change The Wireless Adapter Power Settings
Similar to the power conservation option, you can set the Wireless adapter power settings to the maximum for it to work with better connectivity. To do this, follow the steps given below:
- Type Edit Power plan in the start menu and select the top option. This will open the Edit power plan settings window in the control panel.
- Click on the Change Advanced power settings option.
- Expand the Wireless Adapter Settings and then expand the Power Saving Mode.
- Change the Setting to Maximum Performance.
- Click on Apply and OK to save the changes.
Solution 6: Uninstall McAfee
3rd party antiviruses are many times linked with network-related errors. In the case of the default gateway is not available in Windows 10, the error is linked with McAfee. Uninstall anything of MacAfee installed on your PC and this issue should be fixed. To uninstall MacAfee, follow the steps given below:
- Press the Windows + R keys to open the Run utility.
- Type appwiz.cpl and press Enter to open the Programs and Features panel.
- Locate McAfee among the listed apps and right-click on it.
- Select the Uninstall option.
- Follow the on-screen instructions to complete the process.
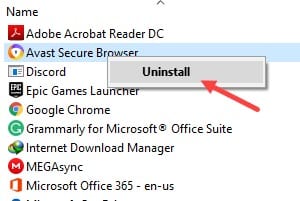
After you have uninstalled McAfee, the default gateway not available error should be fixed.
Solution 7: Disable Auto Logon
This may seem completely unrelated, but plenty of users have reported that stopping the auto logon fixed this issue for them. Well, there isn’t any option for enabling or disabling the auto logon feature, you simply just have to add a password to your account.
Wrapping Up
So, there you have it. Now you know how to fix the default gateway is not available in Windows 10 error. The above solution should be enough to fix this issue. If you have any questions related to this article, ask them in the comment section below.

Leave a Reply