Windows errors and issues are common, which is why the System restore feature is extremely useful to load a previously saved version of the system whenever one encounters a system breaking bug.
However, this privilege may become unavailable for you. Many users have reported that a virus is preventing system restore of Windows 10 in their system.
This is a serious issue and is very frightening for the users. When you encounter this issue, do not worry as in this article I have discussed what to do when the system restore keeps failing.
Also read: How To Restore Files Using Windows 10 Previous Versions – Complete Guide
Why System Restore Keeps Failing?
Contents
There can be various reasons why System restore keeps failing on your PC. Here are some of the possible causes of this issue:
- Corrupted System File: Corrupted system files are known to trigger various errors on Windows 10. The applications, not opening can also be related to it.
- Virus or malware: Virus and malware can infect applications and prevent them from working correctly.
- Antivirus and Firewall: Antiviruses and firewall protect your PC from malicious apps. However, they can also prevent the system from restoring.
- Outdated Windows: Keeping the Windows updated is paramount in preventing bugs and errors.
- Bad Memory sectors: Bad memory sectors are another known reason for this issue.
How To Fix Virus System Restore Of Windows 10?
Here are the troubleshooting methods you need to follow in order to fix this issue. Remember to read the instructions carefully before executing it to avoid making mistakes.
Solution 1: Run SFC And DISM Scans
Corrupted system files can also be the cause of this error. If this is the case, then you can try running the System File Checker scan and DISM scan. The SFC checks for corrupted system files and fixes them while the DISM scan will repair the Windows image. To run the SFC scan and DISM scan, follow the steps given below:
- Open the Run utility again.
- Type cmd and press Ctrl + Shift + Enter to open an elevated Command Prompt.
- Type the following command and press Enter:
sfc /scannow
- Wait for the scan to finish as it will take around 20-30 minutes. Do not close the Command Prompt prematurely.
- Restart the computer.
- Now, open the elevated command prompt again.
- Type the following commands and press Enter after finishing each one:
a) Dism /Online /Cleanup-Image /CheckHealth
b) Dism /Online /Cleanup-Image /ScanHealth
c) Dism /Online /Cleanup-Image /RestoreHealth - Wait for the commands to finish running and then restart the computer.
Solution 2: Run An Antivirus Scan
Viruses and malware are known to delete DLL files. If your PC is infected by virus or malware, it won’t matter if you install the DLL file again. First, you need to clear the virus or malware from your PC and then install the DLL file. To clear malware, you can use the power Malwarebytes.
But if you don’t want to use any 3rd party software, you can run the Windows Defender Offline Scan. To run the offline scan, follow the steps given below:
- Type Windows Security in the search bar and select the top result.
- Click on the Virus and threat protection option.
- Select the Scan options in the Current threats section.
- Check the Microsoft Defender Offline scan circle and click on the Scan now option.
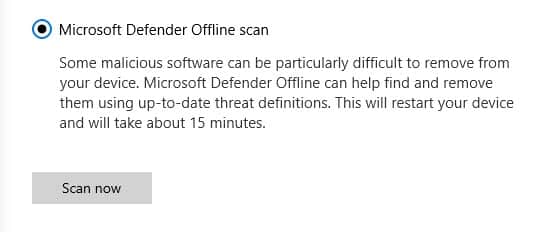
It will take around 15 minutes for the scan to finish. Don’t turn off the computer while the scan is happening. After the scan finishes, your computer will restart automatically.
Solution 3: Enter Safe Mode And Try System Restore
After restarting, you can try entering the Safe Mode and check whether the error remains there also. When you enter Safe Mode, only the most essential settings and drivers are loaded, leaving everything else. If the issue isn’t related to the default settings and basic drivers, then the error shouldn’t trigger in Safe Mode.
To enter Safe Mode, follow the steps given below:
- Press the Windows + I keys to open the Settings app.
- Click on the Update and Security option.
- Scroll down and select the Recovery option on the left panel.
- Select the Restart Now option in the Advanced Startup section.
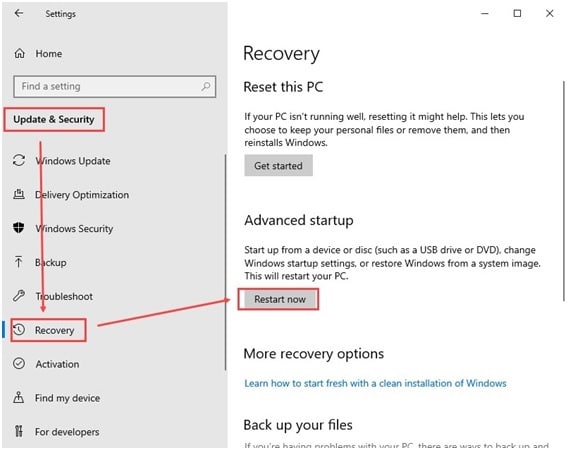
- Wait for your PC to restart. Windows will directly boot into recovery options.
- Click on the Troubleshoot option after the PC restarts.
- Next, click on the Advanced Options.
- Select the Startup Settings option and press F4 on your keyboard to restart your computer and boot in Safe Mode.
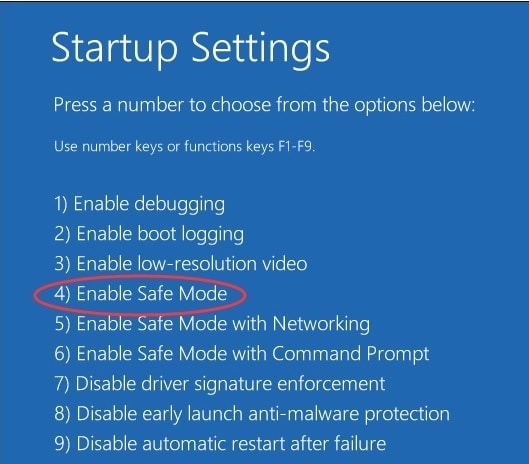
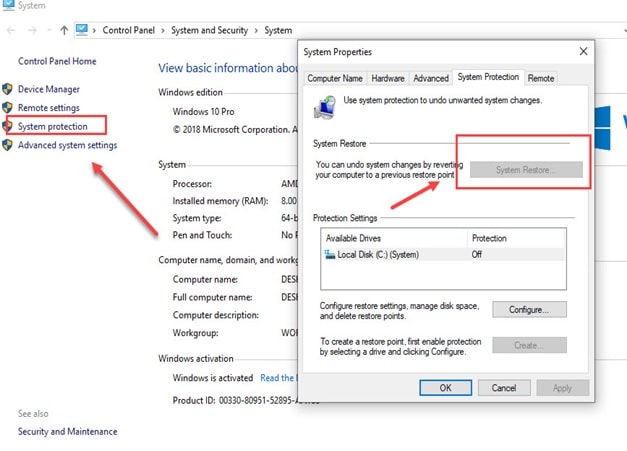
- After the PC boots in Safe mode, type Create a restore point in the start menu and select the top result. The System Properties will open on your screen.
- In the System Protection tab, select the System Restore option.
- Click on the restore point made before this error appeared and follow the on-screen information to restore your PC to that state.
Solution 4: Use Automatic Startup Repair Tool
The automatic Startup repair tool fixes any booting related issues of Windows. In this situation, running the Automatic Startup option should fix the system restore did not complete successfully in Windows 10. To run the Automatic Startup Repair tool, follow the steps given below:
- Open the Startup Repair options.
- Select the Troubleshoot option.
- Click on the Advanced options button.
- Select the Automatic Repair option.
- Follow the on-screen instructions to complete the process.
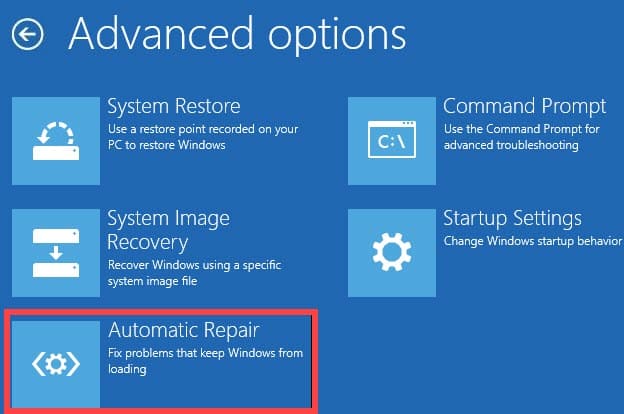
After the Automatic Startup Repair tool finishes running, the Windows 10 Critical Service Failed error should be fixed.
Solution 5: Check For Corrupting In The Memory
Corruption in memory is another known cause of this error. Fortunately, you can run the chkdsk scan in Windows 10 to check for memory corruption and fix it. To run the chkdsk scan, follow the steps given below:
- Open the Run utility again.
- Type cmd and press Ctrl + Shift + Enter to open an elevated Command Prompt.
- Type the following command and press Enter:
chkdsk - Wait for the scan to finish and close the command prompt.

You can also run the Memory Diagnostic tool with the chkdsk scan. To run the Memory diagnostic tool, follow the steps given below:
- Type Windows Memory Diagnostic in the Windows search bar and click on the appropriate option.
- Select the Restart now and check for problems (recommended) option.
- Wait for the scan to finish.
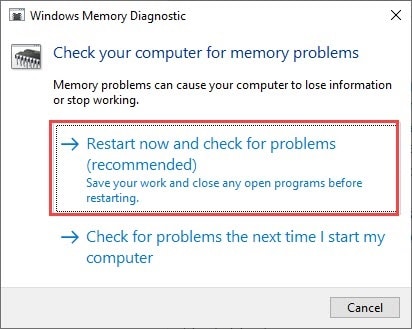
If any errors are found during the scan, then the RAM is the main culprit. Try removing and resetting the RAM to eliminate any possibility of loose connection and it also resets the RAM.
Solution 6: Perform A Clean Boot
After you have checked whether you find the error in Safe Mode, you can try performing a clean boot. This will start the PC in an environment without unnecessary software and services. Thus, if the cause of this error is an application or service, you will avoid this error. To perform a clean boot, follow the steps given below:
To perform a clean boot, follow the steps given below:
- Press the Windows + R keys to open the Run utility.
- Type msconfig and press Enter to open the System Configuration dialog.
- Select the Services tab and check the Hide all Microsoft services box.
- Click on the Disable all option to disable all the unnecessary services.
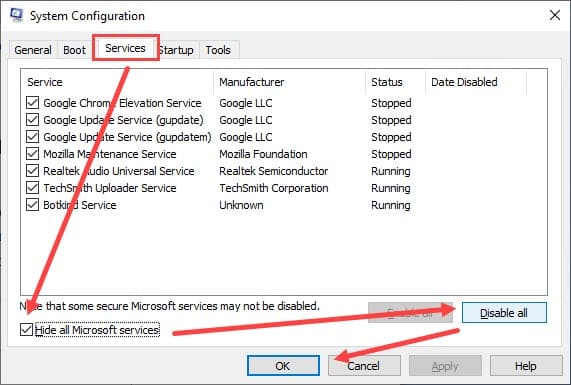
- Now, click on the Startup tab and then click on the Open Task Manager option.
- The Task Manager will open on your screen.
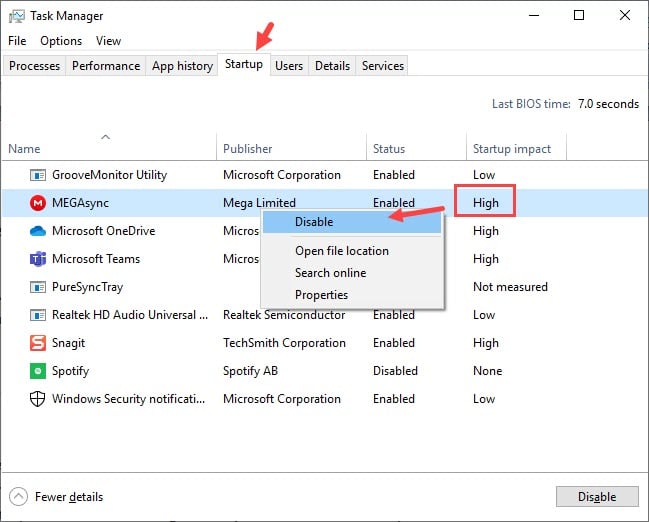
- Select the Startup tab and disable all the apps in the list.
- Right-click on the app and select the Disable option.
- Finally, restart your computer to boot in the clean boot environment.
Solution 7: Rebuild Boot Configuration Data And Repair Master Boot Record File
One effective solution to this error is to rebuild the BCD and repair the MBR file using command lines. BCD or Boot Configuration Data contains the boot configuration parameters for starting Windows. If it gets corrupted, then Windows can face unbootable situations.
The MBR is a special type of boot sector that holds the executable code to function as a loader for the installed operating system. When MBR gets corrupted, Windows boot related issues can occur.
To rebuild BCD and repair the MBR file, follow the steps given below:
- Open the Command Prompt as mentioned above.
- Type the following commands and press Enter after finishing each one:
a) bootrec.exe /rebuildbcd
b) bootrec.exe /fixmbr
c) bootrec.exe /fixboot - Wait for the commands to finish running.
After the above commands finish running, the boot sector problem should be fixed. If this error was caused due to corruption in the boot sector, then this solution should fix it.
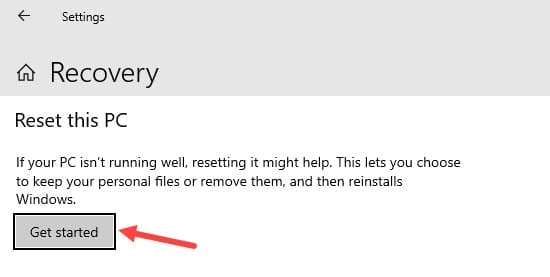
Solution 8: Reset Your PC
If the above solutions fail to work, then you need to try out some of the advanced solutions. The first extreme solution you can try is resetting your PC. To reset the PC, follow the steps given below:
- Open the Startup Repair options.
- Select the Troubleshoot option.
- Select the Reset this PC option.
- Click on the Keep my files option so that your files don’t get deleted.
- Follow the on-screen instructions to complete the process.
Solution 9: Perform A Clean Reinstallation Of Windows 10
If resetting your PC also doesn’t work, then the only alternative you have left is to clean install Windows 10. After you clean install your Windows 10, the issue should be fixed. To clean install Windows, follow the steps given below:
- Insert your DVD or USB installation device and restart your computer.
- When it boots up, press F10 to access the Boot Override Menu.
- In the boot section, change the boot order to put the device you want to boot from at the top.
- Find and select the Save and Restart Your computer should now boot into the Windows 10 setup program.
- Now, select your language, time and currency format, and input method. Then, click on the Next option.
- Click on the Install Now button and enter your Windows activation key.
- Select the Custom Install Windows only (advanced) option.
- You will see various disks called Drive 0, Drive 1, and so on. Delete all these partitions by selecting each one and clicking Delete.
- Finally, select the Drive you want to install your Windows and click on the Next
Wrapping Up
So, there you have it. Now you know what to do when virus preventing system restore of Windows 10. The above solutions should help you fix this issue. If you have any other questions regarding this article, ask them in the comment section below.

Leave a Reply