DLL files are extremely important in Windows as they are files that contain data and sets of functions that other programs in Windows use. Sometimes, you can come across a DLL file error, which happens when the DLL file is corrupted or missing.
One of the DLL errors that you may end up facing is the opencl.dll missing error. In this article, I have discussed what you can do in order to troubleshoot this error.
Also read: Sysmenu.Dll Error Windows 10! How To Fix?
Why OpenCl.dll Missing In Windows 10?
Contents
There can be various reasons related to cause this error for you. Here are some of the known causes that can do this to you:
- Corrupted System File: Corrupted system files are known to trigger various errors on Windows 10. The applications, not opening can also be related to it.
- Faulty Graphics Drivers: Faulty graphics drivers are known to cause plenty of errors and bugs, including this one.
- Outdated Windows: Keeping the Windows updated is paramount in preventing bugs and errors.
- Unnecessary applications and services: Application and services that are unnecessary may conflict with each other and cause this error.
How To Fix OpenCl.dll Missing Error?
Now that you know the possible causes of this error, it is time to troubleshoot it. Here I have discussed the troubleshooting procedure that you can follow in order to fix this issue. Remember to read the instructions carefully to avoid making any mistakes.
Solution 1: Restore To A Previous System Point
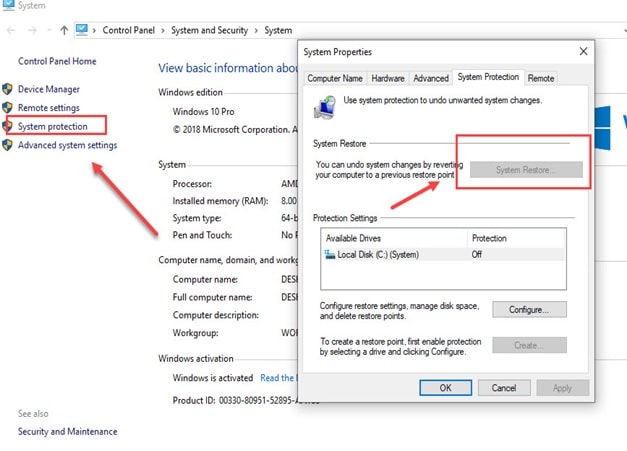
If system restore is enabled on your PC and you have saved a previous restore point before this error appeared, then you can restore to it. By restoring to a previous system point, you should be able to get rid of this error. To restore to a previous system point, follow the steps given below:
- Type Create a restore point in the start menu and select the top result. The System Properties will open on your screen.
- In the System Protection tab, select the System Restore option.
- Click on the restore point made before this error appeared and follow the on-screen information to restore your PC to that state.
Solution 2: Run SFC And DISM Scans
Corrupted system files can also be the cause of this error. If this is the case, then you can try running the System File Checker scan and DISM scan. The SFC checks for corrupted system files and fixes them while the DISM scan will repair the Windows image. To run the SFC scan and DISM scan, follow the steps given below:
- Open the Run utility again.
- Type cmd and press Ctrl + Shift + Enter to open an elevated Command Prompt.
- Type the following command and press Enter:
sfc /scannow
- Wait for the scan to finish as it will take around 20-30 minutes. Do not close the Command Prompt prematurely.
- Restart the computer.
- Now, open the elevated command prompt again.
- Type the following commands and press Enter after finishing each one:
a) Dism /Online /Cleanup-Image /CheckHealth
b) Dism /Online /Cleanup-Image /ScanHealth
c) Dism /Online /Cleanup-Image /RestoreHealth - Wait for the commands to finish running and then restart the computer.
Solution 3: Update Windows
Outdated operating systems are known to conflict with newer apps and games. If you are using outdated Windows, you should update it to the latest version. Windows update fixes bugs, adds security patches, and provides newer features. To update your Windows 10, follow the steps given below:
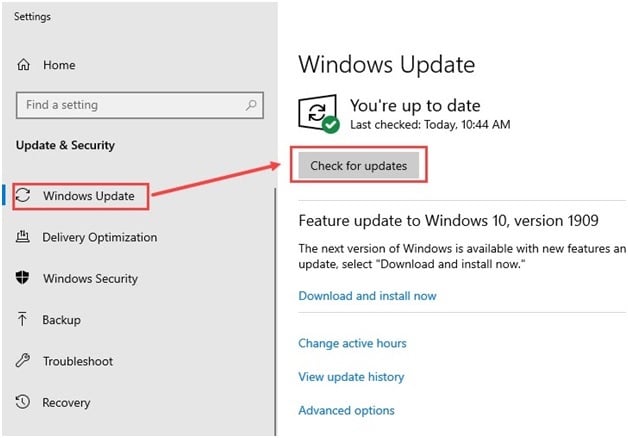
- Type Check for updates in the Start menu and select the top result.
- Click on the Check for updates option and wait for Windows 10 to finish checking.
- If any update is available, Windows should start downloading it automatically. After the download is complete, install it and restart your PC.
Solution 4: Troubleshoot Graphics Drivers
This error is known to occur because of corrupted graphics drivers. You can troubleshoot the graphics drivers by following the steps given below:
- Press the Windows + R keys to open the Run utility.
- Type devmgmt.msc and press Enter to open the Device Manager.
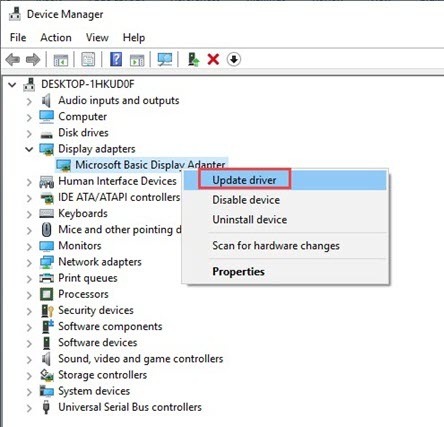
- Expand the Display adapters section.
- Right-click on the graphics drivers driver.
- Select the Update driver option from the right-click context menu.
- Click on the Search automatically for drivers option and follow the instructions on your screen to finish the process.
- After the update is complete, restart the computer.
Check whether the error remains. If yes, then try uninstalling and reinstalling the graphics drivers. To uninstall the audio drivers, follow the steps given below:
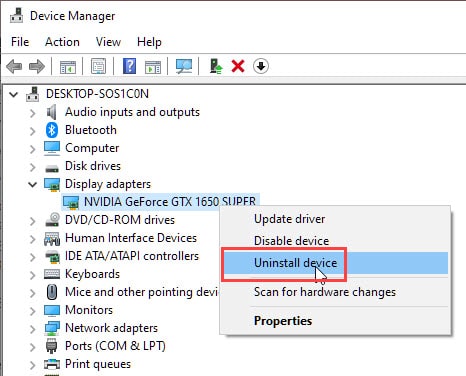
- Open the Device Manager again.
- Right-click on the graphics driver and select the Uninstall device option.
- Follow the instructions on your screen to finish uninstalling.
- Finally, restart your PC.
Solution 5: Restore Mfc100u.dll From The Recycle Bin
This error is triggered when the DLL file goes missing. The DLL file can go missing if it was deleted. If you have deleted the DLL file mistakenly, there is always a chance that the file is still in the Recycle bin. The chances may be slim, but it is better to check this possibility anyway. If the DLL file is in the Recycle bin, you can simply restore it.
To restore the DLL file in the Recycle bin, follow the steps given below:
- Open the Recycle bin and check if the Mfc100u.dll file is there or not.
- If the DLL file is present in the Recycle bin, right-click on it.
- Select the restore option to restore the DLL file.
After you have restored the DLL file, check whether you can start the application or not.
Solution 6: Download OpenCL Runtime Package
You can always install the OpenCL runtime package from Intel’s website to fix this issue on your PC. To install the OpenCL runtime package in your Windows 10, follow the steps given below:
- Visit this webpage.
- Download the OpenCL runtime driver for Windows.
- After you have downloaded the runtime tool, run it. Follow the on-screen installation instructions to complete the process.
Solution 7: Run An Antivirus Scan
Viruses and malware are known to delete DLL files. If your PC is infected by virus or malware, it won’t matter if you install the DLL file again. First, you need to clear the virus or malware from your PC and then install the DLL file. To clear malware, you can use the power Malwarebytes.
But if you don’t want to use any 3rd party software, you can run the Windows Defender Offline Scan. To run the offline scan, follow the steps given below:
- Type Windows Security in the search bar and select the top result.
- Click on the Virus and threat protection option.
- Select the Scan options in the Current threats section.
- Check the Microsoft Defender Offline scan circle and click on the Scan now option.
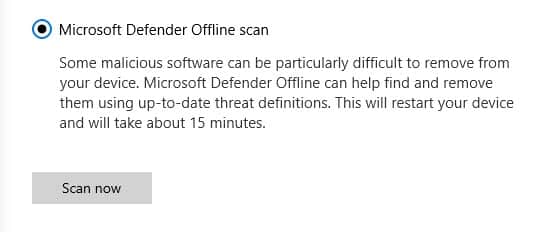
It will take around 15 minutes for the scan to finish. Don’t turn off the computer while the scan is happening. After the scan finishes, your computer will restart automatically.
Solution 8: Reinstall The Application
If your computer isn’t infected with malware or viruses and if installing the redistributable didn’t work, it means that the application of the game is also corrupted. In this scenario, you need to reinstall the application that is triggering this error. Before you reinstall the application, it needs to be uninstalled. To uninstall the application, follow the steps given below:
- Press the Windows + R keys to open the Run utility.
- Type appwiz.cpl and press Enter to open the Program and Features panel.
- Locate the application among the other listed apps and right-click on it.
- Select the Uninstall option and follow the on-screen instructions to finish the process.
After the application is uninstalled, reinstall the application.
Wrapping Up
So, there you have it. Now you know what to do when OpenCL.dll missing is missing. The above solutions should help you fix this issue. If you have any other questions, ask them in the comment section below.

Leave a Reply