DLL files are extremely important in Windows as they are files that contain data and sets of functions that other programs in Windows use.
Sometimes, you can come across a DLL file error, which happens when the DLL file is corrupted or missing.
One of the DLL errors that you may end up facing is the Windows Shell Common DLL is not responding error.
This error is usually preceded by the user’s attempts of causing changes in the audio devices. In this article, I have discussed what you can do in order to troubleshoot this error.
What Causes The Windows Shell Common Dll Not Responding Error?
Contents
There can be various reasons related to cause this error for you. Here are some of the known causes that can do this to you:
- Corrupted System File: Corrupted system files are known to trigger various errors on Windows 10. The applications, not opening can also be related to it.
- Faulty Audio Drivers: Faulty audio drivers are known to cause plenty of errors and bugs, including this one.
- Windows Time Service is Disabled: Windows is heavily dependent on services to work. This particular error is known to get triggered when the Windows Time Service is disabled.
- Outdated Windows: Keeping the Windows updated is paramount in preventing bugs and errors.
- Windows not accepting certificates: This error is known to appear when Windows is not accepting certificates. Configuring it to accept certificates can fix this error.
- Unnecessary applications and services: Application and services that are unnecessary may conflict with each other and cause this error.
How To Fix Windows Shell Common Dll Is Not Responding Error?
Now that you know the possible causes of this error, it is time to troubleshoot it. Here I have discussed the troubleshooting procedure that you can follow in order to fix this issue.
Remember to read the instructions carefully to avoid making any mistakes.
Solution 1: Restore To A Previous System Point
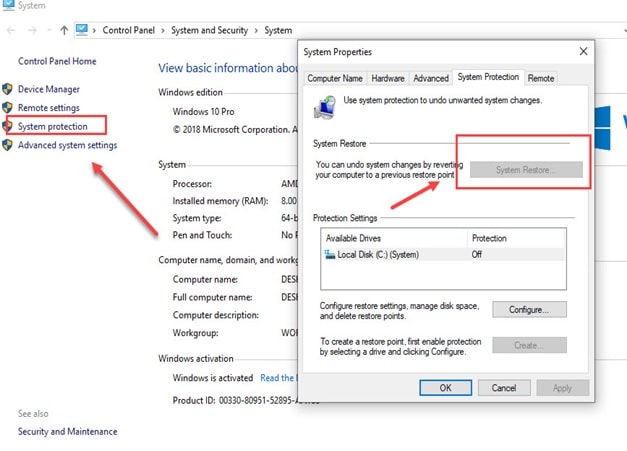
If system restore is enabled on your PC and you have saved a previous restore point before this error appeared, then you can restore to it.
By restoring to a previous system point, you should be able to get rid of this error. To restore to a previous system point, follow the steps given below:
- Type Create a restore point in the start menu and select the top result. The System Properties will open on your screen.
- In the System Protection tab, select the System Restore option.
- Click on the restore point made before this error appeared and follow the on-screen information to restore your PC to that state.
Solution 2: Run SFC And DISM Scans
Corrupted system files can also be the cause of this error. If this is the case, then you can try running the System File Checker scan and DISM scan.
The SFC checks for corrupted system files and fixes them while the DISM scan will repair the Windows image. To run the SFC scan and DISM scan, follow the steps given below:
- Open the Run utility again.
- Type cmd and press Ctrl + Shift + Enter to open an elevated Command Prompt.
- Type the following command and press Enter:
sfc /scannow
- Wait for the scan to finish as it will take around 20-30 minutes. Do not close the Command Prompt prematurely.
- Restart the computer.
- Now, open the elevated command prompt again.
- Type the following commands and press Enter after finishing each one:
a) Dism /Online /Cleanup-Image /CheckHealth
b) Dism /Online /Cleanup-Image /ScanHealth
c) Dism /Online /Cleanup-Image /RestoreHealth - Wait for the commands to finish running and then restart the computer.
Solution 3: Update Windows
Outdated operating systems are known to conflict with newer apps and games. If you are using outdated Windows, you should update it to the latest version.
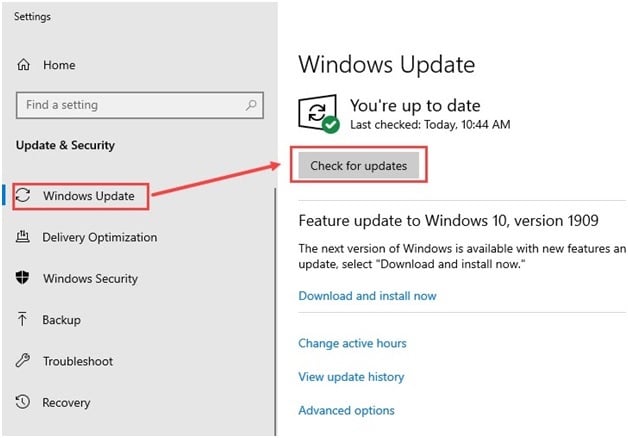
Windows update fixes bugs, adds security patches, and provides newer features. To update your Windows 10, follow the steps given below:
- Type Check for updates in the Start menu and select the top result.
- Click on the Check for updates option and wait for Windows 10 to finish checking.
- If any update is available, Windows should start downloading it automatically. After the download is complete, install it and restart your PC.
Solution 4: Troubleshoot Sound Drivers
This error is known to occur while configuring the audio settings. Incorrect or faulty audio drivers can trigger this issue. You can troubleshoot the sound drivers by following the steps given below:
- Press the Windows + R keys to open the Run utility.
- Type devmgmt.msc and press Enter to open the Device Manager.
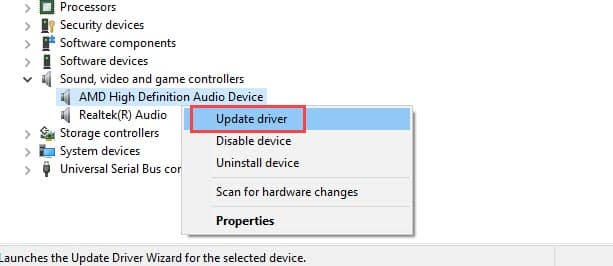
- Expand the Sound, video, and game controllers option.
- Right-click on the sound driver.
- Select the Update driver option from the right-click context menu.
- Click on the Search automatically for drivers option and follow the instructions on your screen to finish the process.
- After the update is complete, restart the computer.
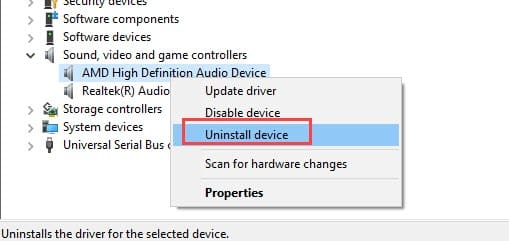
Check whether the error remains. If yes, then try uninstalling and reinstalling the audio drivers. To uninstall the audio drivers, follow the steps given below:
- Open the Device Manager again.
- Right-click on the audio driver and select the Uninstall device option.
- Follow the instructions on your screen to finish uninstalling.
- Finally, restart your PC.
After you restart your PC, Windows will automatically install the default audio driver.
Solution 5: Perform Clean Boot
As mentioned above, the computer probably crashes during the shutdown, which causes it to restart again. In this scenario, performing a clean boot should disable all the unessential apps and services, which can lead to the crash.
To perform a clean boot, follow the steps given below:
- Press the Windows + R keys to open the Run utility.
- Type msconfig and press Enter to open the System Configuration dialog.
- Select the Services tab and check the Hide all Microsoft services box.
- Click on the Disable all option to disable all the unnecessary services.
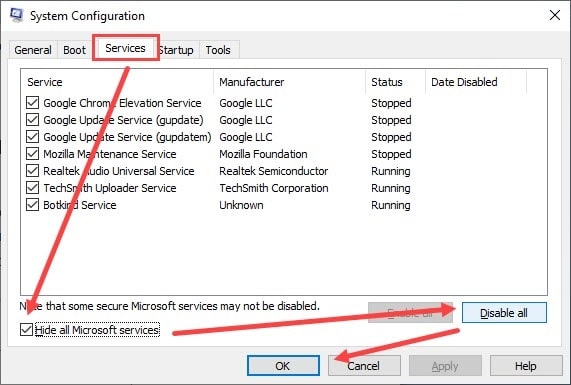
- Now, click on the Startup tab and then click on the Open Task Manager option.
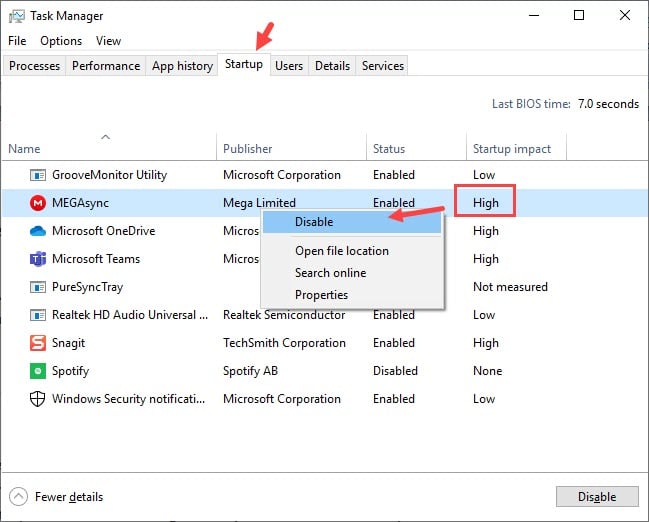
- The Task Manager will open on your screen.
- Select the Startup tab and disable all the apps in the list.
- Right-click on the app and select the Disable option.
- Finally, restart your computer to boot in the clean boot environment.
Solution 6: Re-Register The Shell32.DLL File
Another solution you can try is to re-register the Shell32.DLL file. To do it, follow the steps given below:
- Press the Windows + R keys to open the Run utility.
- Type cmd in the search box and press the Ctrl + Shift + Enter keys to open an elevated Command Prompt.
- Type the following command and press Enter to initiate it:
regsvr32 /i shell32.dll - Wait for the command to finish running and close the Command Prompt.
Check whether the Windows shell common dll is not responding error is fixed or not.
Solution 7: Enable Windows Time Service
If the Windows Timer service stops running or gets disabled somehow, this error can arise. In this case, you can manually enable and start the Windows Time Service. To do it, follow the steps given below:
- Press the Windows + R keys to open the Run utility.
- Type services.msc in the search box and press Enter to open the Services app.
- Locate the Windows Time service and double-click on it.
- Change the Startup Type to Automatic and select the Start option. Click on Apply and OK to save the changes.
Solution 8: Configure Windows To Accept Certificates
Windows is heavily dependent on the Certificates to verify the identity of users and installed devices and drivers. If the certificates somehow get block, then such an error can arise. To configure Windows for accepting certificates, follow the steps given below:
- Right-click on the Start Menu and select the Windows PowerShell (Admin) option. This will open Windows PowerShell with administrative privileges.
- Type the following command and press Enter to initiate it:
Set-ExecutionPolicy -ExecutionPolicy Unrestricted -Scope CurrentUser - After the command finishes running, restart the computer.
Solution 9: Troubleshoot Synaptics Touchpad Driver
The Synaptics touchpad driver is also known to trigger this error in laptops. Troubleshoot the Synaptics touchpad driver by following the steps given below:
- Press the Window + R keys on your keyboard to open the Run utility.
- Type devmgmt.msc and press Enter to open the Device Manager on your screen.
- Expand the Mice and other pointing device option and right-click on the touchpad driver.
- Select the Uninstall Device option from the right-click context menu. Follow the instructions on your screen to complete the uninstallation process.
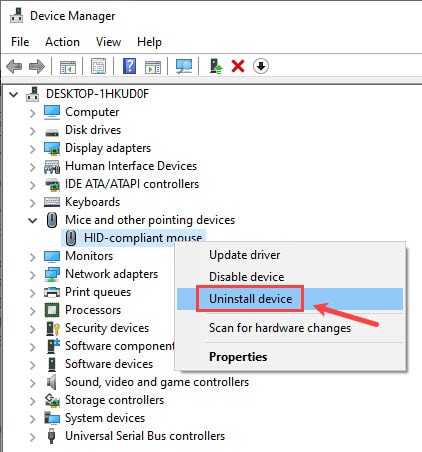
- Now, right-click on the Mice and other pointing devices option and select the Scan for hardware changes option.
- Windows will start installing the default touchpad drivers.
- Right-click on the touchpad driver and select the Update Driver option.
- Now, click on the Search automatically for updated driver software and follow the instructions on your screen to update the driver.
- After the update is complete, restart the computer.
Frequently Asked Questions [FAQs]
Here are the answers to some commonly asked questions related to this topic.
- What is Windows Shell Common Dll?
Windows Shell Common dll is associated with the shell32.dll, which is responsible for the Windows Shell and GUI for Windows. Dll files contain program code and data, which are needed by programs and browser extensions.
- How do I fix Windows Shell Common Dll Error?
Updating Windows, running the SFC scan for fixing corrupted system files, reregistering the Shell.dll file are a few ways this error can be fixed. Other than that, try the rest of the solutions provided here to fix this error.
- Is it possible to edit Dll files?
Yes, you can edit Dll files using Dll file editors. There are plenty of Dll file editors available online that you can use to edit the DLL files.
Wrapping Up
So, there you have it. Now you know how to fix the Windows shell common dll is not responding error. The above troubleshooting procedure should help you fix this issue. If you have any other questions related to this article, ask them in the comment section below.

Leave a Reply