Windows has a feature that puts it to sleep if the computer has been inactive for a certain amount of time. This feature was introduced as a way to save power, but in Windows 10, black screen after sleep can appear as reported by users, which doesn’t restore the session until the computer is forced to restart.
This problem can be very distressing for the users. So that this problem doesn’t distress the users anymore, in this article we have discussed the different ways one can diagnose and troubleshoot this problem.
Why Monitor Won’t Turn On After Sleep In Windows 10?
Contents
This problem can occur due to various different reasons. Now, let’s take a look at those causes:
- If the Fast startup and Hibernation is enabled, then this issue is known to occur.
- It is also known that sometimes the App readiness service can cause this issue.
- Some users have also reported that certain registry keys can cause this issue.
- The graphics driver can get corrupted and cause this issue.
Solving The Windows 10 Black Screen After Sleep Issue
Now that you have seen the various ways this problem can occur, it’s time to troubleshoot all the causes one by one.
Solution 1: Disable Fast Startup
The Fast startup feature was introduced in Windows as a way to increase the boot speed of the computer. Sadly, this feature is also known to cause various errors and bugs in Windows 10, including this problem.
Many users have reported that disabling the Fast startup solved this issue. If Fast startup is enabled on your computer, then it’s very much possible that it is causing this error. To disable Fast startup, follow the steps given below:
- Type Power & Sleep Option in the Windows search bar and select the suitable option.
- Click on the Additional power settings option below the Related settings.
- Now, select the Choose what the power buttons do option and check if the Turn on fast startup (recommended) option is enabled.
- If the Fast startup is enabled, then click on the Change settings that are currently unavailable option.
- Uncheck the Turn on fast startup (recommended) option.
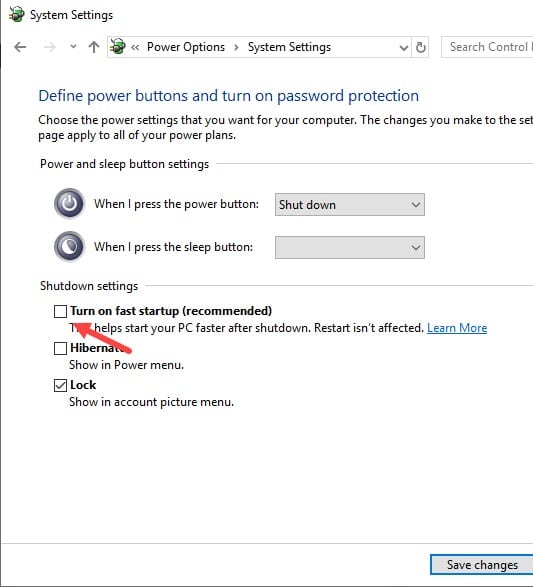
After the fast startup is disabled, restart your computer and check if, in Windows 10 the black screen after sleep problem persists.
Solution 2: Disable Hibernation In Your Computer
As with Fast startup, users have also reported that the Hibernation feature can also cause this problem. If Hibernation is enabled on your computer, then disabling it should fix this problem.
To disable Hibernation, follow the steps given below:
- Open the Run utility by pressing the Windows + R keys on your keyboard.
- Type cmd and then press the Ctrl + Shift + Enter keys to open the elevated Command Prompt.
- Now, type powercfg /h off and press Enter.
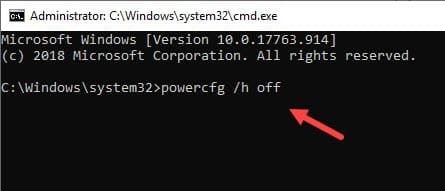
Your computer will now restart on its own and after the restart, Hibernation will be disabled. Check if still wake from sleep shows a black screen in Windows 10.
Solution 3: Disable App Readiness Service
App Readiness service basically makes sure that the apps are ready to be used when you sign in or when you install a new app.
This service is also known to cause various black screen errors including this one. Unfortunately, it is also reported that it is required for conducting Windows update successfully so you can’t just disable it. In this scenario, changing the startup status of the service to manual from automatic can solve both issues.
To change the startup status of App Readiness service, follow the steps given below:
- Open the Run utility again (follow Solution 2).
- Type services.msc and press Enter to open the Services console on your screen.

- Locate the App Readiness service and double-click on it.
- In the General tab, click on the Startup type and select Manual from the drop-down menu.
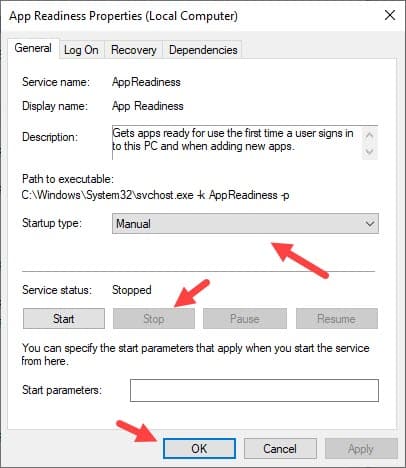
- Also, click on the Stop option to halt any running services of App Readiness.
- Finally, click on Apply and OK to save the changes made.
Restart your computer and check if still the monitor won’t turn on after sleep in Windows 10.
Solution 4: Delete Problematic Registry Keys
There are certain registry keys that are known to create these types of issues. Deleting them should fix this problem.
Remember, before you delete anything in the registry you should create a backup of your Registry so that in case deleting these keys does not solve this problem, then you can recover the keys back.
To delete the registry keys, follow the steps given below:
- Open the Run utility again type regedit and then press Enter.
The Registry Editor will open on your screen. - Navigate to this address:
HKEY_LOCAL_MACHINE\SOFTWARE\Microsoft\Windows\CurrentVersion\Appx\AppxAllUserStore\Applications
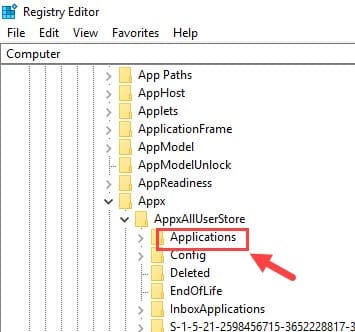
- Now, locate all sub-keys that starts with the following names:
Microsoft.NET.Native.Framework
Microsoft.NET.Native.Runtime
Microsoft.VCLibs - Right-click on these sub-keys and click on the Delete option from the pop-up menu.
- Finally, restart your computer and check if the problem is resolved or not.
If the problem persists, then restore the registry subkeys using the backup and then try the next solution.
Solution 5: Troubleshoot The Graphics Driver
If any problem occurs related to the display of the computer, then the graphics drivers can be the culprit behind it. The driver can be outdated or corrupted.
First, check if your drivers are up to date. If they are outdated, then update them. To update graphics drivers, follow the steps given below:
- Right-click on the Start button and then select the Device Manager option from the pop-up menu.
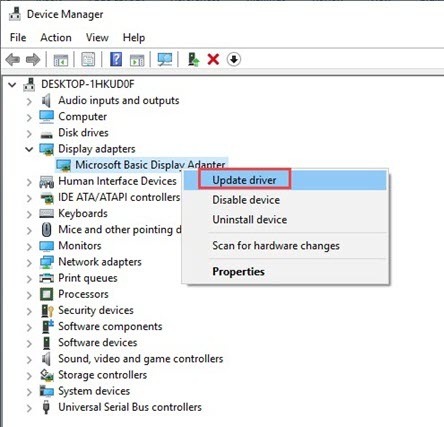
- Once the Device Manager opens, locate the graphics drivers in the Display adapters and right-click on them.
- Click on the Update driver option from the pop-up menu.
- Now, click on the Search automatically for updated driver software Follow the instructions on your screen to complete the update.
If your drivers are up-to-date, then they can be faulty or corrupted. In this scenario, uninstalling and then installing them should fix this problem. To uninstall your Graphics drivers, follow the steps given below:
- Locate the display drivers and right-click on them (follow the previous steps).
- Now, select the Uninstall device option from the pop-up menu. Follow the instructions on your screen to complete the process.
Once the drivers are uninstalled, visit the manufacturer’s website and then download and install them back.
Solution 6: Disable Sleep Mode
If none of the above solutions worked, then you can make sure the computer doesn’t go to sleep and thus avoid the black screen. This is not a solution but a way to avoid this problem and you should only do it if the other solutions don’t work.
Now, you can’t really disable sleep mode but what you can do is make sure your computer never goes to sleep in the first place. To do this, follow the steps given below:
- Open the Additional power settings (follow Solution 1) and then click on the Choose when to turn off the display option.
- Change the Turn off the display option to Never and then click on the Save changes option.
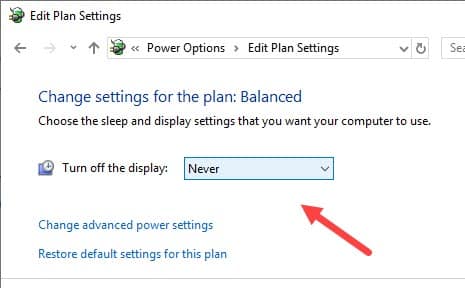
Now, the computer won’t go to sleep and thus in Windows 10, black screen after sleep issue won’t occur.
Wrapping Up
So, now you know what to do if, in Windows 10 black screen after sleep issue arises again. The above troubleshooting methods should help you solve this problem. Feel free to share your thoughts on the article in the comment section below.
Leave a Reply