Private Internet Access (PIA) is a very popular VPN that has around 3500 servers in 30 different countries. It also provides security features like multiple gateways, ad-blocking, malware blocking, unlimited bandwidth, P2P support, and no traffic logging. This VPN is used by users all over the world.
That’s why it can become really annoying for the users when Private Internet Access can’t connect to the internet. We have received many reports from users on private internet access not connecting to the internet.
If you are also facing this error, then don’t worry as in this article we have discussed how you can diagnose and troubleshoot this problem.
Why Private Internet Access Won’t Connect?
Contents
PIA not connecting to the internet can be due to various reasons. Let’s take a look into those reasons:
- If your internet connection is slow or unstable, then you can face this error.
- The server you have connected to via PIA can be down or having some disturbance, thus causing this error.
- If your proxy is enabled, then this type of error can occur.
- The default DNS can be incompatible with the PIA and thus cause this error.
What To Do When Private Internet Access Can’t Connect To Internet?
As mentioned above, there are various different causes of this error. Now, it’s time to troubleshoot them one by one.
Solution 1: Check Your Internet Connection
Private internet access not connecting can be due to a bad internet connection. The very first thing that you need to do is to check your internet speed and internet stability. Disconnect and reconnect your internet connection and check if the error persists.
Solution 2: Connect To A Different Server
Sometimes the server you have connected to can be down or having some issues. Disconnect from the server that is triggering this issue and then, connect to the server of another country. As there are over 30 countries where PIA has its servers, it shouldn’t be a problem.
Now, if PIA connects via the new server without any issue, then probably the previous server was down. However, if the problem continues to persist even after using different servers, then try the next solution.
Solution 3: Change The DNS
The default DNS of your network can be incompatible with PIA. In this scenario, changing the default DNS to a public DNS should solve this issue.
To change the DNS, follow the steps given below:
- Type Network status in the Windows search bar and select the appropriate option.
- Now, below the Change your network settings click on the Change adaptor options.
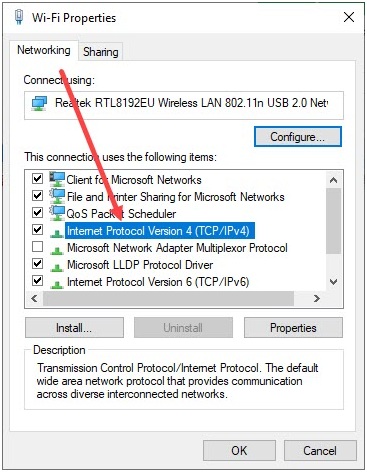
- Right-click on the network adaptor you are using and click on the Properties option.
- Find the Internet Protocol Version 4 (TCP/IPv4) and double-click on it.
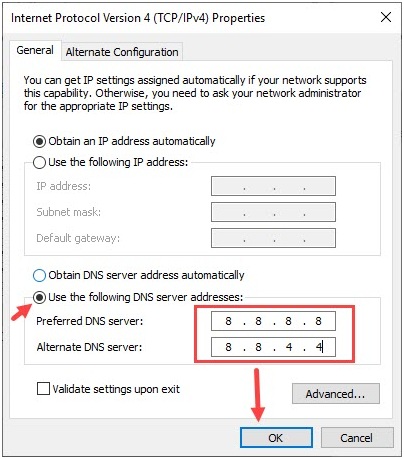
- Select the Use the following DNS server addresses and then enter the following values:
Preferred DNS server: 8.8.8.8
Alternate DNS server: 8.8.4.4
- Finally, click OK and then restart your computer.
After the computer restarts, this error should be resolved. If the problem persists, then try the next solution.
Solution 4: Clear DNS Cache
Some users have reported that if the DNS cache gets corrupted, then this type of issue can occur. In this scenario, you can use the flush DNS command, which will clear all the cache of name to IP entries and then will reload them from the connected DNS server.
To clear the DNS cache, follow the steps given below:
- Press the Windows + R keys to open the Run dialog.
- Type cmd and then press the Ctrl+ Shift+ Enter keys to open an elevated Command Prompt.
- Type ipconfig /flushdns and press Enter.
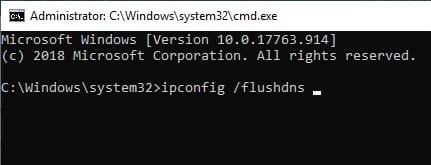
After the DNS cache is cleared, check if still the Private Internet Access can’t connect to internet error persists.
Solution 5: Disable Your Proxy
If Proxy is enabled on your computer, then this error can occur. In this scenario, disabling your Proxy should fix this error.
To disable Proxy, follow the steps given below:
- Open the Network Status by following Solution 3.
- Select the Proxy option on the left side of the screen.
- Now, turn off all the options.
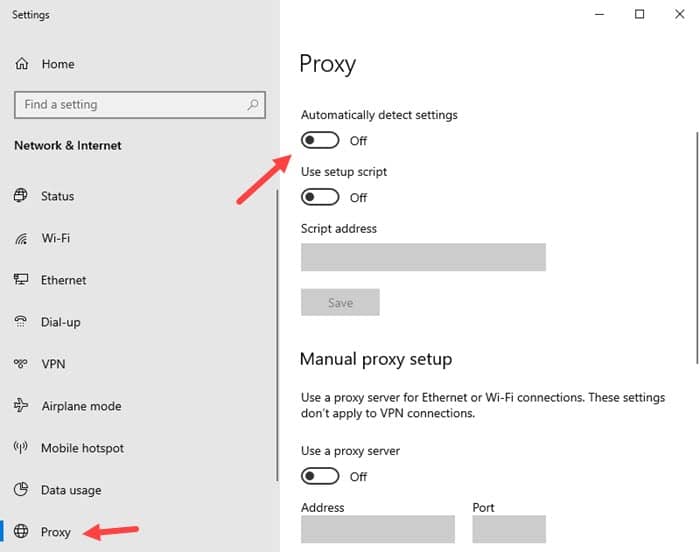
Now, try connecting to a server using PIA and check if PIA connects to the internet.
Solution 6: Change The VPN Port
If still Private Internet Access is not connecting, then try changing the VPN port and check if the error gets resolved.
To change your VPN port, follow the steps given below:
- First of all, disconnect from the VPN.
- Next, open Private Internet Access and click on the menu button (3 vertical dots).
- Click on the Settings option from the pop-up menu.
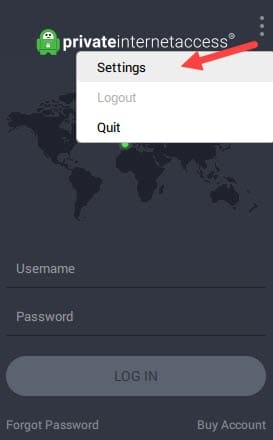
- Now, click on the Connection tab and set the Connection type to UDP and then change the Remote Port to 1194.
- Click on the Save option and then connect to the VPN.
If still, the problem hasn’t resolved, then redo the above steps but:
- Change the Port to 8080, 9201 or 53 and reconnect each time to check if the problem has resolved.
If the problem persists, then:
- Change the Connection type to TCP and the Remote port to auto and save the settings and reconnect.
If the issue still continues, then:
- Change the Remote port to 443, 110, 80 or enter 53 in the local port box and then each time reconnect and check if the problem persists.
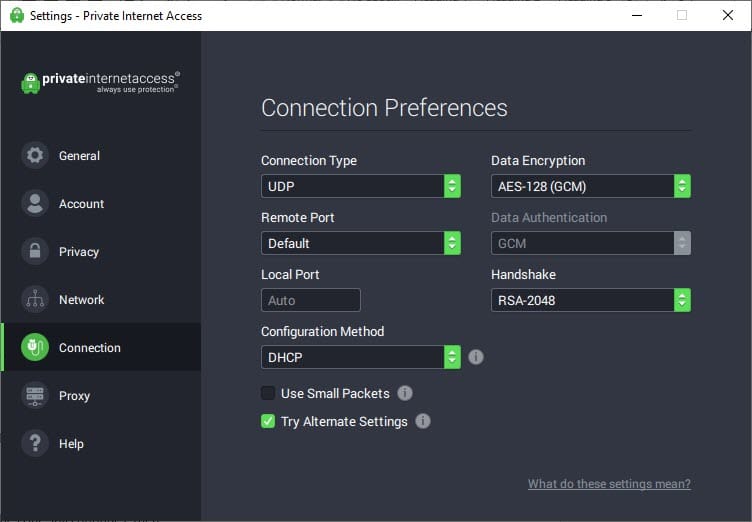
This solution should solve the Private internet access not connecting issue.
Wrapping Up
So, now you know what to do if your Private Internet Access can’t connect to the internet. One or a combination of a few of the above solutions should help you fix this problem. And feel free to leave your thoughts on the article in the comment section.
Leave a Reply