Android Studio is the official IDE (Integrated Development Environment) for the Android OS. The Android Studio emulator is creating issues for many users. They are unable to start the Android studio emulator on Windows 10. If you are facing a similar issue, don’t worry as in this article I have discussed what to do when Android Emulator not starting.
Why Android Studio Emulator Won’t Start?
Contents
Lets first have a look at the multitude of things that can go wrong and prevent the Android emulator from working:
- If you are getting an error on ‘failed to install APK’ or ‘failure to run Android Debug Bridge’, then it means that the required Android SDK is not available for connecting to the emulator.
- Hardware acceleration can be disabled in the Android studio, which can lead to this issue.
- If you have not created an x86 based image in your virtual device, then the Android Studio will run extremely slow, and maybe the issue behind the emulator not starting.
- Having Hyper V enabled in Windows 10 can also prevent the Android Emulator from starting.
- Incorrectly configured BIOS settings can disable the hardware acceleration and not even provide the option for it.
- Inadequate free space in the drive is another cause of this issue.
- Memory leak or background applications hogging memory can prevent the Android Studio emulator from accessing enough memory to start.
- Outdated Graphics Drivers: Outdated Graphics drivers can also be the cause of this issue.
- Antivirus can prevent Android Studio from working correctly and run the emulator.
What To Do When Android Emulator Not Starting?
Now that you know the different causes of this issue, it is time to troubleshoot it. Follow the solutions given below carefully and you should be able to run the Android Studio emulator again.
Solution 1: Download Intel’s HAXM Through Android SDK Manager
If your application’s minimum SDK is higher than the emulator’s SDK, then such an issue can arise. However, if this is not the case, then install the HAXM on your SDK manager. HAXM issues are also known to trigger this error. It generally happens when there are conflicts with other virtualization technologies or outdated HAXM driver.
To install the latest HAXM, follow the steps given below:
- Launch Android SDK Manager.
- In the Packages section, locate the Extras folder and expand it by clicking on the downward arrow beside it.
- Check the Intel x86 Emulator Accelerator (HAXM) box.
- Click on the Install Package option.
- Accept the terms of the Intel Corporation License Agreement after reviewing them.
- Click on the Install option to begin the download process. Now, the SDM manager will download the installer to the Extras folder.
- After the download is finished, open the executable and run it to install it.
- Follow the on-screen instructions to complete the process.
Solution 2: Check If Your PC Has The Required Free Disk Space
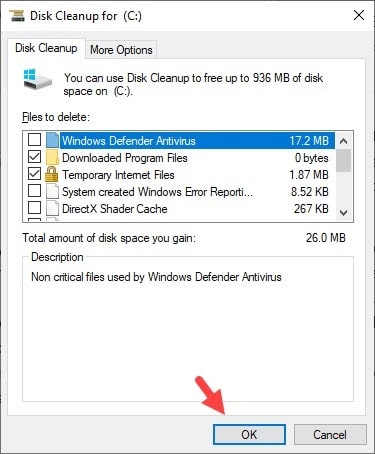
The Android Studio Emulator requires at least 2 GB of free RAM to start. If this much free space is unavailable, then the Android Studio Emulator won’t start. If you find that your PC doesn’t have adequate free disk space, then try running the Disk Cleanup tool to delete all the unnecessary files remaining on your PC.
To run Disk Cleanup, follow the steps given below:
- Type Disk Cleanup in the Windows search bar and select the appropriate option.
- The Disk cleanup app will now be up on your screen. Select the drive from which you want to delete the junk files and then click on OK.
- Now, click on the Clean up system files option. The disk cleanup tool will now scan your selected drive for all the junk files.
- Once the scan finishes, select the files that you want to delete from the list and then click on OK.

Solution 3: Check For Memory Leak And Close Unnecessary Processes In The Background
If the system memory is hogged by other applications, or if there is a memory leak, then the Android Studio Emulator won’t start. This happens because the emulator asks for the total amount of guest memory at the start from Windows. When the full guest memory size exceeds the Commit limit of the system, the emulator fails to start.
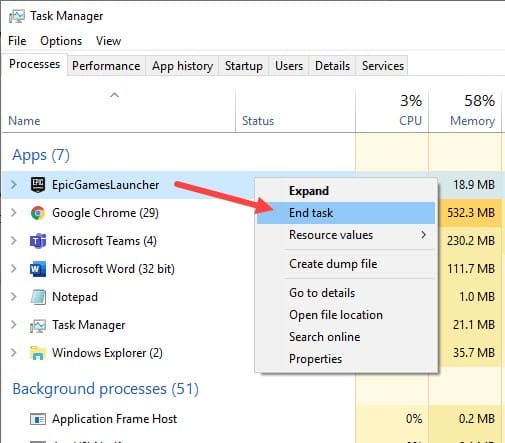
To check this, you can open the Task Manager and see the memory consumption in the Performance tab. If the Committed memory is already too high, then it explains why the Android Studio Emulator not starting. Close the unnecessary background processes to free up space. To do it, follow the steps given below:
- Press the Ctrl + Shift + Esc keys to open the Task Manager.
- Select the Processes tab and locate the processes that are consuming the system resources.
- Right-click on them and select the End Task option.
- Once you have freed enough space, try starting the Android Studio Emulator.

Solution 4: Update Graphics Drivers
If your graphics drivers are outdated, then it explains why Android Emulator is not working. Update your graphics drivers, and this issue should get fixed. Keeping the graphics drivers up to date is always a wise choice of action. To update your graphics drivers, follow the steps given below:
- Press the Windows + R keys to open the Run utility.
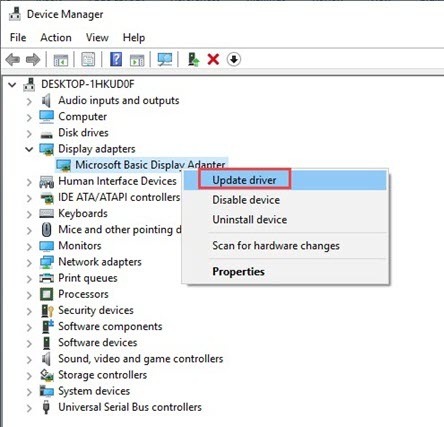
- Type devmgmt.msc and press Enter to open the Device Manager.
- Expand the Display Adapters option.
- Right-click on the graphics driver and select the Update Driver option.
- Select the Search for updated drivers option.
- Follow the on-screen instructions to complete the process.
Solution 5: Disable The Antivirus
The antivirus software installed on your PC can also prevent the Android Studio emulator from starting. Antiviruses are well known for acting overprotective and interfere with programs that are not a threat to the system. Try disabling the antivirus and see whether still the Android Studio Emulator won’t start.
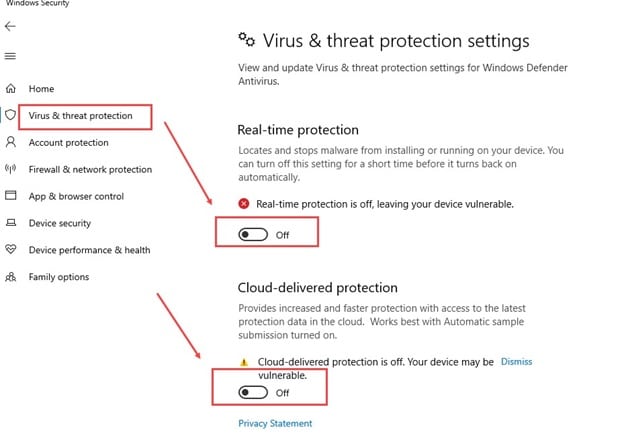
If you are not using a 3rd party antivirus, then disable the Windows Defender, which is the native antivirus of Windows 10. To do it, follow the steps given below:
- Type Windows Security in the Start menu and select the top result.
- Click on the Virus & Threat protection option.
- In the Virus & threat protection settings section, click on the Manage settings
- Disable the Real-time protection option. This will disable the Windows Defender.

After disabling antivirus, the Android Studio Emulator should start normally.
Wrapping Up
So, there you have it. Now you know what to do when the Android Studio emulator not starting. Follow the steps given above and this issue should get fixed. If you have any questions related to this article, ask them in the comment section below.

Solution No. 3 is the best method I think. Because, after applying this method, the issue is fixed now. Can you tell me the minimum requirements to build a Pc, that runs an Android emulator smoothly?