As I have mentioned in many of the other articles, wireless is the correct way in the future. Wires can be extremely infuriating when they coil up and you have to waste your entire afternoon managing them. Wireless makes life so much easier. Among the wireless devices, wireless headphones are the most comfortable to use.
You no longer have to stick to the same place while wearing your headphones or worry about choking yourself in the wires. So, how to connect Bluetooth headphones to PC in Windows 10? It is actually a fairly easy process and quite shocking that so many users don’t know how to do it. In this article, I have given detailed instructions on how to connect your Bluetooth headset to a PC in Windows 10.
Also, in the latter part of this article, I have discussed some troubleshooting methods you may need to follow if your Bluetooth headsets don’t connect.
Check Some Basic Things
Contents
Before I give you the instructions to connect your Bluetooth headphones to PC, you need to check some basic things first. Here is a list of the things you need to check beforehand:
- Check whether your PC has either inbuilt Bluetooth or a Bluetooth modem attached to it.
- Make sure that the Bluetooth headset is fully charged.
- Keep the Bluetooth headset unpaired. Make sure it isn’t paired with any other devices.
After you have checked these basic things, move on to the instructions for how to connect Bluetooth headphones to PC in Windows 10.
How To Connect Bluetooth Headphones To PC In Windows 10?
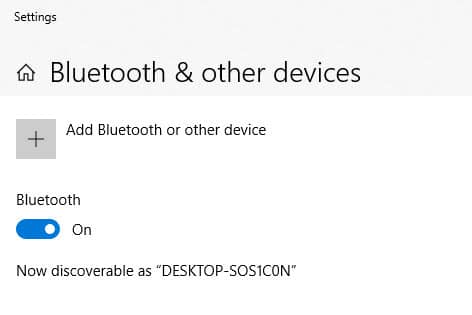
For connecting your wireless headphones to the PC, you need to enable the Bluetooth in Windows 10 first. To enable the Bluetooth in Windows 10, follow the steps given below:
- Right-click on the Start menu and select the Settings option. This will open the Settings app.
- Click on the Devices option.
- Select the Bluetooth & other devices option.
- Turn on the toggle just below Bluetooth.
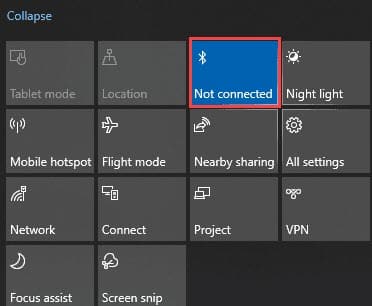
You can also enable Bluetooth from the Action Center. To do it, follow the steps given below:
- Click on the action center icon in the system tray (message icon).
- Select the Expand option.
- Click on the Bluetooth symbol (B symbol). If it lights up, then Bluetooth is enabled.
After you have enabled Bluetooth, you will have to pair your headset with your PC. To do it, follow the steps given below:
- Turn on your Bluetooth headset pairing by pressing the physical button on it. You may have to press and hold it for a few seconds depending on the company and model. The correct instructions will be given in the manual that came with the headset.
- Enable the Bluetooth on your PC and open the Bluetooth settings as mentioned above.
- Click on the Add Bluetooth or other device option.
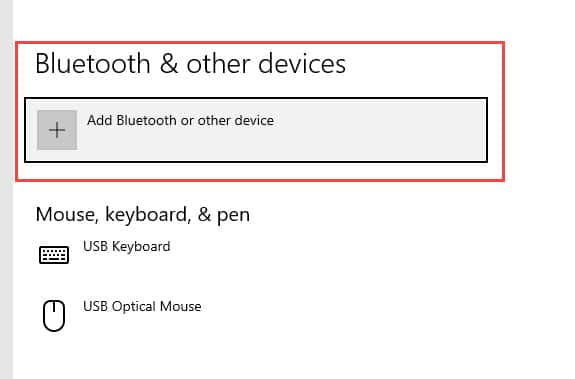
- Select the Bluetooth option on the prompt. It will begin searching for nearby Bluetooth devices.
- When your Bluetooth headset pops up among the names, click on it and select the Connect option.
- You should get a notification saying that the devices are paired. Click on the Done option.
- Your headset should get connected to the PC once the pairing is done.
So, this is how to connect Bluetooth headphones to PC in Windows 10. Once you have paired your PC and the Bluetooth headset, you no longer need to do it again unless the device is deleted from your PC. If that happens, then simply follow the above instructions again to pair them back.
Now, in the future all you will need to do is to enable the Bluetooth on your PC, enable the Bluetooth headphones and they should connect automatically. If they don’t connect automatically, then click open the Bluetooth settings again and in the Audio section, click on the name of the Bluetooth headset.
What To Do When Bluetooth Won’t Connect To Laptop Or Desktop?
There may be times when Windows 10 can’t find Bluetooth headphones or the headphones won’t connect to laptop or desktop. In this scenario, you can do the following troubleshooting procedures.
Solution 1: Check Whether The Devices Are Compatible
Each Bluetooth device has a specific profile that it can connect to. You can find it mentioned in your users-manual of the headphone. Here are the profiles that are supported by Windows 10 after the April OS update:
- Advanced Audio Distribution Profile (A2DP 1.2)
- Audio/Video Control Transport Protocol Target (AVCTP 1.4)
- Interoperability (IOP)
- Audio/Video Remote Control Profile (AVRCP 1.6.1)
- Battery Service over GATT Profile (1.0)
- Bluetooth LE Generic Attribute (GATT) Client
- Dial-up Networking Profile (DUN 1.1)
- Bluetooth Network Encapsulation Protocol (BNEP 1.0)
- Device ID Profile (DID 1.3)
- Bluetooth LE Generic Attribute (GATT) Server
- Device Information Service over GATT Profile (DIS 1.1)
- Generic Access Profile (GAP)
- Generic Audio/Video Distribution Profile (GAVDP 1.2)
- Hands-Free Profile (HFP 1.6)
- Hardcopy Cable Replacement Profile (HCRP 1.2)
- HID over GATT Profile (HOGP 1.0)
- Human Interface Device (HID 1.1)
- Human Interface Device Service (HIDS)
- Audio/Video Distribution Transport Protocol (AVDTP 1.2)
- Logical Link Control and Adaptation Protocol (L2CAP)
- Object Push Profile (OPP 1.1)
- Personal Area Networking User Profile (PANU 1.0)
- RFCOMM (1.1 with TS 07.10)
- Scan Parameters Profile Client over GATT Profile (ScPP 2.1)
- Security Manager Protocol (SMP)
- Serial Port Profile (SPP 1.2)
- Service Discovery Protocol (SDP)
Solution 2: Run Bluetooth Troubleshooter
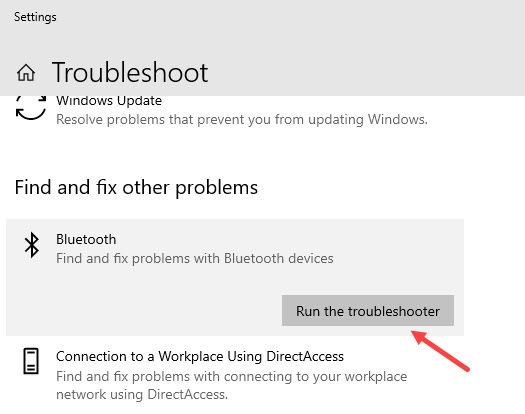
Windows has an inbuilt troubleshooter specifically for Bluetooth. Whenever you face any issues with Bluetooth, run this troubleshooter to get an insight into the problem and even fix it. To run the Bluetooth troubleshooter, follow the steps given below:
- Type Troubleshoot settings in the Start menu and select the top result.
- Click on the Additional troubleshooters option.
- In the Find and fix other problems section, click on the Bluetooth option.
- Select the Run the troubleshooter option.
- Follow the on-screen instructions to complete the process.
Solution 3: Update Bluetooth Drivers
Outdated Bluetooth can also be the case why Windows 10 can’t find Bluetooth headphones. To update Bluetooth drivers, follow the steps given below:
- Press the Windows + R keys to open the Run utility.
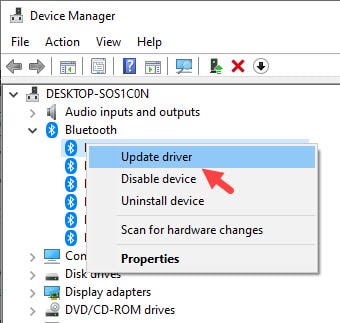
- Type devmgmt.msc and press Enter to open the Device Manager.
- Expand the Bluetooth tree.
- Right-click on the problematic Bluetooth driver and select the Update driver option.
- Click on the Search automatically for drivers option.
- Follow the on-screen instructions to complete the process.
After the Bluetooth driver updates, headphones won’t connect to laptop or desktop issue should be fixed.
Wrapping Up
So, there you have it. Now you know how to connect Bluetooth headphones to PC in Windows 10 and what to do if Bluetooth headphones won’t connect to laptop or desktop. If you have any further questions related to this article, ask them in the comment section below.
Leave a Reply