While starting your PC, you can suddenly come across CPU fan errors.
This is an error message from your BIOS to warn you that something is wrong with the CPU fan.
This can happen due to several factors, which I will discuss in this article today and shall provide the working fixes to solve it.
What Can Happen When CPU Fan Speed Error Detected?
Contents
When there is a CPU fan error, the CPU can get overheated and shut down.
Some users found the CPU fan louder before shutting down. Others found the fans completely standing still and not rotating at all!
Some modern motherboards stop the CPU fans if the CPU is idle, but in general, the COU fans should spin.
The CPU fan speed detection error means that the fan is not spinning exactly how to is supposed to.
Why Am I Getting The Fan Error?
You can get CPU fan speed errors due to various reasons. These are as follows:
Overclocking: Gamers prefer to overclock their system to get the best performance out of it.
However, this overclocking can overload the CPU, making it work more. As a result, the system gets overheated, and you can get the fan error.
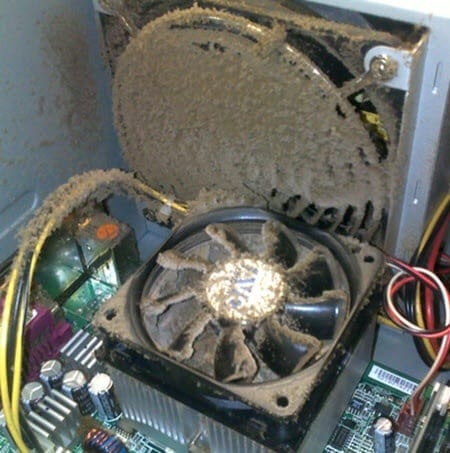
Dust: Dust or dirt is a natural enemy of your PC. The accumulated dust can block the CPU fans and exhausts and affect the hardware. As a result, you get the fan error.
Corrupted System files: Corrupted system files can also overheat your system, and the fans cannot cool it down this overheat can also cause fan errors.
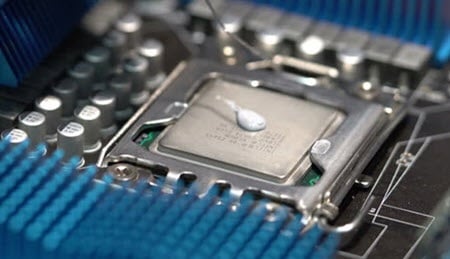
Dry Thermal paste: Old and dry Thermal paste can get eroded after some time, and this can increase the CPU temperature. The fan may be unable to cool down your overheated system and show you errors.
Damaged CPU Fan: A malfunctioning or broken fan will not be able to cool down your system, resulting in errors.
What To Do If CPU Fan Speed Error Is Detected?
Follow the methods discussed below when you get a fan speed error to easily fix it.
1) Check The Fans
When you get the fan error, first of all, check if t is spinning. Check this while running your PC.
You can easily peep through the side window of the cabinet to check the fan.
You can also remove the lid if the side panel and see if the fan is spinning.
Check if it asks for any extraordinary sound or if the speed fluctuates.
2) Perform A Clean Boot
If you are into graphics-intensive work, then this can force the CPU to overwork.
This can overheat your system. A clean boot can help close all these unnecessary programs and services and cool down the system. This can fix the fan error.
To perform a clean boot, follow the steps given below:
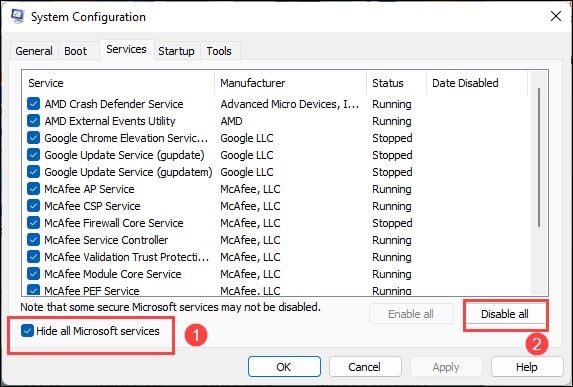
- Press Windows + R buttons to launch the Run utility.
- Type msconfig & press Enter.

- This will open the System Configuration window.
- Go to the Services tab & check the Hide all Microsoft services box.
- Next, click on Disable all and select Apply to save the changes.

- Go to the Startup tab and select Open Task Manager option. When Task Manager opens, disabling the Startup programs that greatly impact your system.
Once done, restart your PC. The PC will now boot into a clean environment. If this could not fix the problem, ensure there is proper ventilation.
3) Ensure Proper Ventilation
You should always take care that your computer is kept in an airy space, protected from sunlight or direct heat.
Those things can overheat the system, and as a result, you can get CPU fan speed detection error.
So, move your PC to a cooler space away from direct sunlight and heat.
4) Stop Overclocking The CPU
Overclocking provides optimal performance experience, so, we often overclock our system.
But overclocking can force the CPU to overwork and overheat it.
So make sure to maintain the balance on performance and overwork.
5) Check The Location Of The CPU Fan

Make sure that the CPU fans are installed in the correct place they are supposed to.
It should be connected to the CPU header on the motherboard. You can get the CPU fan speed detection error if it is connected somewhere else.
If you are not confident about how to check it, you can take professional help to do that.
Once you find the fan location is proper, clean the dirt from your PC.
6) Clean Your PC

Dust and dirt are arch-nemesis of PC. It can jam the CPU fans, and block the exhausts making the PC overheated.
Make sure to clean the space surrounding your PC on a daily basis.
Make sure to clean your PC also following the steps given below:
- Turn off your computer and detach the power cables attached to the CPU.
- Move the CPU to some airy, ventilated space, and place it on a hard and clean surface.
- Carefully open the side panels of the PC cabinet.
- Using a soft lint-free cloth or compressed air can clean the filters. Also, clean the base of the case.
- Compressed air is better for cleaning the dust and dirt from the cooling fan & heatsinks of the CPU & GPU.
After cleaning everything, put everything back and on your PC. Check the thermal paste if a CPU fan speed error is detected again.
7) Check The Thermal Paste

The space between the heatsink and the CPU is filled with thermal paste.
This aids in heat transfer. If the thermal paste is dry or not properly applied, then this can overheat the CPU. As a result, you can get fan error.
To check the thermal paste, follow these steps:
- Turn off your PC and detach all the cables.
- Open the panels of the cabinet.
- Find the heatsink and then remove t carefully.
- Check the thermal paste. Check if it is dry or properly applied.
If it has eroded, reapply it on the processor. Then carefully place the heatsink back.
Once done, check if the problem is fixed. If the problem persists, check the CPU fan settings.
8) Check The CPU Fan Settings
If you are getting a BIOS CPU fan error, you can check the CPU fan settings in BIOS and make sure it’s proper.
To do that, follow the steps given:
- Each motherboard differs from others and has a dedicated BIOS key to enter into BIOS.
So, make sure to find your BIOS key by going through the user manual. Once you find the BIOS key, get into BIOS.
- If you have set the BIOS recently, make sure the fan’s speed complies with the indication provided by the CPU cooler manufacturer.
- In case you need professional help to check all these, go for it. If the issue persists after that, run SFC and DISM scans.
9) Run SFC & DISM Scans
Corrupted system files can put pressure on your CPU and overload it.
As a result, the CPU can get overheated. This can be responsible for the fan error you are getting.
You can easily fix it by running the System File Checker tool, which will repair the corrupted system files, if any.
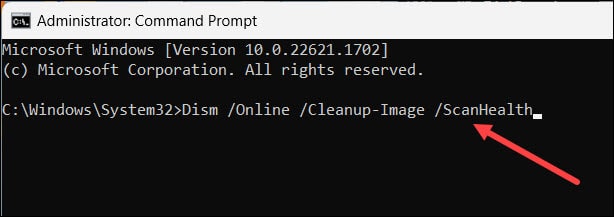
A DISM scan will help you to detect and fix broken Windows images that can also trigger the error.
To run the SFC and DISM scans, follow these steps:
- Open the Run utility and type cmd in the Run command window.
- Press Ctrl + Shift + Enter to open an elevated Command Prompt window.
- Type the following command and hit Enter to run it.
sfc/ scannow

- It can take several minutes to finish, so wait patiently till it’s done.
- Once done, restart your PC.
After your PC restarts, again open an elevated Command Prompt window.
Now copy and paste the following line of commands one after another and press Enter after each one:
Dism /Online /Cleanup-Image /CheckHealth

Dism /Online /Cleanup-Image /ScanHealth

Dism /Online /Cleanup-Image /RestoreHealth

Once done, restart your PC. If you again get the fn error again, replace the fan.
10) Get A New CPU Fan
If none of the above methods could fix the CPU fan issue, then replace the CPU fan and see if this helps.
The fan can be broken and needs replacement. Check if you have purchased it separately and is within the warranty period.
If yes, then contact the dealer immediately and get it replaced. If not, buy a new fan instead.
Wrap Up
So, that was all about the CPU fan errors. For any related query, ask us in the reply section below and we shall turn up soon with answers. Keep discussing your problems and stay connected.
Leave a Reply