Over the years, CPU cores have kept increasing, with beasts such as AMD Thread rippers running 64 cores and 128 threads. The core usage is always important, and every user wants to utilize it in its entirety. Checking the number of cores and their utilization can be achieved using Windows Task Manager.
Task Manager monitors the number of cores and threads on your CPU. It also monitors the cores separately. While checking your CPU cores in Task Manager, you may find that your CPU is not using all cores. In some cases, this is simply a display bug, but in other cases, the CPU cores in your PC may have been disabled.
In this article, I have discussed why your CPU is showing a lesser core count and how to activate all cores in Windows 10.
Also check out:
- What to do when Windows Driver Foundation is consuming high CPU resources.
- How To Reduce CPU Usage While Gaming?
Why CPU Not Using All Cores?
Contents
Generally, your system should utilize all the CPU cores unless you have changed the settings to do otherwise. That obviously doesn’t consider the cores used for starting applications. The applications/games will only use as many cores as it is programmed to use.
Now, this issue can be a simple display bug in the Task Manager. If it isn’t then you may have been misinformed of your CPU cores? Or if you have repaired your PC recently, the CPU could have been changed without your knowledge. Other than that the CPU cores may simply be disabled in your Windows 10, either knowingly or unknowingly done by someone.
Whichever the case, proceed with the troubleshooting mentioned here and see if you are able to fix the issue.
Solution 1: Verify With A Different CPU Monitoring Application
The first thing you must do is use a dedicated CPU monitoring application, such as CPU-Z, and check your CPU details. In particular, check the CPU mentioned and search it online to find the number of cores it should provide. If you have recently repaired your PC from a local service center, there is the possibility that they changed your CPU without informing you. Make sure this isn’t the case.
If you find that the CPU is not using all cores in CPU-z, try restarting a couple of times. If the issue persists, move on to the next solution.
Solution 2: Reset Number Of Cores By Changing System Configuration
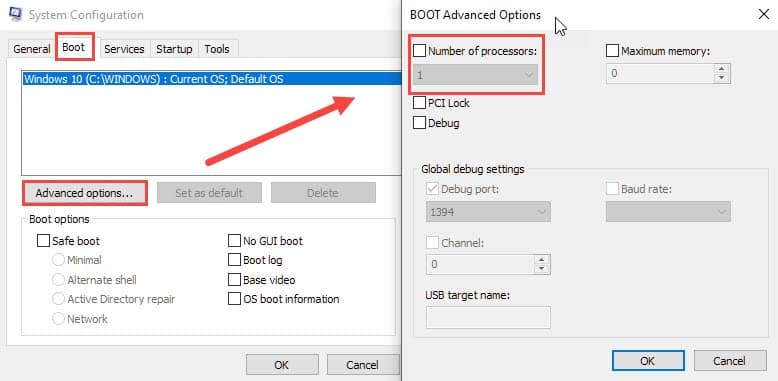
After checking with the CPU-Z, if you find that your CPU is still using a lesser number of cores than it should, try activating all cores. So, how to enable all cores in Windows 10? Enabling or disabling cores can be easily done using the System Configuration menu in Windows 10. First, try resetting the core number to what the system decides, if that doesn’t work, enable all cores.
Here are the steps to do so:
- Press the Windows + R keys to open the Run utility.
- Type msconfig in the search box and press Enter to open the System Configuration window.
- Click on the Boot tab.
- Select the Advanced options. If the Number of processors box is checked, uncheck it. If it was unchecked, skip this solution.
- Click on OK.

- Select Apply and OK in the System Configuration window to save the changes.
- Restart your PC.
After your PC restarts, open both the Task Manager and CPU-Z to check the number of cores used in your PC. The system should now be using all the CPU cores.
Solution 3: Activate All The Cores In Windows 10
If you find the Number of processors box unchecked in the system configuration, it means the lesser number of cores your system is using was not done by user intervention. In this scenario, you can force enable all cores in Windows 10. This can be done easily by changing the same System configuration settings as in solution 2. This is how to activate all cores in Windows 10:
- Open the System Configuration.
- Click on the Boot tab.
- Select the Advanced options.
- Check the Number of processors box. This will unlock the drop-down menu below it.
- Click on the drop-down menu and select the maximum number of cores available there.
- Select OK.
- Click on Apply and OK in the System Configuration window to save the changes.
- Restart your PC.
After your PC restarts, your system will start to use the number of cores you inputted in the System Configuration menu.
Solution 4: Upgrade To UEFI
If you are unable to use the above solutions, either if it doesn’t show you the correct number of cores in the System Configuration window, or if your PC crashes trying to activate all the cores, then this may be relevant to you. One user in Steam community forums mentioned that he was still using the Legacy BIOS and his system didn’t register all the CPU cores. Apparently, upgrading to UEFI from Legacy fixed this issue for him.
If your PC is also using Legacy BIOS, read this article and learn how to upgrade to UEFI firmware, if your motherboard supports it.
Wrapping Up
So, there you have it. Now you know why your CPU is not using all cores and how to enable all cores in Windows 10. If you have any questions regarding this topic, ask them in the comment section below.
Leave a Reply