Network problems are quite common for most of us. When facing a network problem, running the Windows network troubleshooter can provide insight into the issue and even fix it.
For some network errors, running the network troubleshooter shows the “The Diagnostics Policy Service is not running” message.
When this happens, the network troubleshooter is unable to fix the problem, leaving the user on their own.
In this article, I have discussed some troubleshooting methods that users can go through when they face the Diagnostic Policy Service not running error to fix it.
What Causes The Diagnostic Policy Service Not Running Error?
Contents
What this message basically tells you is that the Windows 10 Diagnostic Policy Service is not running for some reason. It might have simply disabled, or there can be other factors causing this issue. Here are some potential causes of this error:
- The most likely reason for this error is that the Windows 10 Diagnostic Policy Service is disabled.
- Corrupted system files can also be the cause of this error.
- The network services may be lacking in permissions, which can be why you are facing the network-related issues.
- Corrupted or problematic network drivers can also be the cause of this issue.
Now that you know some of the potential causes of this error, it is time to troubleshoot it.
How To Fix The Diagnostics Policy Service Is Not Running Error?
Now, here I have mentioned the troubleshooting procedure that you need to go through in order to fix this error.
Read the solutions given below carefully before executing them so that you don’t make any mistakes.
Solution 1: Enable And Run Windows 10 Diagnostic Policy Service Manually
The Windows 10 Diagnostic Policy Service is an essential service that aims to find and troubleshoot the potential problems in Windows.
This service may have become disabled somehow, which is why you are seeing the Diagnostic Policy Service not running error.
To enable the Diagnostic Policy Service and manually start it, follow the steps given below:
- Press the Windows + R keys to open the Run utility.
- Type services.msc and press Enter to open the Services app.
- Locate the Diagnostic Policy Service and double-click on it.
- In the Startup type drop-down menu, select the Automatic option.
- Select the Start option below the Service status.
- Click on Apply and OK to save the changes.
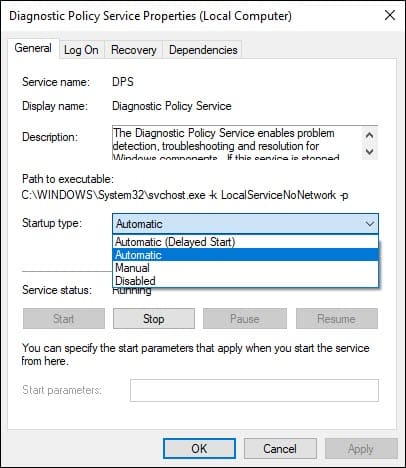
After following the above steps, Windows 10 Diagnostic Policy service will be enabled and should start running.
Now, run the network troubleshooter again and check whether you are still facing the same error. If yes, then try the other solutions given below.
Solution 2: Grant Administrative Privileges To Network Service
Lacking administrative privileges for network service and local service administrator can also cause this error.
That’s because these modules require complete access to your computer for working correctly, which is only possible when they administrative privileges.
To provide administrative privileges for network service and local service administrator, follow the steps given below:
- Open the Run utility again.
- Type cmd and press Ctrl + Shift + Enter to open an elevated Command Prompt.
- Now, type the following commands and press Enter after finishing each one:
net localgroup Administrators /add networkservice


- After the command runs, close the Command Prompt and run restart your PC.
Now, check if you are still getting the Diagnostics Policy Service is not running error after running the network troubleshooter.
Solution 3: Run System File Checker Scan
Corrupted system files can also be the cause of this error. If this is the case, then you can try running the System File Checker scan and DISM scan. The SFC checks for corrupted system files and fixes them while the DISM scan will repair the Windows image. To run the SFC scan and DISM scan, follow the steps given below:
- Open the elevated command prompt again.
- Type the following command and press Enter:
sfc /scannow
- Wait for the scan to finish as it will take around 20-30 minutes. Do not close the Command Prompt prematurely.
- Restart the computer.
- Now, open the elevated command prompt again.
- Type the following commands and press Enter after finishing each one:
a) Dism /Online /Cleanup-Image /CheckHealth
b) Dism /Online /Cleanup-Image /ScanHealth
c) Dism /Online /Cleanup-Image /RestoreHealth - Wait for the commands to finish running and then restart the computer.
Solution 4: Reinstall The Network Drivers
Corrupted or problematic network drivers are known to cause many network-related errors. This can also be the case for this situation. Reinstall the network drivers and see if that fixes this issue. To reinstall the network drivers, follow the steps given below:
- Open the Run utility again.
- Type devmgmt.msc in the search box and press Enter to open the Device Manager.
- Expand the Network adapter tree.
- Right-click on the adapter causing this issue for you and select the Uninstall Device option.
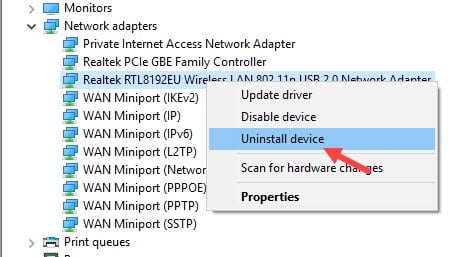
- Follow the on-screen instructions to complete the process.
- Now, right-click on the Network Adapters option.
- Select the Scan for hardware changes
- Windows will now scan for the uninstalled network driver and reinstall it automatically.
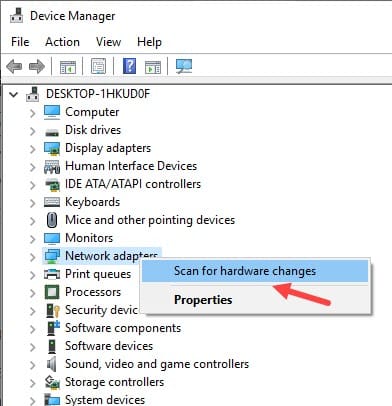
Now, check if the issue persists. If yes, then try updating the network driver. To do it, follow the steps given below:
- Open the Device Manager again.
- Expand the Network adapter tree.
- Right-click on the adapter causing this issue for you and select the Update Driver option.
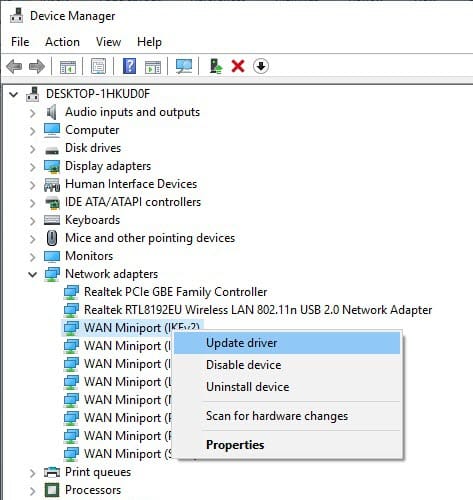
- Click on the Search automatically for drivers option.
- Follow the on-screen instructions to complete the process.
Solution 5: Use System Restore
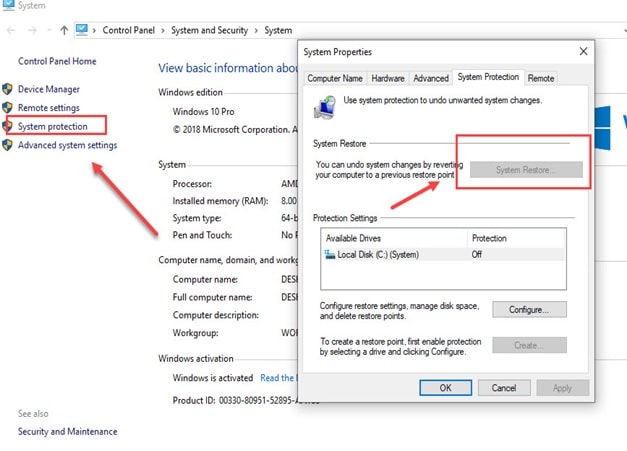
If system restore is enabled in your PC and you have saved a previous restore point before this error appeared, then you can restore to it. By restoring to a previous system point, you should be able to get rid of this error. To restore to a previous system point, follow the steps given below:
- Type Create a restore point in the start menu and select the top result. The System Properties will open on your screen.
- In the System Protection tab, select the System Restore option.
- Click on the restore point made before this error appeared and follow the on-screen information to restore your PC to that state.
Solution 6: Reset Your PC
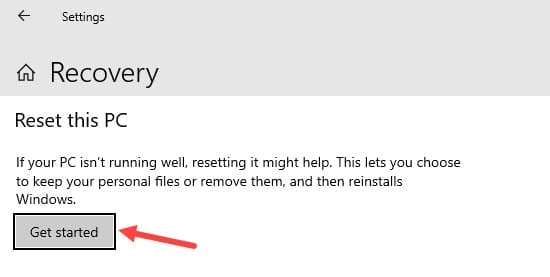
If none of the above solutions work, then you can try resetting your PC. To reset your PC, follow the steps given below:
- Type Reset this PC in the Start menu and select the top result. This will open the Recovery Settings.
- In the Reset This PC section, click on the Get started option.
- Follow the on-screen instruction to complete the process.
Frequently Asked Questions [FAQs]
Here I have answered some of the commonly asked questions regarding this topic. Hopefully this will also answer some of your questions.
- What Does It Mean When The Diagnostic Policy Service Is Not Running?
Without this service, diagnostic will no longer function on Windows. So, Windows won’t be able to detect issues and troubleshoot them.
- Is Diagnostic Policy Service Necessary?
Yes, Diagnostic Policy Service is necessary as it is responsible for conducting diagnostics on Windows. Without it Windows wont be able to troubleshoot problems.
- Where Is The Diagnostic Policy Service?
The diagnostic policy service can be accessed from the Services app. Search Services in the Windows search bar and select the top result. Find the diagnostic policy service and double-click on it to change its settings.
Wrapping Up
So, there you have it. Now you know how to fix the Diagnostics Policy Service is not running error. One or the combination of a few of the above solutions should help you fix this issue. If you have any further questions regarding this article, ask them in the comment section below.

Leave a Reply