Are you receiving a slow charging notification on your Windows 10? The notification “Slow charging” indicates that the charging speed is much slower than what it should be for your PC. This generally happens for users that use a USB-C cable to charge their laptops. Is it the same for you?
Many laptops, nowadays, supports charging by USB – C type cables. Sometimes, the USB cable may not provide sufficient charging speed for the laptop, which then triggers the slow charging notification. You can disable slow charging notification if this is the only way you can charge your laptop.
In this article, I have discussed how to turn off slow charging notification, so that it stops annoying you while you use your device.
Also, check out this article to fix slow boot time in Windows 10.
Disable Slow Charging Notification With 2 Methods
Contents
The notification “Slow charging” shows on screen when the USB cable can’t supply the required power to charge the device. If you keep on using this cable to charge your device, then sooner or later going to get damaged. It is advised to use a different charging cable to avoid damaging your laptop.
But in the meantime, what to do about the notification? Until you get a better cable, you can disable the notification. I have shared 2 methods below that you can use to disable to disable the charging slow notification.
Method 1: Disable From The Settings App
To disable the battery charging Windows 10 notifications using the Settings app, follow the steps given below:
- Press the Windows + I key to open the Settings app.
- Click on the Devices option.
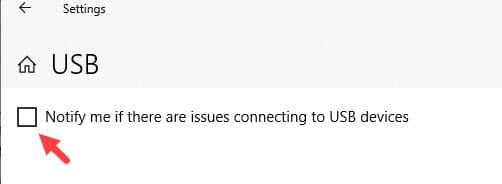
- Next, select the USB option from the left pane.
- Now, uncheck the Notify me if my PC is charging slowly over USB box.

Method 2: Use The Registry To Disable Notification
You can also modify the registry to disable the charging slow notification. To do it, follow the steps given below:
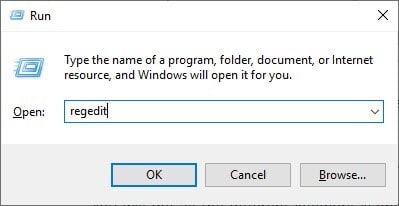
- Press the Windows + R keys to launch the Run utility.
- Type regedit in the search bar and press Enter to open the Registry Editor.

- Navigate to the following location:
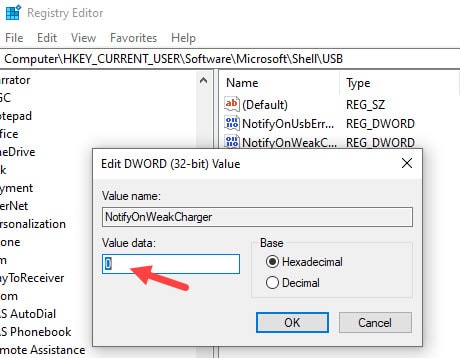
HKEY_CURRENT_USER\SOFTWARE\Microsoft\Shell\USB - Now, right-click on the white part of the right pane and then select the New option. Then, click on the DWORD (32-bit) value option to create a new DWORD.
- Rename the DWORD to NotifyOnWeakCharger.
- Double-click on the DWORD and enter 0 in the Value data section. Setting the value to 0 disables the notification and setting it to 1 enables it.

- Finally, click on OK to save the changes in the DWORD.
Wrapping Up
So, there you have it. Now you know how to disable slow charging notification on Windows 10. Remember that you have only disabled the notification, the charger is still providing insufficient power to your device. Change the charger as soon as possible to avoid lasting damage on your device. If you have any questions related to this topic, then ask them in the comment section below.
Leave a Reply