Internet connection issues are common and very frustrating for users. One such connection issue that gets reported frequently by users is the DNS server not responding issue.
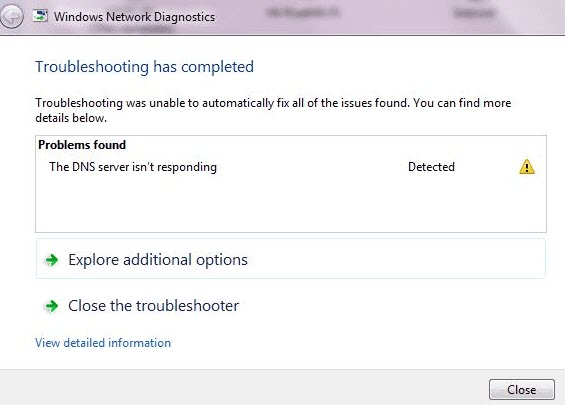
In this article, we will discuss the various ways in which you can diagnose and troubleshoot this issue.
Why DNS Server Isn’t Responding?
Contents
The DNS not responding, or the secure DNS can’t run on this network error are widely known for causing discomfort to the users. This error can occur due to many reasons. Let’s have a look at some of the causes of this issue:
- This error is most commonly caused because of incorrect DNS addresses.
- Sometimes corrupted DNS cache can also cause this problem.
- Outdated or damaged network drivers are another common cause of this error.
- This error can also happen if the internet connection isn’t working correctly from your network providers’ end.
- The Firewall is also known to cause this issue, although it is not a common occurrence.
Solving The DNS Server Not Responding Issue
As mentioned above, there can be various different reasons for this error. Now, let’s troubleshoot all the causes one by one to fix this issue.
Solution 1: Restart The Modem And Router
Whenever you face this type of issue, the first thing you should do is restart your modem and router. Simply restarting modem and router fixes many connectivity bugs that may happen due to an inactive connection.
Press the router and modem’s power button and wait for a few minutes before pressing the power button again to restart it.
After the modem and router restarts, check if the issue has resolved. If not, then try the next solution.
Solution 2: Change The DNS Server
If the DNS server is incorrectly recorded, then the DNS server obviously won’t respond. If this is the case, then you can either change the DNS server manually or you can have it selected automatically.
To change the DNS server manually, follow the steps given below:
- Type Network Status in the Windows search bar and select the appropriate option.
- Click on the Change adapter options in the Change your network settings section.
- Double-click on your network device and select the Properties option.
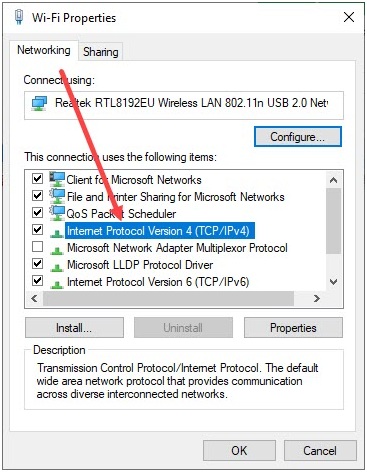
- Locate the Internet Protocol version 4 (TCP/IPv4) option and double-click on it.
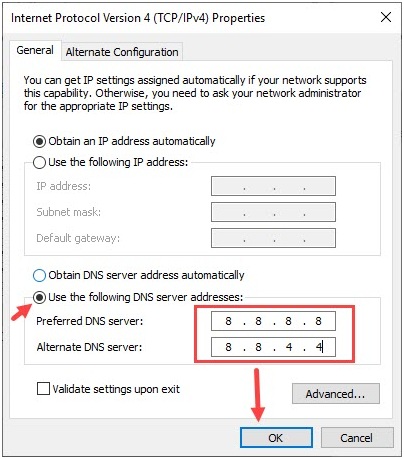
- Make sure the Use the following DNS server addresses option is checked or else check it.
- Enter the following values:
Preferred DNS server= 8.8.8.8
Alternate DNS server= 8.8.4.4
If it also doesn’t work, then enter:
Preferred DNS server= 208.67.222.222
Alternate DNS server= 208.67.220.220
- Finally, click on the OK option to save the changes and restart your computer.
To have the DNS selected automatically, follow the steps given below:
- Open the Properties of your network device again (follow step 1- step 3 from the earlier steps).
- Double-click on the Internet Protocol version 4 (TCP/IPv4) option again to open it.
- Check the Obtain an IP address automatically option and Obtain DNS server address automatically option and click on OK to save the changes.
- Now, locate the Internet Protocol version 6 (TCP/IPv6) option in the properties of your network device and double-click on it.
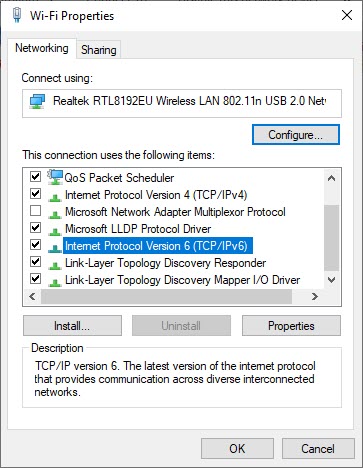
- Again, check the Obtain an IP address automatically option and Obtain DNS server address automatically option and click on OK to save the changes.
- Finally, restart your computer.
Now, after changing the DNS server either manually or automatically, check if the DNS not responding issue has resolved. This solution should fix this issue.
Solution 3: Flush, Register, Release And Renew IP
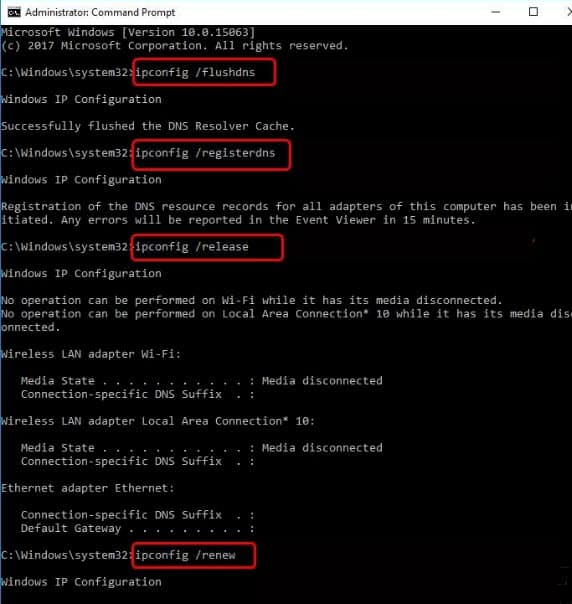
Corruption in the DNS cache can also cause this error. In this scenario, clearing the DNS cache and resetting the IP should fix this problem. To flush, register, release and renew the IP, follow the steps given below:
- Press the Windows + R keys to open the Run
- Type cmd and press Ctrl + Shift + Enter
Select Yes in the pop-up dialogue to open an elevated Command Prompt. - Type the following commands:
ipconfig /flushdns and press Enter.
ipconfig /registerdns and press Enter.
ipconfig /release and press Enter.
ipconfig /renew and press Enter.
- Now, restart your computer.
Check if the secure DNS can’t run on this network error has resolved. This solution should fix this issue if it was caused by corruption in the DNS cache.
Solution 4: Update Network Drivers
Outdated network drivers are known for creating many network-related problems, including the DNS server not responding issue. If your network driver is outdated, then you have most likely found the culprit of the problem.
In this scenario, updating the network drivers should fix this issue. To update the network drivers, follow the steps given below:
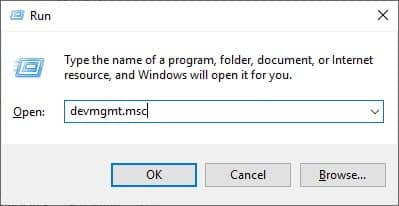
- Open the Run utility again.
- Type devmgmt.msc and press Enter.
The Device Manager will open on your screen.
- Expand the Network adapters and right-click on the outdated network driver.
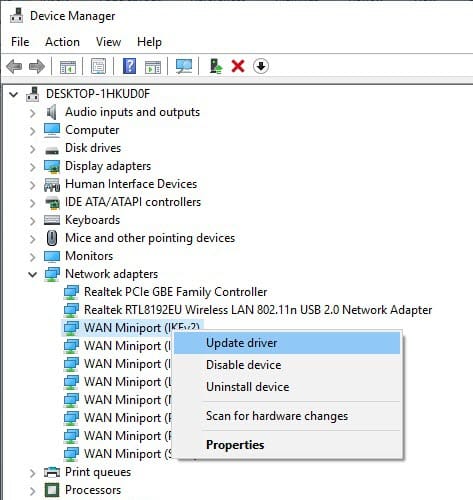
- Click on the Update Driver and then select the Search automatically for updated driver software option.
- Follow the instructions to complete the update and then restart your computer.
Solution 5: Uninstall The Wireless Adapter Driver
If your network drivers are already updated, then uninstalling the wireless adapter can also fix this problem. To uninstall the wireless adapter, follow the steps given below:
- Open the Device Manager and expand the Network adapters again (follow Solution 4).
- Locate the wireless adapter and right-click on it.
Select the Uninstall Device option from the pop-up menu. - Follow the instructions on your screen to complete the uninstallation.
- Now, right-click on the Network adapters option and click on the Scan for hardware changes option.
The wireless adapter will be installed again.
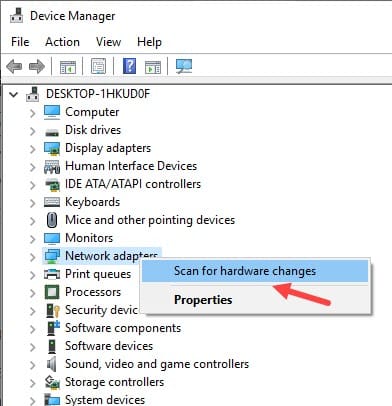
Check if still the DNS server is not responding. This solution should solve this issue.
Solution 6: Disable Firewall And Antivirus
If none of the above solutions worked for you, then try disabling the Firewall of your computer. Some users have reported that the Firewall was causing this problem for them. This is generally not the common cause for this issue, but if none of the other solutions have worked, then it is likely that the Firewall is the main culprit.
Some users have also reported that third-party antivirus like McAfee can trigger this issue. McAfee has a history of causing internet problems for users. If disabling the Firewall didn’t work, then you can try disabling or uninstalling the antivirus.
Wrapping Up
So, we have come to the end of this article and now you know how to deal with the DNS server not responding issue. The above solutions should help you with this issue so try them out carefully. As always, feel free to share your thoughts on this article in the comment section below.
After changing the DNS server, the problem is solved. Thank you.