Recently a new problem is causing distress for Windows 10 users, as the Windows Driver Foundation (WDF) is suddenly consuming high CPU usage on some computers. Sometimes, it is even consuming 50-60 % of the CPU, which means that the users will be unable to do other CPU taxing activities on their computers.
In this article, we will discuss how this problem can occur and also the various troubleshooting methods that you can use to fix this problem.
Why Windows Driver Foundation Is Consuming High CPU Resources?
Contents
This problem can occur due to the following causes:
- The Windows Driver Foundation may be doing something important in the background, which is why it is consuming so much CPU.
- 3rd party applications can also cause WDF to consume high CPU.
- Outdated Windows can also trigger this kind of issue.
- Outdated and corrupted drivers are also known instigators for this problem.
Solving The Windows Driver Foundation High CPU Usage Issue
Now that you know the various causes of this issue, it’s time to troubleshoot them one by one.
Solution 1: Wait For Some Time
Sometimes, the WDF can be doing some work in the background, which is why its consuming high CPU usage. WDF is, after all, a standard Windows process. So, if it is doing something in the background, then it’s very likely important.
Wait for a couple of hours at least for the WDF to stop finish any work in the background. However, if the problem remains after a couple of hours, then you probably have a genuine issue at hand.
Solution 2: Update Your Drivers
Outdated drivers are reported by many users for causing this problem. If the drivers on your computer are outdated, then updating them should fix this problem. To update your drivers, follow the steps given below:
- Type Device Manager in the Windows search bar and open the appropriate option.
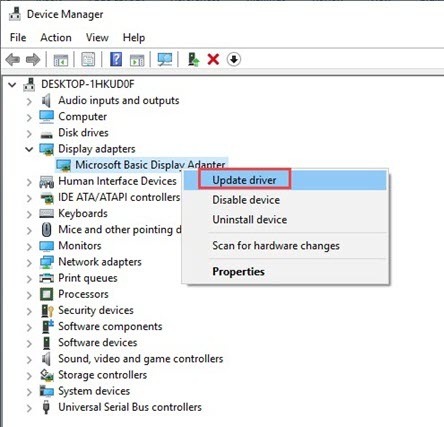
- Locate the outdated drivers and right-click on them.
- Click on the Update driver option.
- Select the Search automatically for updated driver software option. Now, wait for the update to finish.
Solution 3: Re-Install The Wi-Fi Driver
If updating the drivers didn’t fix this issue, then try uninstalling and re-installing the Wi-Fi driver. The Wi-Fi driver caused this problem for many users and uninstalling fixed this issue. The Wi-Fi driver on your computer can also be the culprit of this issue.
To uninstall the Wi-Fi Driver, follow the steps given below:
- Open the Device Manager (follow solution 2) and locate the Wi-Fi driver among the Network adapters.
- Right-click on the Wi-Fi driver and click on the Uninstall Device option.
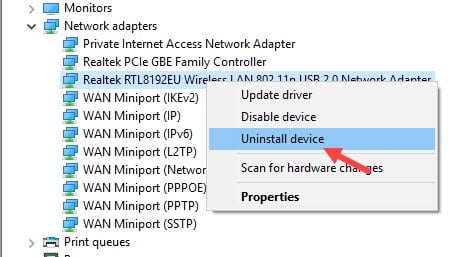
- In the confirmation dialogue, check the Remove driver software box (if available) and then click on the Uninstall option.
- Follow the instructions given on-screen to successfully uninstall the Wi-Fi driver.
- Now, restart your computer after the driver is uninstalled.
- Finally, check if the problem has resolved.
Solution 4: Clean Boot Your Computer
If any 3rd party application is causing this problem, then doing a clean boot should fix this issue. To do a clean boot, follow the steps given below:
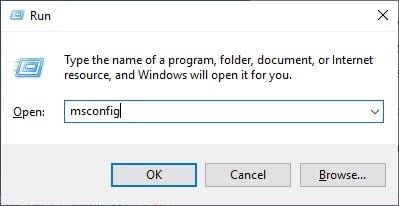
- Open the Run utility by pressing the Windows + R keys on your keyboard.
- Type msconfig and press Enter. This will open the System Configuration on your screen.
- Select the Services tab and then check the Hide all Microsoft services box.
- Click on the Disable all option.
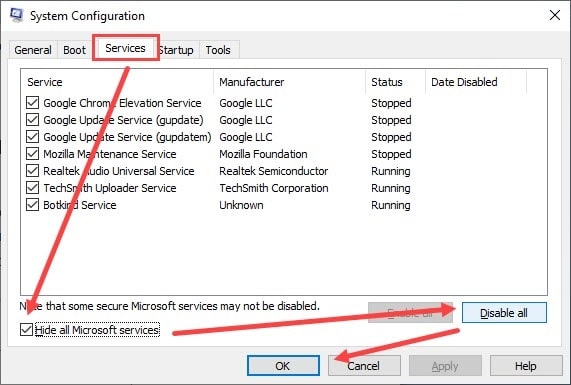
- Next, select the Startup tab and click on the Open Task Manager option.
This will open the Task Manager on your screen. - Now, select the Startup tab in the Task Manager and right-click on any entry.
- Click on the Disable option from the pop-up menu. Repeat this for all the Startup entries in the Task Manager.
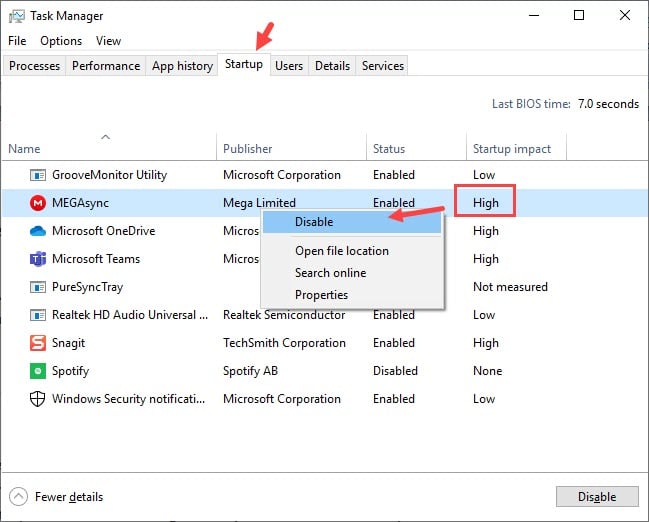
- After all the Startup entries are disabled in the Task Manager, restart your computer.
Once the computer clean boots, check if this problem is resolved.
Solution 5: Update Windows
This problem can happen if you have outdated Windows. Check if your Windows is up to date, if not then update it and then check if the high CPU usage problem gets resolved.
To update your Windows, follow the steps given below:
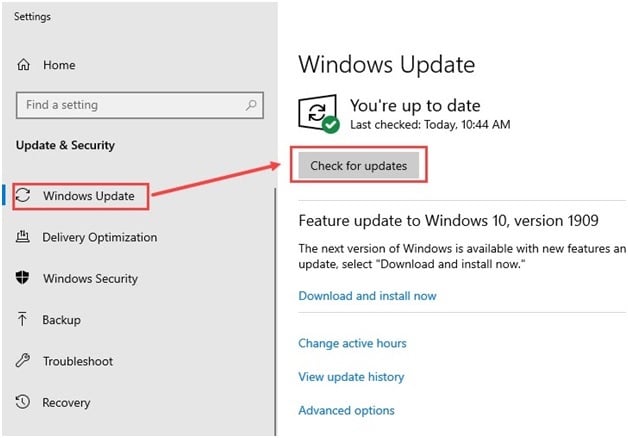
- Type Check for updates in the Windows search bar and select the appropriate option.
- Click on the Check for updates option. If the Windows is outdated, then it will automatically start updating.
- Restart the computer after the update is finished and then check if the problem is resolved or not.
Solution 6: Run System Maintenance Troubleshooter
There is an in-built troubleshooter in Windows to handle all the Windows system related problems. Running the System Maintenance troubleshooter should fix this problem if it’s caused by system-related issues.
To run the System Maintenance troubleshooter, follow the steps given below:
- Open the Windows search bar and type and select Control Panel.
- Click on the View by option on the upper right corner of your screen and select the Large icons option.
- Now, locate the Troubleshooting option and click on it.
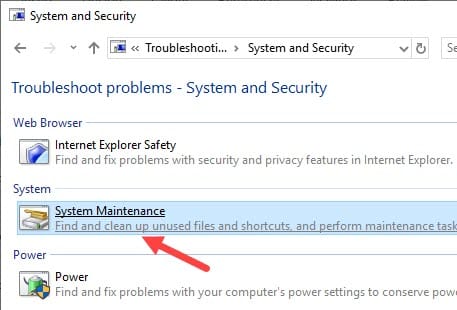
- Select the System and Security option.
- Locate and click on the System Maintenance option.
- Follow the instructions on your screen to successfully run the troubleshooter.
- Finally, restart your computer after the System Maintenance troubleshooter ends.
Solution 7: Remove The Peripheral Devices
Some users have reported that this problem can also be fixed by removing the peripherals from your computer. One by one remove all the peripherals except the mouse and check if it resolves this problem for you.
Solution 8: End The WDF Process From Task Manager
If none of the above solutions worked for you, then you can try ending the WDF process from the task manager, which will close it. This is just a workaround, but it can work when everything fails.
To end the WDF process, follow the steps given below:
- Press the Ctrl + Shift + Esc keys on your keyboard to open the Task Manager.
- Now, locate the Windows Driver Foundation in the Processes tab and right-click on it.
- Click on the End Task option.
- Finally, restart your computer. Check if the problem is resolved or not after your computer restarts.
Wrapping Up
So, there you have it. Now, you should be able to fix the Windows driver foundation high CPU usage issue without any problem. We recommend you follow Solution 1 and wait it out for the WDF to finish its work but if it doesn’t work, then try the other solutions. Feel free to share your thoughts on this article in the comment section below.
I have tried all of these steps multiple times and if I remove the peripheral, what’s the point? I want to be able to use three displays and this only happens sometimes and it’s not connected to anything that I’m doing. I want 3 displays to work CONSISTENTLY. I want three displays. How does remove peripherals solve my problom at all?