Windows 10 has become the most used desktop OS in recent years. It provides a wide range of features and customizability options that has kept its user base loyal to it. However, Windows is not exempt from errors and bugs, however, Microsoft does patch these with regular updates.
One error that has remained without a patch fix is “Explorer.exe Element not found. This error appears while trying to open different apps, command prompt, images, or even when opening the Settings app. If you are facing this error, go through the troubleshooting mentioned here to fix this issue.
Also read:
- How To Fix Chkdsk Cannot Lock Current Drive Error? [Complete Guide]
- How To Fix ‘An Array Value Could Not Be Found’ Error On Sheets?
What Does Element Not Found Mean?
Contents
The error element not found in Windows 10 appears because of instability in the Windows File Explorer. When you try to open an app or a system setting on Windows, somehow the Windows Explorer either crashes or becomes unable to find the element. This can happen due to various factors, here are some of them:
- Corrupted System Files: If system files become corrupted, it will explain why Windows Explorer becomes unstable. When this happens, follow the steps given below:
- Corrupted OS update: If you have recently updated your Windows, and since then facing this error, the update is likely triggering this issue.
- Applications are corrupted: Corrupted applications can also trigger this error for their respective self.
- Malware or Virus: A virus or malware infection can also lead to the exe Element not found error.
How To Fix The Error Explorer.exe Element Not Found On Windows 10?
As mentioned above, this error can get triggered for various applications. Below I have discussed the troubleshooting procedure that should fix this issue for all the applications.
Solution 1: Restart Explorer.Exe
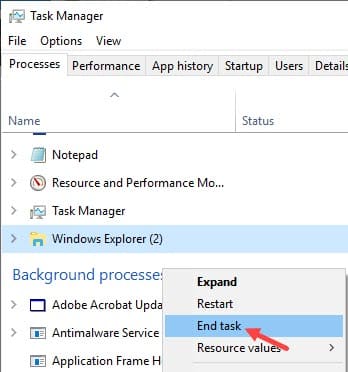
One of the main causes of this error is instability in Windows Explorer. The first thing you can try is to end the Windows Explorer unstable process and restart it from Task Manager. To do it, follow the steps given below:
- Press the Ctrl + Shift + Esc keys to open the Task Manager.
- Click on the More Details option, if available.
- Select the Processes tab.
- Locate the Windows Explorer process and right-click on it.
- Select the End Task option.
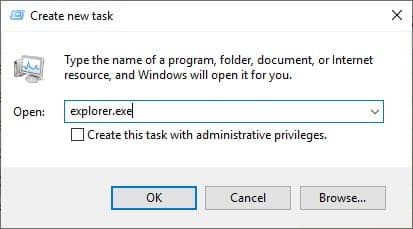
- Now, click on the File tab and select the Run new task option.
- Type explorer.exe in the search box and check the Create this task with administrative privileges box.
- Click on OK to start Windows Explorer again.
Now, try opening the application that was triggering the issue on your PC and check whether it is resolved. If this doesn’t work, try the next solution.
Solution 2: Remove Lenovo Applications (For Lenovo Laptop Users Only)
If you are using the Lenovo laptop, this error is likely triggered by some of the in-built Lenovo apps as many have reported. Applications like CAPSOD and OneKey Theater in particular are the most reported applications for instigating this issue. Uninstall them from your Lenovo laptop and check whether the issue gets resolved.
To remove Lenovo applications, follow the steps given below:
- Press the Windows + R keys and type appwiz.cpl in the search box.
- Click on OK to open the Programs and Features panel.
- Locate the Lenovo applications and right-click on them.
- Select the Uninstall option.
- Follow the on-screen instructions to complete the process.
After the applications have uninstalled, check if the error persists or not.
Solution 3: Update Graphics Driver
Some reported that updating graphics driver fixed this error for them. If your graphics driver isoutdated, try updating them. To update your graphics driver, follow the steps given below:
- Right-click on the Start Menu.
- Select the Device Manager option from the pop-up menu. Device Manager will open.
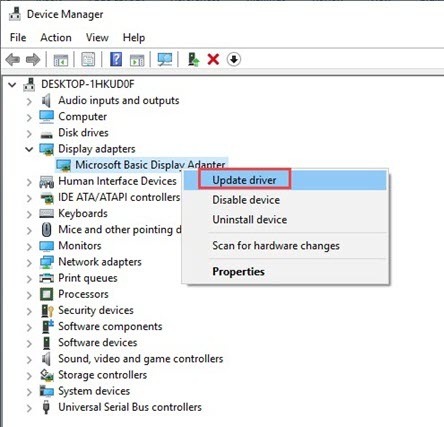
- Expand the Display Adapters and right-click on the graphics driver.
- Select the Update Driver option.
- Click on the Search automatically for drivers option.
- Follow the on-screen instructions to complete the process.
- After the update finishes, restart your PC.
After your PC restarts, check whether the issue has been resolved.
Solution 4: Rollback Windows Update
If you have recently updated your Windows, and since then you are facing this error, it is likely due to a corrupted Windows update. Rollback to the previous Windows update and see whether the issue gets resolved. To rollback your Windows Update, follow the steps given below:
- Press the Windows + I keys to open the Settings app.
- Click on the Update and Security option.
- Select the Windows Update option.
- Click on the Update history section.
- Select the Uninstall updates option and uninstall the problematic update.
- Follow the on-screen instructions to complete the process.
- After you have rolled back the update, restart your PC.
Solution 5: Run The SFC And DISM Scan
Corrupted system files can also be responsible for this issue. Run the System File Checker tool, which scans and repairs system files. After that run the DISM scan, which repairs the Windows image. To run these scans, follow the steps given below:
- Press the Windows + R keys to open the Run utility.
- Type cmd and press the Ctrl + Shift + Enter keys to open an elevated Command Prompt.
- Now, copy-paste the following commands and press the Enter key to initiate it:
sfc /scannow
- It will take a significant amount of time to finish scanning. Make sure you do this while you have time in your hands. Do not close the scan before it finishes.
- After the scan finishes, restart your PC.
- Once the PC restarts, open the elevated Command Prompt again.
- Type the following commands and press Enter after finishing each one:
a) Dism /Online /Cleanup-Image /CheckHealth
b) Dism /Online /Cleanup-Image /ScanHealth
c) Dism /Online /Cleanup-Image /RestoreHealth - After the scan finishes, restart your PC again.
Solution 6: Run An Antivirus Scan
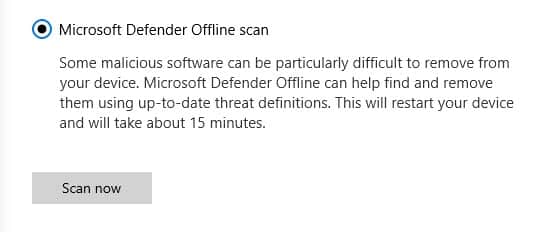
This error can also be triggered by virus or malware infections. Run an antivirus scan just to be safe. If you don’t have any good 3rd party antiviruses, run the Microsoft Offline Defender Scan. To do it, follow the steps given below:
- Type Windows Security and open the top result.
- Click on the Virus and Threat protection option.
- Select the Scan options below the Current Threats section.
- Check the Microsoft Defender Offline scan box and click on Start scan.
- Wait for the Scan to finish. It will take a long to finish, and it will restart your PC automatically after the scan finishes.
Solution 7: Disable Integrated Graphics
Does your PC use both integrated and dedicated graphics? If yes, disable the integrated graphics driver and see whether it fixes this error. To disable integrated graphics driver, follow the steps given below:
- Right-click on the Start Menu.
- Select the Device Manager option from the pop-up menu. Device Manager will open.
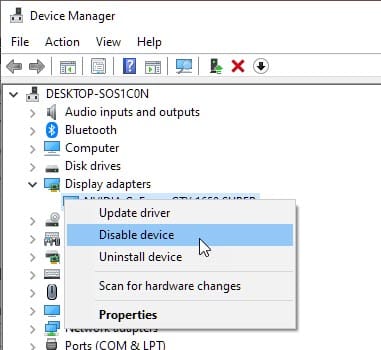
- Expand the Display Adapters and right-click on the integrated graphics driver.
- Select the Disable Device option.
- Confirm the decision on the pop-up prompt.
- Restart your PC.
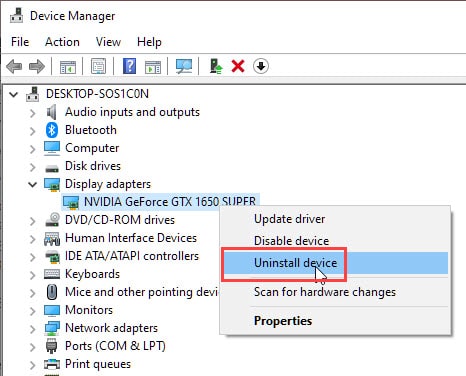
Check if the error persists. If no, then the issue was triggered by conflicts between the dedicated and integrated graphics. Rather than keeping the integrated graphics driver disabled, uninstall it. To uninstall the graphics driver, follow the steps given below:
- Right-click on the Start Menu.
- Select the Device Manager option from the pop-up menu. Device Manager will open.
- Expand the Display Adapters and right-click on the integrated graphics driver.
- Select the Uninstall Device option.
- Follow the on-screen instructions to complete the process.
Solution 8: Reset Your PC
If none of the above solutions work, try resetting your PC. To reset your PC, follow the steps given below:
- Press the Windows + I keys to open the Settings app.
- Click on the Update and Security option.
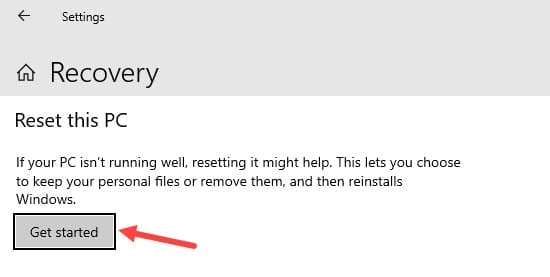
- Select the Recovery option from the left panel.
- Click on the Get started option in the Reset this PC section.
- Follow the on-screen instructions to complete the process.
Wrapping Up
So, there you have it. Now you know how to fix the error Explorer.exe Element not found in Windows 10. If you have any questions regarding this topic, ask them in the comment section below.

Leave a Reply