This article has been updated to stay relevant for Windows 11 and 10 users.
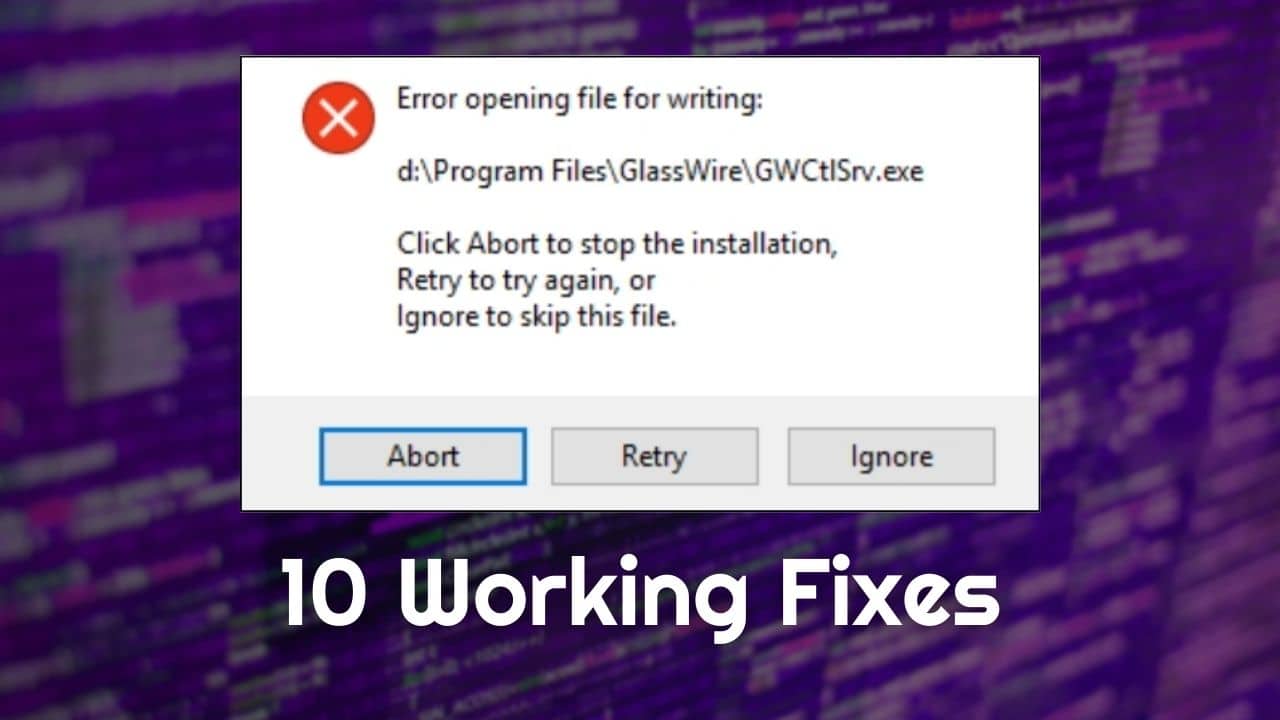
Errors that appear during installation are surely the worst kind. The error opening file for writing has been reported by many users for a long time, and it appears while trying to install certain applications.
This error mainly appears for writing MSI Afterburner, Steam, vcredist_x86.exe, VLC, and some other commonly used applications.
Here we have discussed how to solve this error, so keep reading!
Why You Cannot Open File For Writing?
Contents
As per reports, this error is most common when setup files lack the required permissions as the setup file can’t open the file to write.
But, there can be other causes for this error, such as:
- If the installation file is not compatible with your system, then it can cause such an error.
- The antivirus is known to stop files from writing that it considers a threat to the computer, including installation files. Thus, the antivirus can be responsible for the error while opening the file.
- The installation file itself can be corrupted causing this error.
- If the installation process of the file is already running in the background and you try to start the installation again, then this error can get triggered.
- Problems in registry or excess of junk files in the computer can also cause this error.
How To Fix Error Opening File For Writing
This error can be fixed with the following solutions. So, perform all of them and see which one solves it for you.
Solution 1: Close All Background Installation Processes
If one installation is already in process in the background and you are trying to start another installation, then this error can get triggered.
To ensure there are no installation processes in the background, follow the steps given below:
- Press Ctrl + Shift + Esc keys on your keyboard to open the Task Manager.
- Select the Processes tab, and check if any installation process is running.
If yes, then right-click on it and click on the End task option.
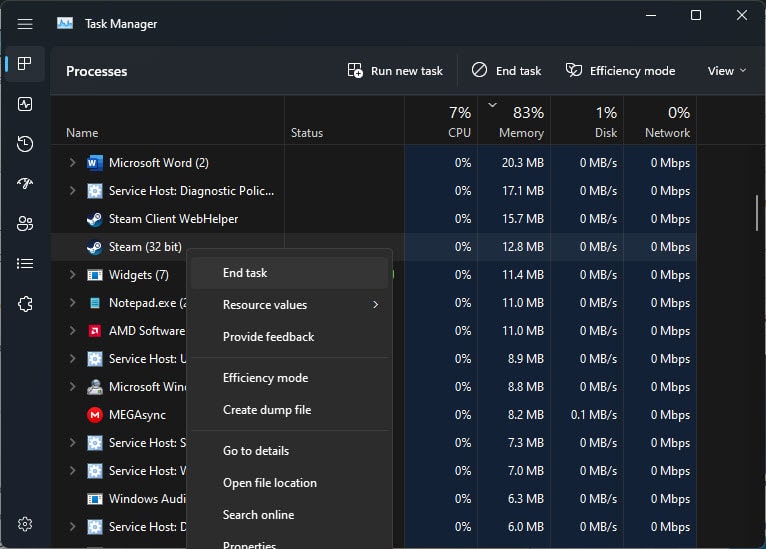
Try installing the file again. This solution should fix the problem if it was caused by another installation in the background.
Solution 2: Delete Junk files
If your computer has excess junk files, then it can cause this type of installation errors.
Fortunately, there are some in-built junk file cleaners in your Windows like the Storage sense and the Disk cleanup tool, which can be used to delete the junk files present in your computer.
After the junk files are removed, try to install the application again and check if the error persists.
Solution 3: Run The Compatibility Troubleshooter
If the installer file is incompatible with your Windows, then the installer can’t open the file to write and thus trigger this error.
Fortunately, there is an in-built compatibility troubleshooter in Windows that you can use to check the file’s compatibility.
To run the compatibility troubleshooter, follow the steps given below:
- Locate the installer file of the application that is causing this error for you and right-click on it.
- Click on the Properties option from the pop-up menu.
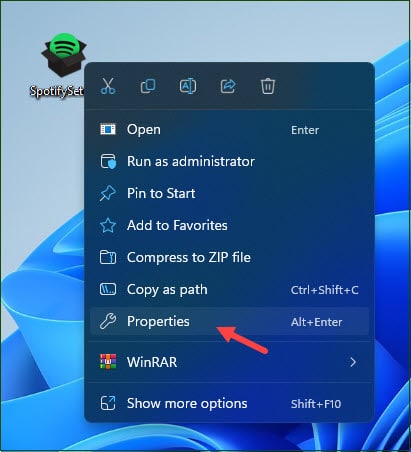
- Select the Compatibility tab and then click on the Run compatibility troubleshooter option.
- Select the Try recommended settings option and follow the instructions given by the wizard to run the compatibility troubleshooter.
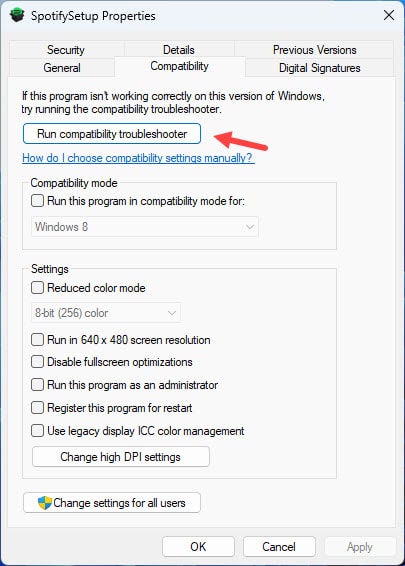
Try to install the file again and check if the installer is facing the same error.
Solution 4: Run The Installer With Administrative Rights
This error mostly happens if the installer doesn’t have the required permissions to install the file. Running the installer as an administrator can fix the problem.
Here is how you can do it:
- First, locate the installer in your computer and right-click on it.
- Select the Run as administrator option.
- The application will now install while having administrator rights.
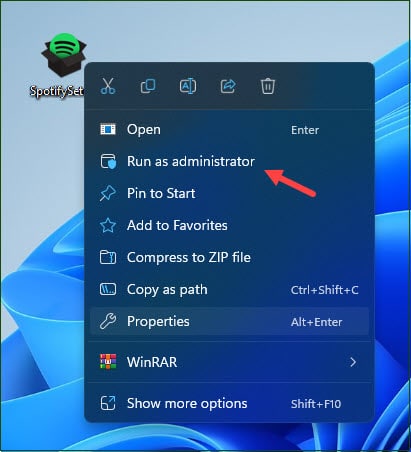
If the error doesn’t arise again, then you will have to open this program each time in administrator mode to work around this problem or you can give this application permanent administrative rights.
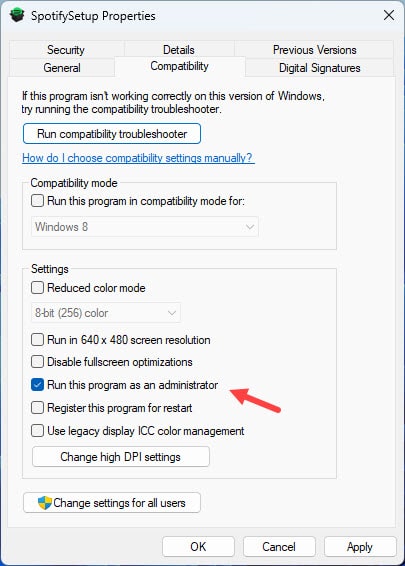
To set the application to run as administrator whenever you open it, follow the steps given below:
- Locate the application on your computer and right-click on it.
- Click on the Properties options from the pop-up menu.

- Select the Compatibility tab and then select the Run this program as an administrator box.
- Finally, click on Apply and then OK to save the changes.
Solution 5: Change Security Permissions
If running the installer as an administrator didn’t work, the check if you are signed in as a regular user account.
Regular users are not allowed to install applications if denied by the administrator. So, they can face this error when they try to install the application.
You can try changing the security permissions to allow the installer to function. To change the security permissions, follow the steps given below:
- Right-click on the application and select Properties.
- Next, select the Security tab and then click on the Edit option.
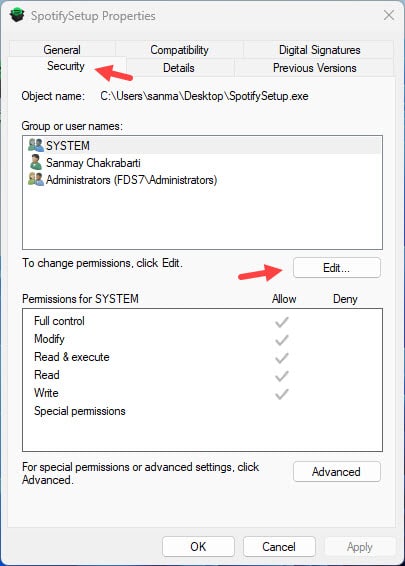
- Click on your account username in the Group or user names section.
- In the Permissions for Users section, locate the Write option and then check the box in the Allow section.
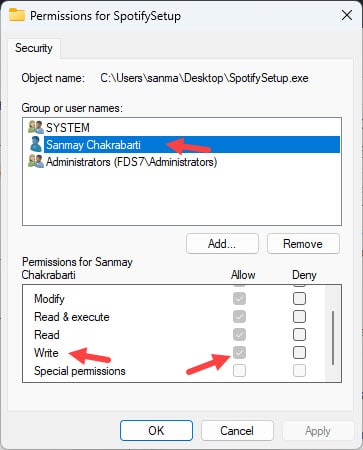
- Finally, click on Apply and OK to save the changes.
By changing the security permissions, you should now be able to install the program without triggering the error during the installation.
Solution 6: Change Advanced Security Permissions
If changing the security permissions didn’t fix this error, then try changing the Advanced security permissions.
To change the Advanced security permissions, follow the steps given below:
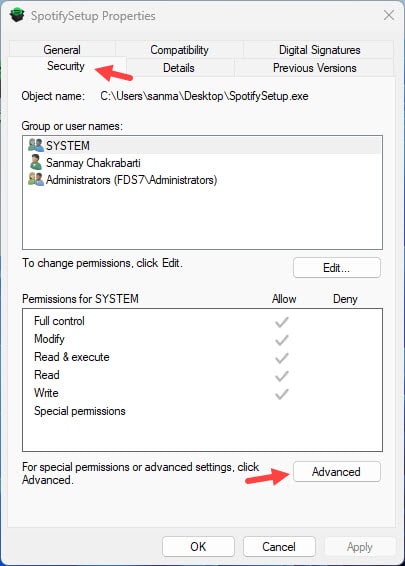
- Follow Solution 5 and open the Security tab.
- Next, click on the Advanced option.
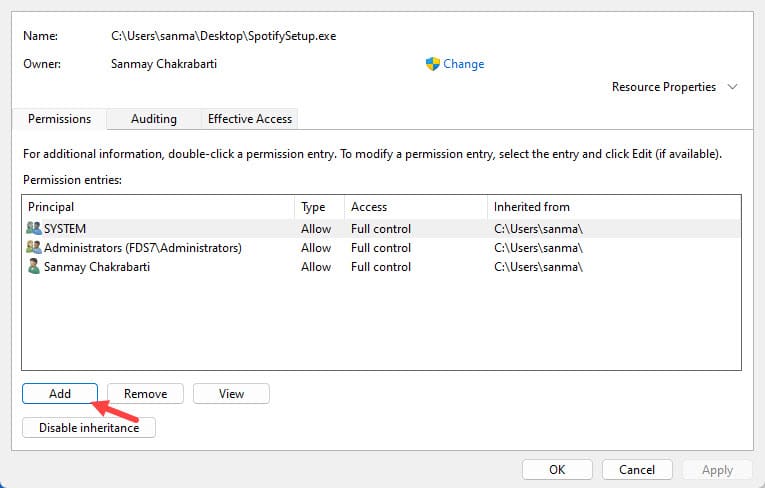
- Click on the Add option and click on the Select a principal option.
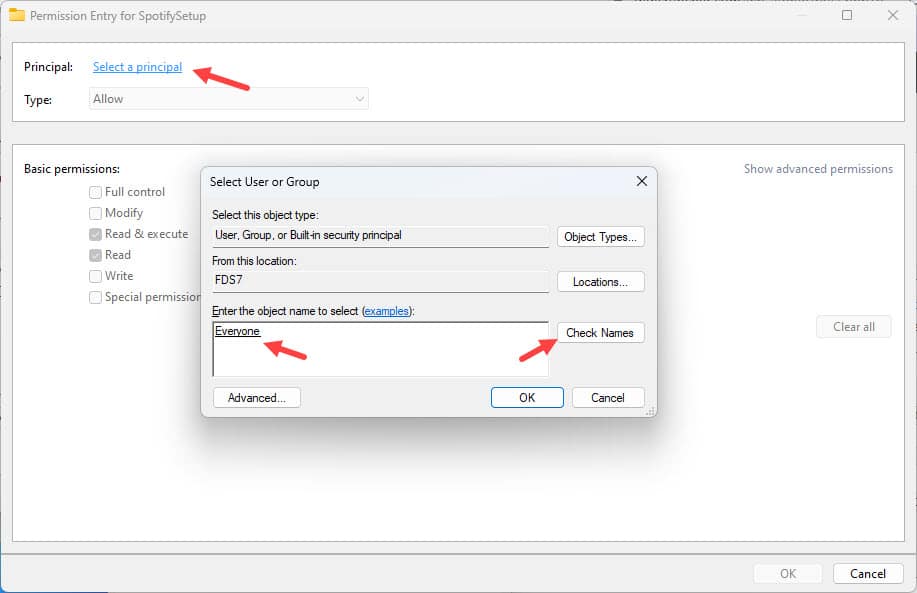
- Type Everyone in the Enter the object name to select (examples) section and then click on the Check Names option. Click OK to save the changes.
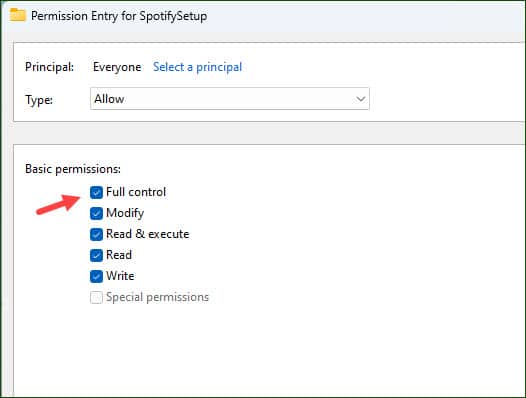
- In the Basic permissions section, check the Full control box and click on OK to save the changes.
- Now, from the Permission entries list, locate the Everyone element and select it.
Now, you should be able to install the application without triggering the error opening file for writing during the installation.
Solution 7: Create New User As Administrator
If you don’t want to change the security permissions, then try creating a new user account as an administrator and then install this application there.
To create a new user account as an administrator, follow the steps given below:
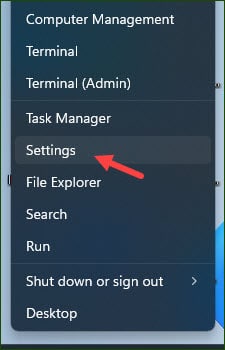
- Right-click on the Windows start button and then click on the Settings option from the pop-up menu.
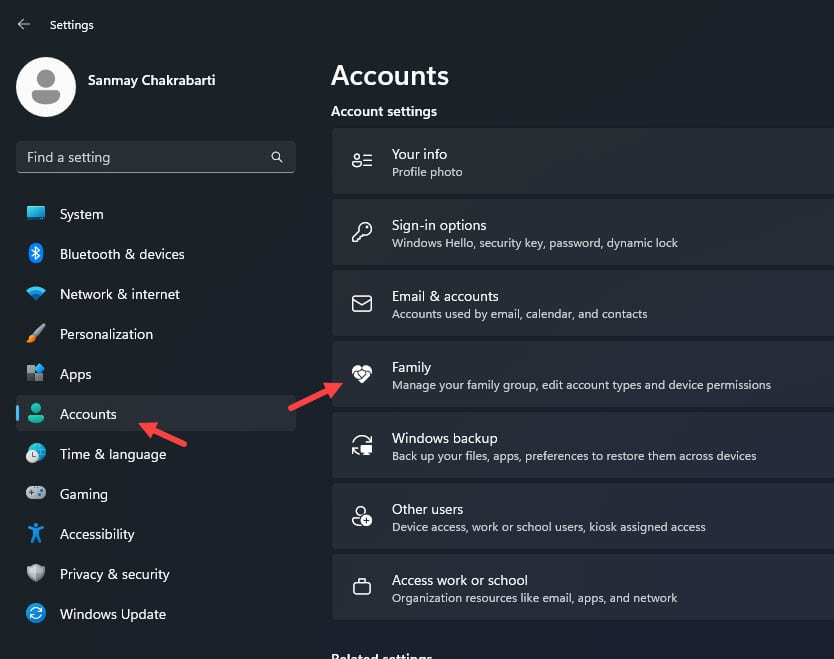
- Locate the Accounts option and open it.
- Now, select the Family & other users option (only Family for Windows 11).
- Then scroll down and click on the Add someone else to this PC (or only Add Someone for Window 11) option.

- Click on the I don’t have this person’s sign-in information option.
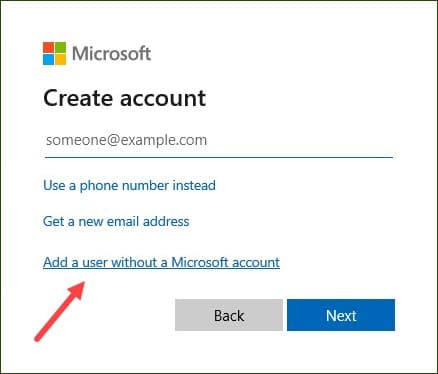
- Next, click on the Add a user without a Microsoft account option. You will have to use another Microsoft account in Windows 11.
- Now, enter the name and the password of the user account and then click on Next.
This should create your new user account and you will be able to see it in the Other users section. - Select the user account you just created and click on the Change account type option.
- Now, click on the Account type menu and select the Administrator option from the drop-down list.
Click Ok to save the changes. - Now, sign out of your current account and log in to your new user account.
Once you have switched to the new user, try installing the program and check if the setup still cannot open file for writing.
Solution 8: Disable Your Antivirus
Antiviruses are known instigators when it comes to stopping other files from opening or stopping installers.
Though the antivirus will only target those that it considers threatening to your PC, but sometimes what they consider and what the reality is can differ.
If your Antivirus is stopping the installation of the program, then disabling the antivirus should fix the problem.
To disable Windows Defender, follow the steps given below:
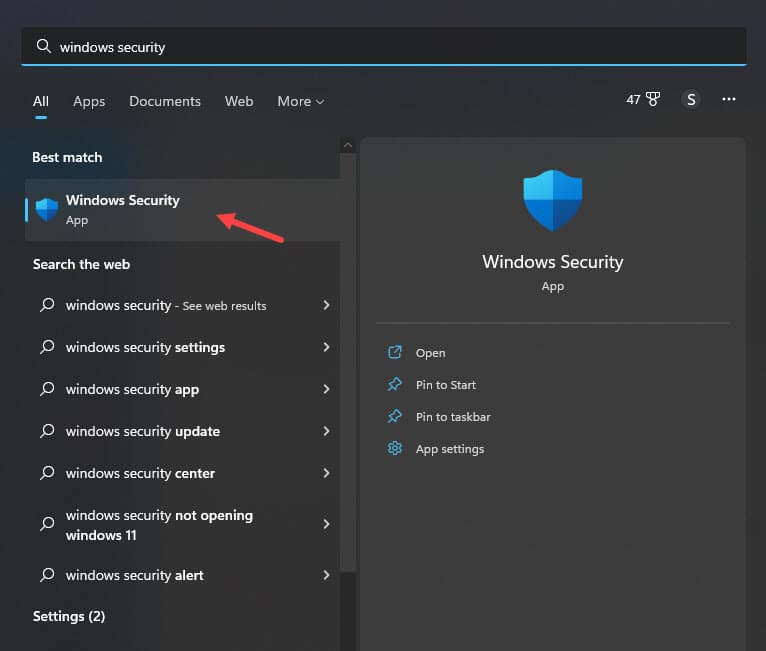
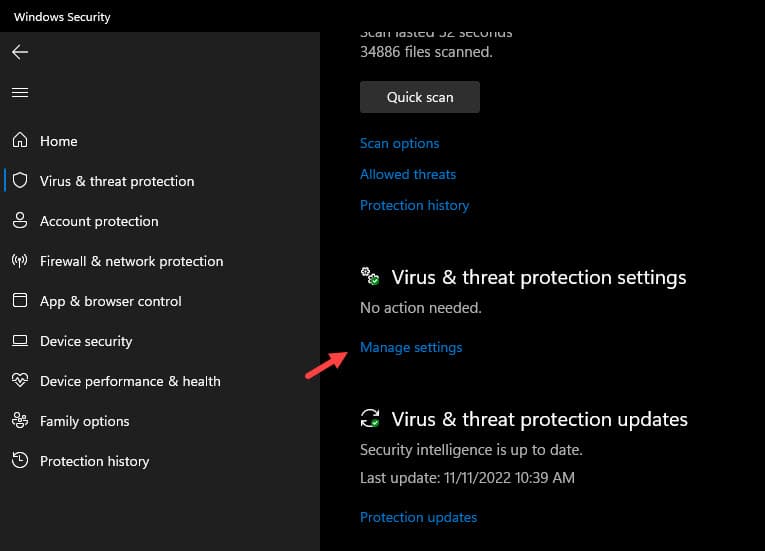
- Type Windows Security in the Windows search bar and select the top option.
- Select the Virus and Threat protection option and then click on the Manage settings option under the Virus and threat protection settings.
- Disable the Real-time Protection toggle to disable Windows Defender.
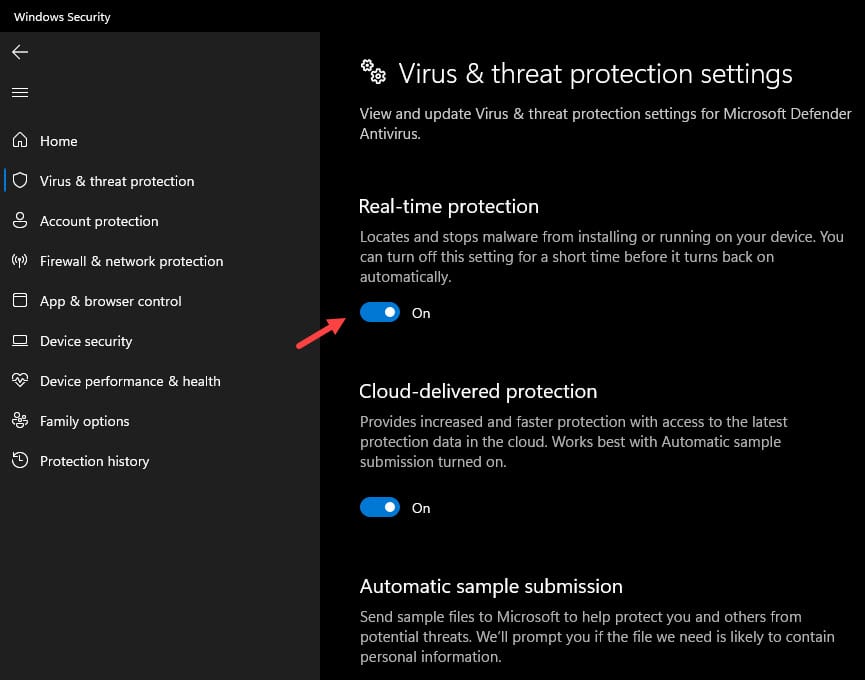
Once the antivirus is disabled, try installing the program and check if the problem arises again.
If the problem still arises, then follow the above steps again to turn on Real-time protection, as the error is most likely not caused by the antivirus.
Solution 9: Disable The User Account Control Feature
Whenever there is a system related change that requires administrator privileges, the User Account Control notifies you about the change.
This feature was included as a way to protect the user, but it is also reported by many users as the cause of this error.
Disabling User Account Control can fix this error. Here is how you can disable it:
- Type Change User Account Control settings in the Windows search bar and select the top option.
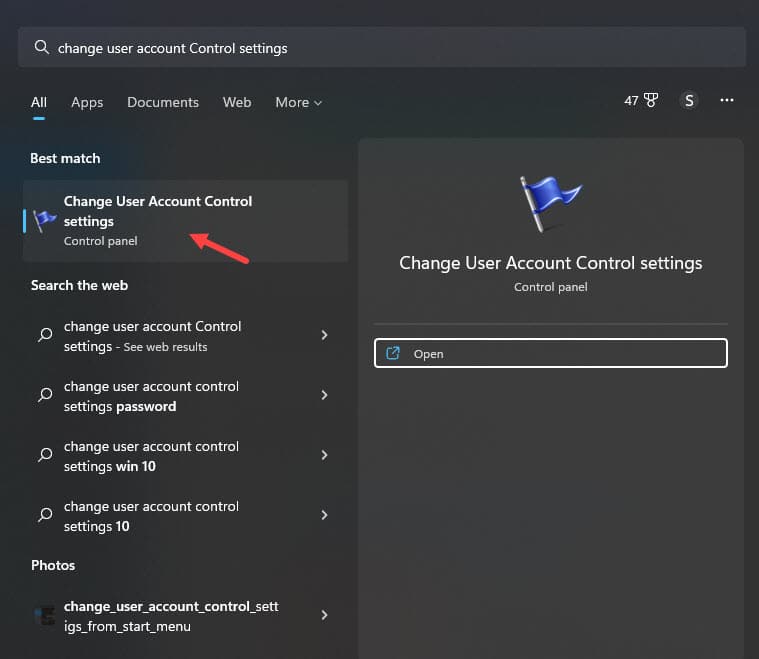
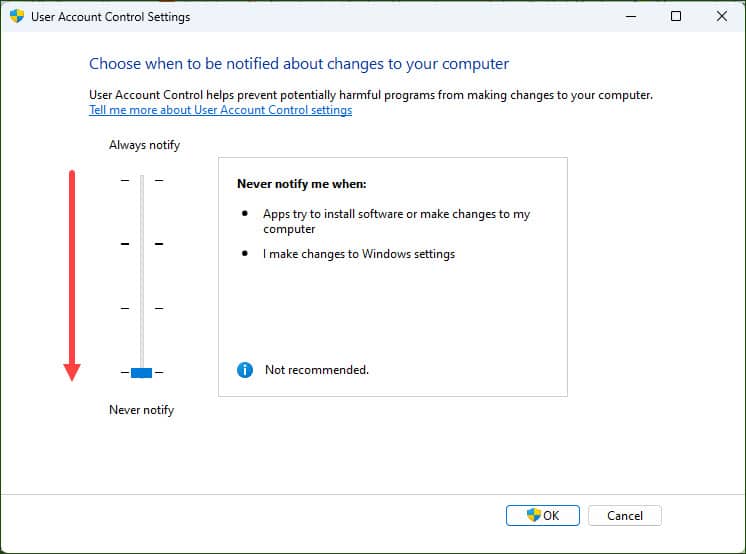
- You will notice a slider on the left side of your screen. Drag that slider down until it says Never notify.
- Finally, click on OK to save the changes.
Solution 10: Delete The Installer And Download It Again
If none of the above solutions worked for you, then the installer file itself may be corrupt. In this scenario, locate the installer file and delete it completely from your computer.
Now, download the installer of the program again from the official website and then try to install the program.
Wrapping Up
So, now you know what to do if you face the error opening file for writing during the installation of any program.
The above solutions should help you fix this issue so read and execute them carefully. And as always, feel free to share your thoughts on this article in the comment section below.
Leave a Reply