Is your mouse scroll speed too slow or too fast? Windows tries to keep the scroll speed consistent, but the default scroll speed may vary among different manufacturers. This creates a difference in experience if you shift to a new mouse and that can be very annoying.

To fine tune the scrolling experience with your new mouse, you can change the mouse scroll speed in Windows 10. In this article, we have discussed how to change scroll speed easily so that you don’t continue to face this issue.
Also, check out this article on what to do when mouse starts clicking on its own.
How To Change Scroll Speed Of Mouse?
Contents
It’s important to finetune the mouse scroll speed for the optimal experience. By default, Windows 10 sets the scroll speed to 3. You can change it either from the Settings app or the Control panel. We have shown both the ways below, so use the one you find easier.
Method 1: Change Scroll Speed From Control Panel
To change the mouse scroll speed from the Settings app, follow the steps given below:
- Press the Windows key and type Settings in the search bar. Select the top option of the search result.
- After the Settings app opens, select the Devices option.
- Next, select the Mouse option.
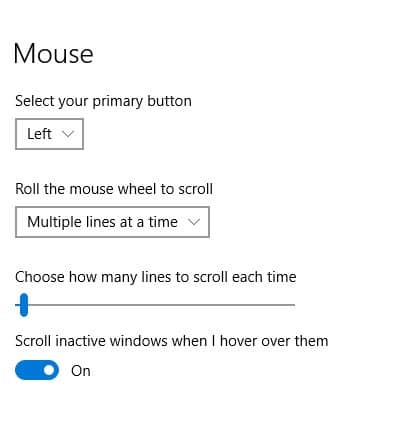
- Now, move the slider to change the mouse scroll speed.

If your mouse wheel scrolls too fast in Windows 10, then move the slider to the left. When you move the slider, you will see numbers given on top of it. As mentioned before, 3 is the default in Windows 10, so change it keeping that in mind.
You can also set the mouse to scroll one screen at a time rather than multiple lines. To do it, click on the Roll the mouse wheel to scroll option and select One screen at a time. This feature will help those users that prefer to scroll through screens at a time.
Method 2: Change Scroll Speed From Control Panel
You can also use the control panel for changing the scroll speed. To do it, follow the steps given below:
- Press the Windows key and type Control panel in the search bar. Select the appropriate option from the search result.
- After the Control panel opens, select the Hardware and Sound option.
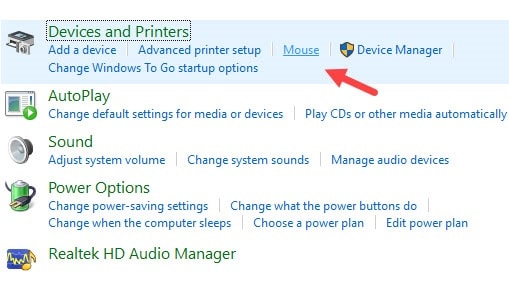
- Now, locate the Mouse option in the Device and Printers Mouse Properties will open on your screen.

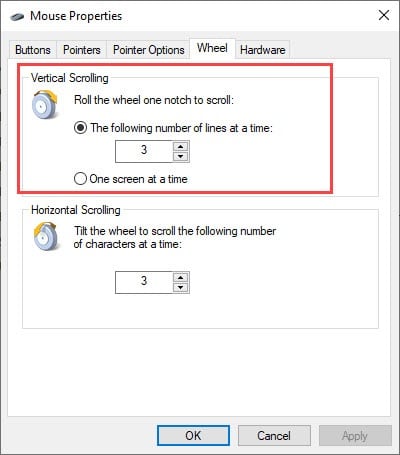
- Select the Wheel tab in the Mouse Properties.
- In the Vertical Scrolling section, change the number in The following number of lines at a time: section to change the scroll speed. Or you can select the One screen at a time option.

You will notice the Horizontal Scrolling option here. This option is not present in the Settings app. The Horizontal Scrolling option is only relevant for those users that have tilted mouse wheels.
Tilted mouse wheels can scroll horizontally in larger pages. If you have a tilted mouse wheel and you want to change the horizontal scroll speed, then this is the option you would have to use.
Wrapping Up
So, there you have it. Now you know how to change scroll speed of your mouse in Windows 10. Remember that the default scroll speed set by Windows is 3, so if you changed the scroll speed too much and want to change it to default, just set it to 3. If you have any questions related to this topic, then write them in the comment section below.
Leave a Reply