Have you grown tired of the default font in Windows 10? The same old looking letters and words can make your experience of Windows 10 dull. It is refreshing to change the system fonts once in a while. However, there is no option in Windows 10 GUI for changing the system font.
After Windows 7, the option to personalize the system font has been removed by Microsoft. But that won’t stop us from changing the system fonts. To change system font on Windows 10, a little modification in the registry is necessary.
In this article, we have discussed how to change system font by modifying the registry. As you would have to modify the registry, we advise that you take read the method below carefully before executing it. A slight mistake with the registry can cause serious problems.
You can also check out this article on what to do when Chrome tab’s font size becomes too small.
Change System Font On Windows 10
Contents
Before we proceed with the steps, we advise that you create a system restore point and backup your registry. In Windows 10 change system font by following the steps given below:
- Right-click on the Windows icon and select the Settings option from the pop-up menu.
- Click on the Personalization option.
- Next, select the Fonts option.
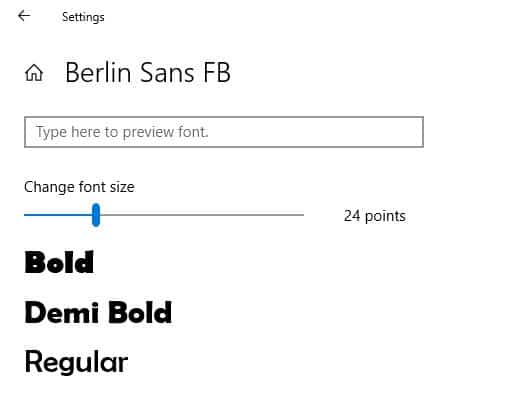
- Search for the font that you like the most and open it. Like we have chosen Berlin Sans FB.

- Press the Windows key and type Notepad in the search bar. When the Notepad option appears, click on it.
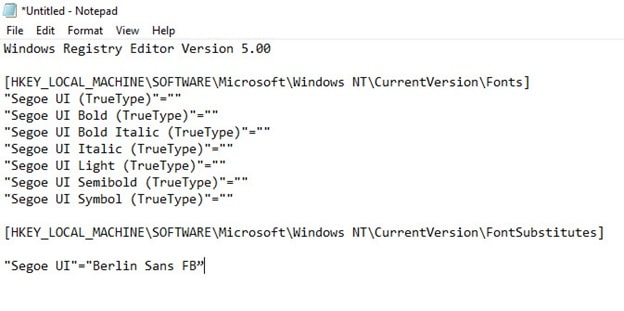
- Now, copy the code given below and paste it in the empty Notepad page.
Windows Registry Editor Version 5.00
[HKEY_LOCAL_MACHINE\SOFTWARE\Microsoft\Windows NT\CurrentVersion\Fonts]
“Segoe UI (TrueType)”=””
“Segoe UI Bold (TrueType)”=””
“Segoe UI Bold Italic (TrueType)”=””
“Segoe UI Italic (TrueType)”=””
“Segoe UI Light (TrueType)”=””
“Segoe UI Semibold (TrueType)”=””
“Segoe UI Symbol (TrueType)”=””
[HKEY_LOCAL_MACHINE\SOFTWARE\Microsoft\Windows NT\CurrentVersion\FontSubstitutes]“Segoe UI”=”ENTER-NEW-FONT-NAME“
In the last entry of the code, in place of ENTER-NEW-FONT-NAME, type the actual name of the font. For us, it would be “Segoe UI”=“Berlin Sans FB”

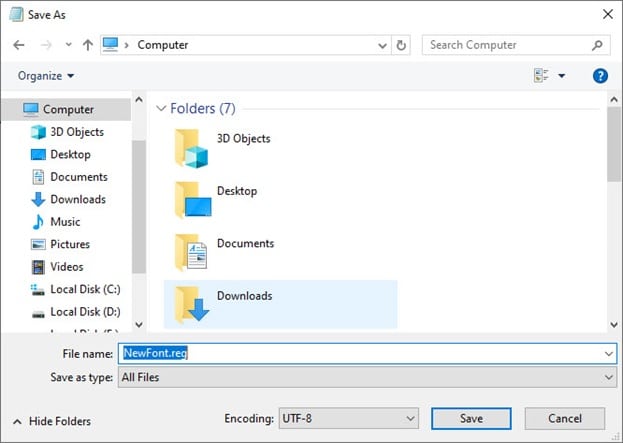
- Now, click on the File tab and select the Save As option.
- Write any name for the file but with the .reg extension and change the Save as type to All files.
- Click on the Save option.

- Now, navigate to the .reg file you just saved and right-click on it.
- Select the Merge option. Click on Yes and OK.

- Finally, restart the PC.
After the computer restarts the system font changer code will be applied. Everything from the message box to the taskbar and apps will have the new font.
If you want to revert to the old font, then you can use the system restore point you made earlier. Or follow the method given below to do it.
How To Revert To The Default System Font?
- Open Notepad again and copy-paste the code given below:
Windows Registry Editor Version 5.00
[HKEY_LOCAL_MACHINE\SOFTWARE\Microsoft\Windows NT\CurrentVersion\Fonts]
“Segoe UI (TrueType)”=”segoeui.ttf”
“Segoe UI Black (TrueType)”=”seguibl.ttf”
“Segoe UI Black Italic (TrueType)”=”seguibli.ttf”
“Segoe UI Bold (TrueType)”=”segoeuib.ttf”
“Segoe UI Bold Italic (TrueType)”=”segoeuiz.ttf”
“Segoe UI Emoji (TrueType)”=”seguiemj.ttf”
“Segoe UI Historic (TrueType)”=”seguihis.ttf”
“Segoe UI Italic (TrueType)”=”segoeuii.ttf”
“Segoe UI Light (TrueType)”=”segoeuil.ttf”
“Segoe UI Light Italic (TrueType)”=”seguili.ttf”
“Segoe UI Semibold (TrueType)”=”seguisb.ttf”
“Segoe UI Semibold Italic (TrueType)”=”seguisbi.ttf”
“Segoe UI Semilight (TrueType)”=”segoeuisl.ttf”
“Segoe UI Semilight Italic (TrueType)”=”seguisli.ttf”
“Segoe UI Symbol (TrueType)”=”seguisym.ttf”
“Segoe MDL2 Assets (TrueType)”=”segmdl2.ttf”
“Segoe Print (TrueType)”=”segoepr.ttf”
“Segoe Print Bold (TrueType)”=”segoeprb.ttf”
“Segoe Script (TrueType)”=”segoesc.ttf”
“Segoe Script Bold (TrueType)”=”segoescb.ttf”
[HKEY_LOCAL_MACHINE\SOFTWARE\Microsoft\Windows NT\CurrentVersion\FontSubstitutes]“Segoe UI”=-
- Save the file similar to the method used earlier, with .reg extension and Save as type to All files.
- Next, navigate the reg file and right-click on it.
- Select the Merge option and click on Yes and OK.
- Finally, restart the PC.
After the PC restarts, the system font should be back to the default one.
Wrapping Up
So, there you have it. Now you know how to change system font on Windows 10. Be extremely cautious while writing the codes given above, as even a slight mistake can be harmful to your PC. If you have any doubts or questions, then write it in the comment section.
Leave a Reply