Connecting to a VPN or Virtual Private Network is very important to keep our browsing activity private. With VPN, your connection is much more secure. VPN may be very important for your connection however sometimes it also becomes essential to disable it. So, how to disable the VPN?
We have found that many users have problems disabling the VPN connection on Windows 10. That’s why in this article, we have discussed how to disable VPN on Windows 10.
Also, check out this article on what to do when Private Internet Access can’t connect to the internet.
How To Disable VPN On Windows 10?
Contents
It’s quite easy to disable the VPN connection on Windows 10, just follow the steps given below and you shouldn’t face any problems. To turn off VPN, follow the steps given below:
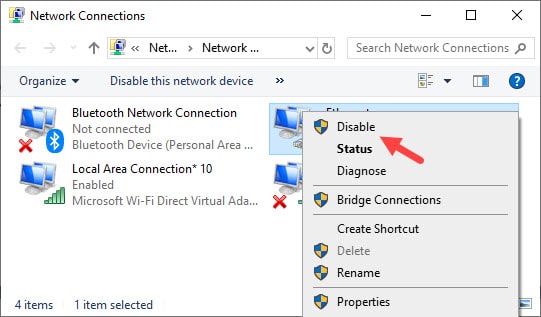
- In the Windows search bar, type View Network Connections and select the appropriate option.
The Network Connections panel will open on your screen. - Now, among the connections your VPN connection will also be present. Right-click on it.
- Select the Disable option from the pop-up menu.

- If any pop-up dialog appears on your screen, then select the Yes option.
After completing the above steps, your VPN will be disabled. This is how to turn off VPN on Windows 10.
How To Remove VPN On Windows 10?
From the above steps you can disable the VPN, but what if you want to remove it rather than disabling it? Don’t worry, we have you covered; you can follow the 3 methods given below to remove the VPN on Windows 10.
Method 1: Remove From The Settings App
The easiest way to remove VPN is by removing it from the Settings app. It’s easier this way as most users are familiar with the Settings app. To remove the VPN from the Settings app, follow the steps given below:
- Type Settings in the Windows search bar and select the appropriate option.
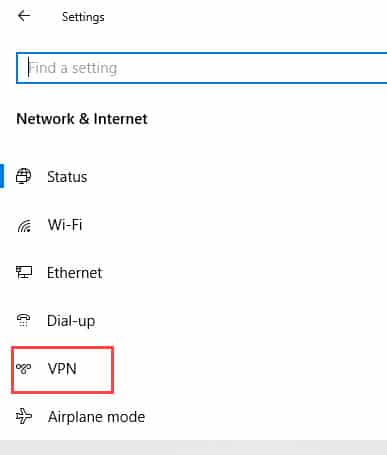
- Select the Network & Internet option.
- Click on the VPN option on the left panel.

- Now, you will see the name of the connected VPN below the Add a VPN connection option.
- Select the VPN and click on the Remove option.
- A pop-up dialog will open up to have your confirmation to remove the VPN. Click on the Remove option and the VPN will be removed.
Method 2: Remove It From The Network Connections
This is another easy way to remove the VPN.
- Open the Network Connections again as mentioned above.
- Right-click on the VPN connection again, but this time select the Delete option.
- If any pop-up dialog opens on your screen, then select the Yes option.
Method 3: Remove Using The Command Prompt
You can also use the Command Prompt to remove the VPN. To do it, follow the steps given below:
- Open the Run utility by pressing the Windows + R keys.
- Type cmd and press Ctrl + Shift + Enter to open an elevated Command Prompt.

- In the Command Prompt, type PowerShell Get-VpnConnection and press Enter.
All the details on the added VPN connections will be on your screen. - Now, type rasphone –R “Name of the VPN” and press Enter.
Example: rasphone –R “MPN”

Wrapping Up
So, there you have it. Now, you know how to disable VPN on Windows 10. The method given above should show you how to turn off VPN. Also, check out the methods given for removing the VPN. If you have any questions regarding this article, then write it in the comment section below.
that wont turn off vpn its always on another load of tripe