Twitch is a popular streaming website used by millions all over the world. With how much popularity Twitch streamers are getting nowadays, it’s no wonder new streamers are joining in regularly and taking it as a serious career option.

For new steamers on Twitch, it can be difficult to understand a few basic differences that Twitch has with the other streaming platforms like YouTube. In Twitch, the streams are not automatically saved for viewers to see after the stream goes offline.
Many new Twitch streamers have asked us “How To Save Streams On Twitch?”, that’s why in this article we are going discuss how to archive Twitch streams locally.
How To Save Streams On Twitch?
Contents
As mentioned above, we get a lot of questions like “Does Twitch automatically archive my broadcasts?” from new Twitch streamers. The answer might be shocking for you as in Twitch, past broadcasts aren’t saved by default.
This might seem dumb to you if you have streamed on other platforms like YouTube before moving to Twitch, but that’s how it is here. However, the settings can be changed so that you can archive videos on Twitch but only for a limited time.
Enable Video On Demand (VOD)
VOD or Video On Demand is basically the feature that archives your entire streams as videos for your viewers in Twitch. This feature is disabled for new streamers and you would have to enable it to save the streams.
To enable VOD, follow the steps given below:
- Click on this link and login to your Twitch account.
This feature is not present in the Twitch app, that’s why it’s important to log in directly to the Twitch website. - Click on your account on the upper right side of the screen and click on the Creator Dashboard option.
Your Twitch dashboard will open on your screen. - Next, click on the menu button (3 vertical bars) on the upper left side of your screen.
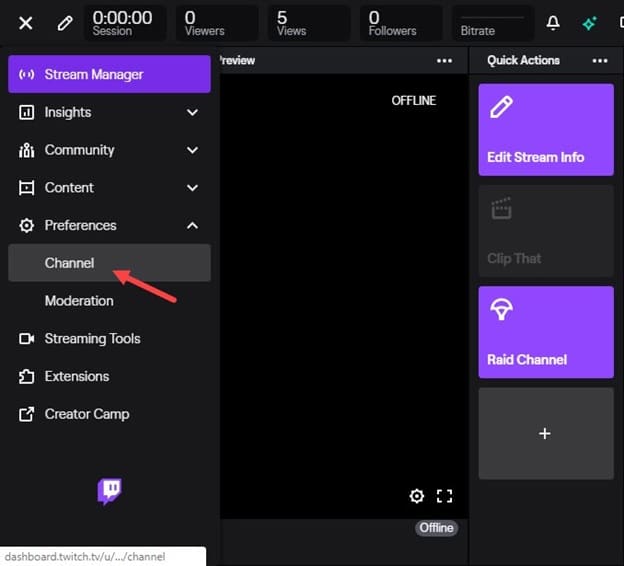
- Now, select the Preferences option and then click on the Channel option.
- Scroll down and locate the Store past broadcasts option and turn on the toggle.
All the changes made here will be auto-saved so you don’t need to worry about saving the options.
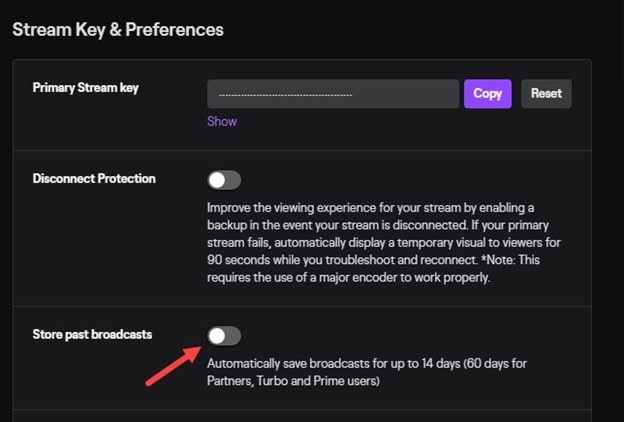
Now, your streams should be saved automatically after your stream goes offline. However, the streams will only be saved for 14 days if for a normal Twitch broadcaster. For both Twitch partners and Twitch Prime users, the video will be saved for 60 days.

Create Highlights From Your Streams
As mentioned above, your streams will only be archived for a limited time. But you can create further short highlights of your streams, which will be saved indefinitely for your viewers.
You can create highlights of your streams by following the steps given below:
- Open the Creator dashboard again after logging in to the Twitch website (follow the above steps).
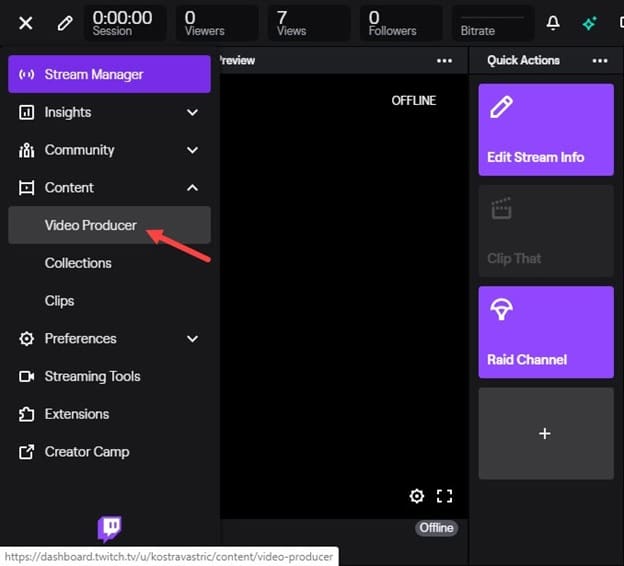
- Click on the menu button and then select the Content option.
- Next, click on the Video Producer option.
- Now, select the VOD you want to create highlights for and then click on the three vertical dots (menu icon) beside the VOD.
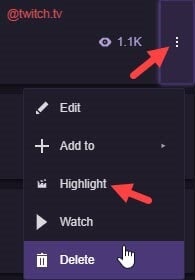
- Click on the Highlight option.
A page will load on your screen that will have the VOD and two markers. Put the markers at the start and end of the clip that you want to create and click on the Describe and Save option. - Next input the title, description and other necessary information of the highlight.
- Finally, click on the Create Highlights option.
If you want to create more highlights of the same VOD, then simply click on the New Highlight option located at the top and create another highlight. The highlight will remain forever unlike the VOD unless you delete it.
Delete Highlights And VODs
Now that you know how to save VODs and create highlights, you might wonder how to delete them. To delete both the archive videos on Twitch (VOD) as well as the highlights, follow the steps given below:
- Click on the menu button in the Creator Dashboard.
- Open the Video producer again.
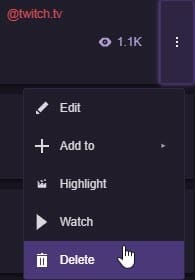
- Click on the three-dot expansion icon on the VOD or highlight that you want to delete, then click on the Delete option.
Wrapping Up
So, we have come to the end of this article and now you know how to save streams on Twitch. Remember that the VODs will only be uploaded for a limited time where the highlights will remain indefinitely. So, use the highlights correctly to gain a greater audience on Twitch. As always, feel free to share your views on this article in the comment section below.
Leave a Reply