The simple note-taking application, Notepad has been used included in Windows since Windows 1.0 in 1985. It was introduced for providing basic functionalities. However, Notepad is mainly used for writing and editing codes by programmers.
Notepad has always been one of the core features of Windows, which is why it was not possible to uninstall it. But after the 2004 (20H1) version update of Windows 10, Notepad has become an optional feature. This means that now you can uninstall Notepad easily.
In this article, we have discussed how to uninstall Notepad and also how to reinstall Notepad in Windows 10.
You may also like to check out this article on what to do when you can’t edit word document.
How To Uninstall Notepad?
Contents
Uninstalling Notepad has become very simple since the 2004 version update of Windows 10. To do it, follow the steps given below:
- Type Settings in the Windows search bar and select the appropriate option.
- Locate and select the Apps option.
- Click on the Apps and features option.
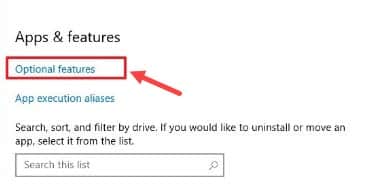
- In the Apps and features section, click on the Optional features option.

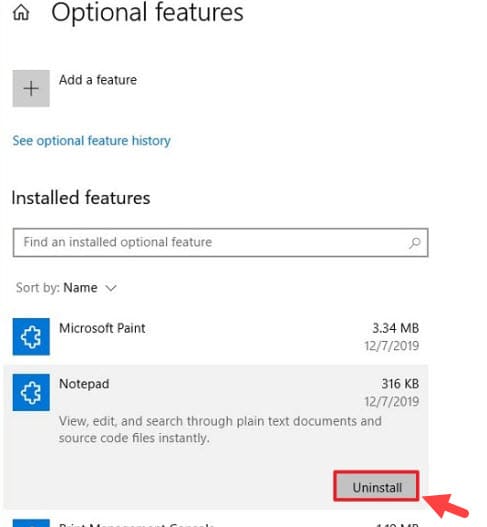
- Find and click on Notepad and select the Uninstall option.

- Follow the instructions on your screen to uninstall the computer.
- After Notepad uninstalls, restart your computer.
Reinstall Notepad In Windows 10
After uninstalling Notepad, you can reinstall it again. To reinstall Notepad, follow the steps given below:
- Open the Apps and Features again and select the Optional features option.
- Click on the Add a feature option.
- Select the Notepad and click on the Install option.
Now, Notepad will be back on your Windows 10.
Wrapping Up
So, there you have it. Now you know what to do if you want to uninstall Notepad from your computer. Feel free to share your thoughts on this article in the comment section below.
Leave a Reply