
The inaccessible boot device strike fear into the hearts of even the most experienced Windows users.
You can face this error message when you start up the computer, and it will prevent your System from booting up properly.
Here, we will explore the common causes of this error and provide you with the solutions.
This guide should help you tackle the inaccessible boot device error confidently. So, keep reading.
What does “Inaccessible Boot Device” Means?
Contents
The “Inaccessible Boot Device” error is a common Windows error message that generally appears when your PC or laptop encounters a problem during startup, thereby preventing it from booting up properly.
This blue screen of death (BSOD) error stops Windows from booting properly, and it generally means Windows failed to access the system partition while starting.
What Causes The “Inaccessible Boot Device” Error In Windows 11?
This error occurs when Windows cannot identify and boot from your boot drive.
It happens due to many reasons, and the common ones are listed below:
- Malware
- Loose Cables or Connections
- Corrupted Programs
- Physical Damage
- Unsuccessful OS Upgradation
- Drive Failure
- Faulty Driver
- Power Failure
- Bad Sectors
- Corrupted Boot Structure
- Drive Letter Change For The Boot Drive
- Failing SATA/NVMe Ports
How Can I Fix “Inaccessible Boot Device” In Windows 11?
Perform the fixes mentioned below to fix this BSOD error on your Windows 11 system.
These fixes will help in protecting your System from failing.
Fortunately, there are plenty of ways to diagnose and fix the inaccessible error in Windows 11.
1) Perform Startup Repair
A startup repair helps in diagnosing and fixing the issue that prevents a computer from starting up properly.
When your computer encounters a problem during the boot process, it prevents your System from starting up.
Therefore, by using the startup repair option, you can potentially fix the issue that causes the boot device error and keeps your computer going without losing important data or programs.
This is how you can perform a Startup repair:
- Use any bootable device for booting your PC.
- After the Windows logo is displayed, select “Repair your computer.”
- The following action will lead to the “Advanced Startup Recovery” menu.
- Select “Troubleshoot” for the menu.
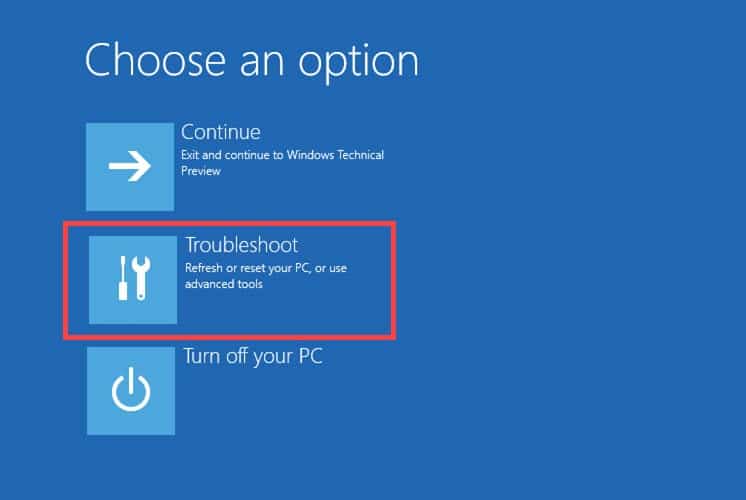
- Select “Advance Options” followed by “Startup Repair.”
Allow the window to finish the repairing process, and then restart your PC. If Windows does not boot into Windows normally, perform rest of the troubleshooting steps entering into safe mode.
2) Enable Safe Mode
Enabling Safe Mode prevents non-essential applications and services from starting up.
This, in turn, will be helpful in identifying and resolving issues that may be caused by problematic software.
Overall, enabling Safe Mode will help in isolating and resolving issues with your device.
This is how to enable Safe Mode:
- Follow the first method for opening the “Advance Startup Recovery Menu.”
- Select the “Troubleshoot” option.
- Next, select “Advanced options” followed by “Startup Settings” and the “Restart” option.
- In order to enter Safe Mode with the networking option, press the F5 key on your keyboard.
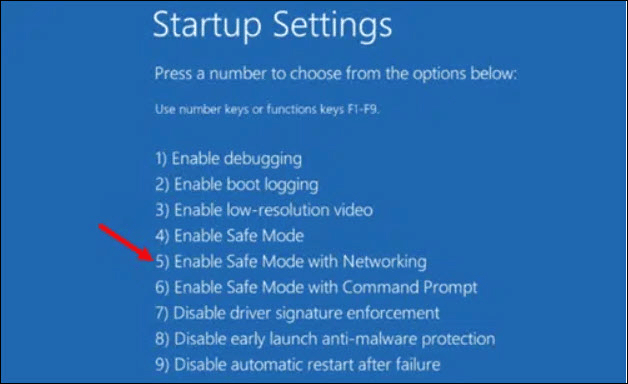
Once you enter Windows Safe Mode, perform the rest of the methods to fix the BSOD error.
3) Enable Secure Boot
BIOS is different for each PC. The general BIOS keys are F1, F2, F9, and F10, but they differ for each motherboard.
If you are unaware of the BIOS key, then check the manufacturer’s manual.
This is how you can perform a Safe Boot on Windows 11 device:
- Go to Advanced Startup Recovery Menu following the first method and select Troubleshoot.
- Next, select Advanced Options followed by UEFI Firmware Settings.
- Then click on Restart.

- This whole process will help you to enter the BIOS Settings.
- Then select Boot, System Configuration, or Security option.
Note: This step will entirely depend upon your BIOS settings.
- Now select the BIOS tab.
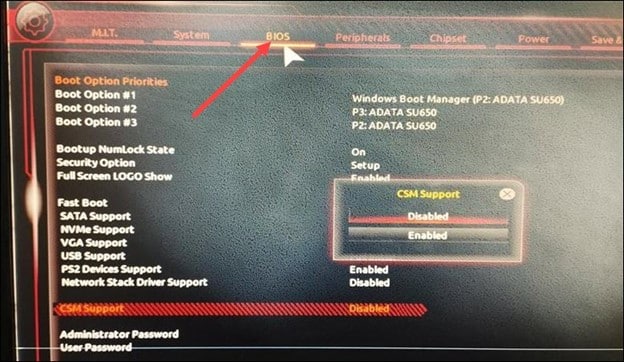
- Next, select the Secure Boot option.
- If you can’t find the Secure Boot option, click on CSM Support and disable the option.
- Next, search for the Secure Boot option.
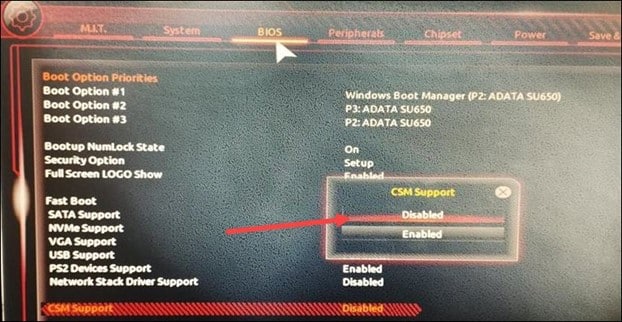
- To enable the option, press the Enter key.
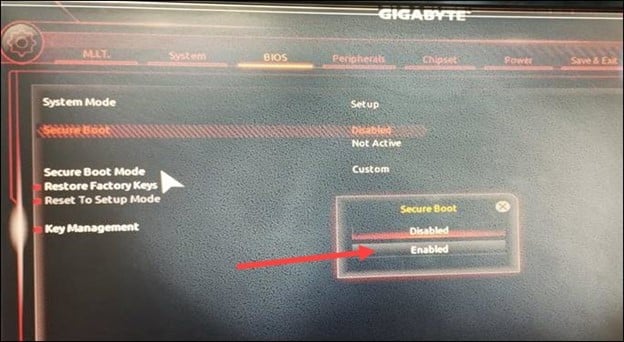
- If you find the option is disabled, then set the Administrator or Supervisor password.
- Go to the Security tab & enter the Administrator password.
- You will need this administrator password whenever you boot into BIOS, so make a note of it.
- Now you are eligible to enable Secure Boot.
- You need to Press the F10 button on your keyboard and then press Enter.
- Doing this will save the changes and help to exit the window.
- Now, boot into Windows 11 and press the Windows key.
- Enter System and select System Information from the options.
- From the System Summary tab, search for Secure Boot State.
- If you see it is ‘on,’ you have successfully enabled the Secure Boot.
Once done with the above steps, check for the error. If it persists, check the boot device for damage.
4) Check The Boot Device For Damage
Check for loose connections before going to further fixes.
You need to take out the drive, clean the pins and then reinsert it.
Make sure you are connecting the SATA/IDE cable properly.
If you come across any damage, then it should be immediately checked by taking it to the nearby hardware store.
Get yourself a new device in order to replace the damaged one.
But if it isn’t damaged, then update or reinstall drivers.
5) Update Drivers
Due to an outdated driver, you can also get this BSOD error. To fix it, update the system driver, and this can fix the issue.
Here is how you can do it:
- Open Device Manager & right-click on the device that is causing the problem.
Or check for a yellow-colored exclamation mark beside the devices and right-click on them.
- Now, choose the “Update Driver” option.

- Click on the “Search automatically for drivers” in the next window.
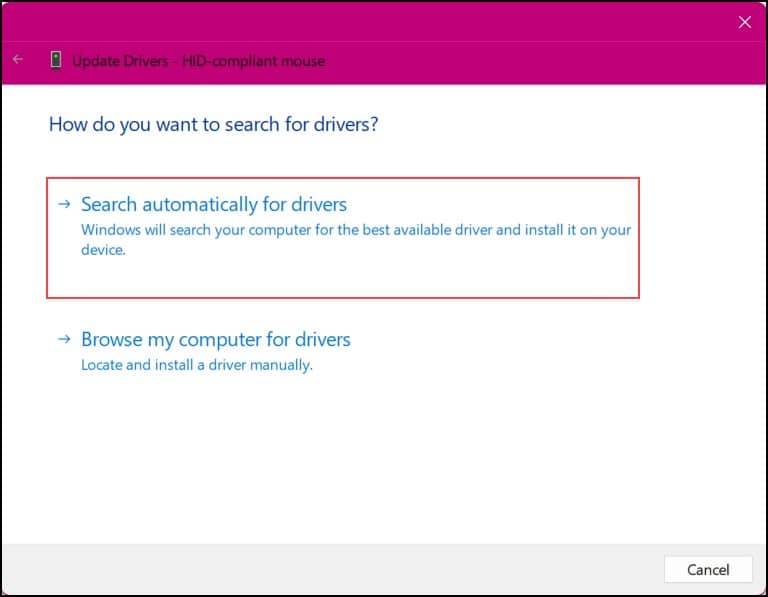
- Windows will search for & download the latest drivers for your device.
6) Run SFC Scan
SFC scan is useful for resolving issues with system files that can cause problems with stability and performance.
SFC scan helps in preventing errors and crashes & improves the performance of your System and is, therefore, a valuable tool for diagnosing and repairing system file issues.
Here is how to do an SFC scan:
- Open the elevated Command Prompt window by right-clicking on it and by selecting the “Run as administrator” option.
- Now, type “sfc /scannow” and press Enter.
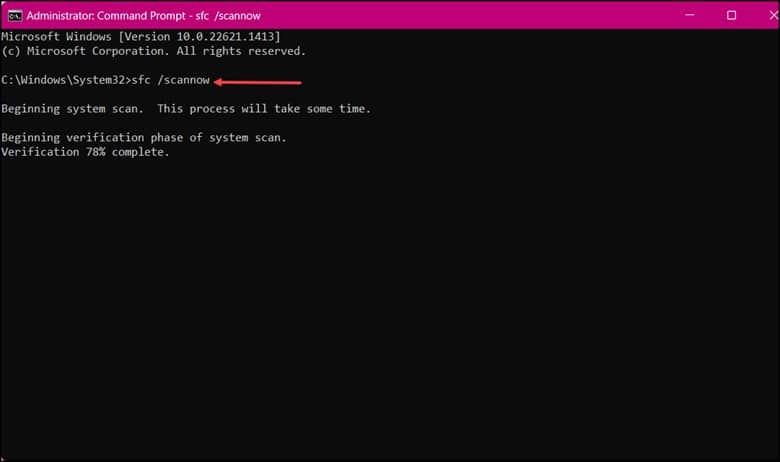
- Then, wait for Windows to scan and fix the integrity of your system files.
- Once done with the entire process, reboot your PC to see if the problem persists.
- If it does, then clear the clipboard.
7) Run DISM Scan
DISM scan can diagnose and repair corrupted Windows images that can be responsible for inaccessible boot devices.
So, after running an SFC scan, you can run a DISM scan to fix the problem.
Follow the steps to run DISM scan on your Windows 11 PC:
- First, type “cmd” and search for Command Prompt.
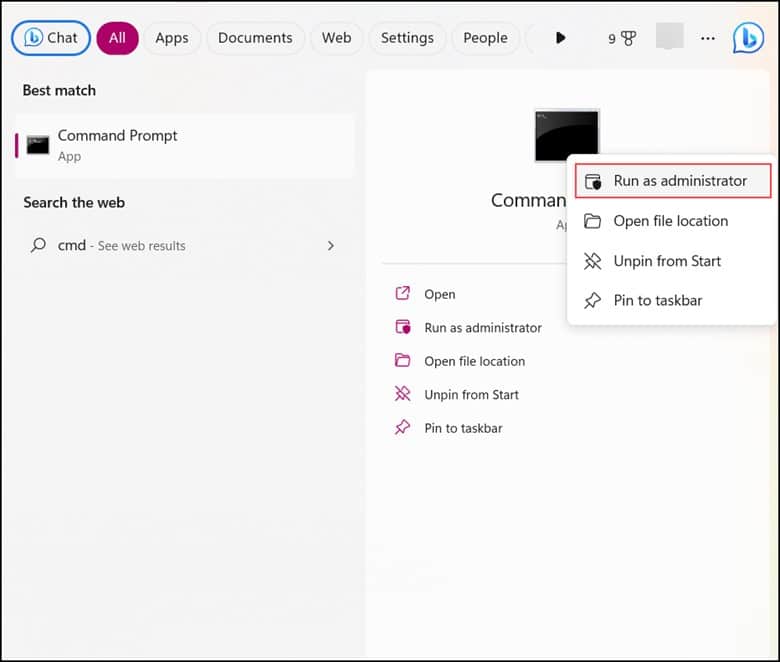
- Then click on “Run as administrator” by right-clicking on it.
- Now, in the elevated Command Prompt window, enter the following commands one after another. Then press Enter.
“DISM /Online /Cleanup-Image /CheckHealth”
“DISM /Online /Cleanup-Image /ScanHealth”
“DISM /Online /Cleanup-Image /RestoreHealth”
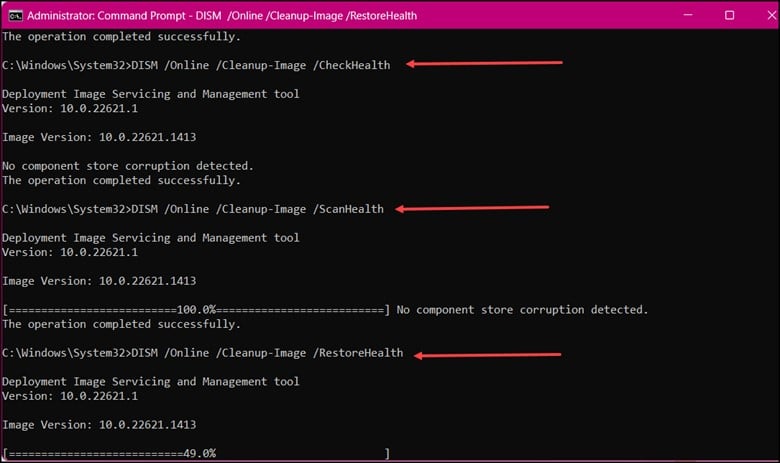
- Restart your device & check for the error message.
If the DISM scan couldn’t be of any help, then run the CHKDSK scan.
8) Run CHKDSK Scan
A CHKDSK scan is a valuable tool for maintaining the health and performance of your hard drive and also preventing issues that occurs while booting the device.
Running a CHKDSK scan periodically will ensure that your hard drive is in good working condition.
Follow the steps to run a CHKDSK scan:
- Open an elevated Command Prompt window and copy & paste the following command: “CHKDSK C: /f/r/x”
- Then press Enter.
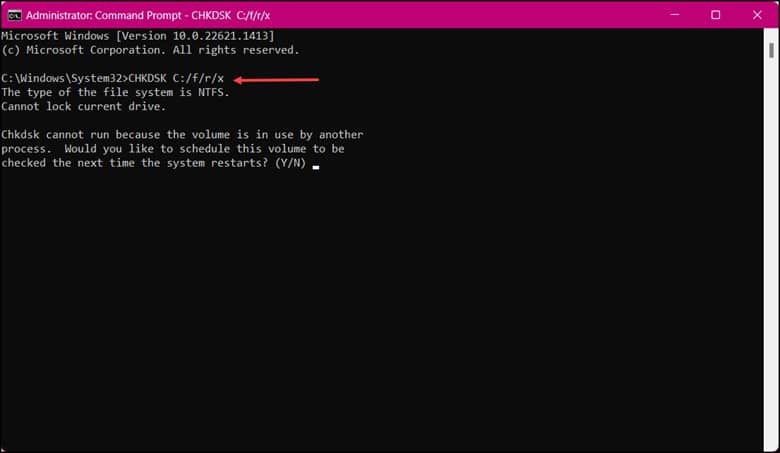
- Since your device’s root is already in use, the Command won’t start. You will be instructed to begin scanning when you restart your PC.
- Type “Y,” press “Enter,” and start rebooting Windows. If the CHKDSK scan fails to solve the issue, then run an SFC scan.
9) Uninstall The Recently Installed Updates
If you get this error soon after a Windows update, uninstall the recent updates.
Uninstalling a recently installed update can fix the issue. To do that, follow these steps:
- Press the Win + R keys to launch the Run utility.
- Next, type “appwiz.cpl” and hit “OK.”
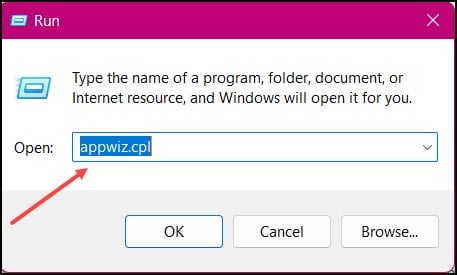
- Soon the program and features page will open when running the above command.
- Then, click on “View” installed updates that are listed in the left section.
- Now, select the Windows update that you have installed recently and right-click on it and then select “Uninstall.”
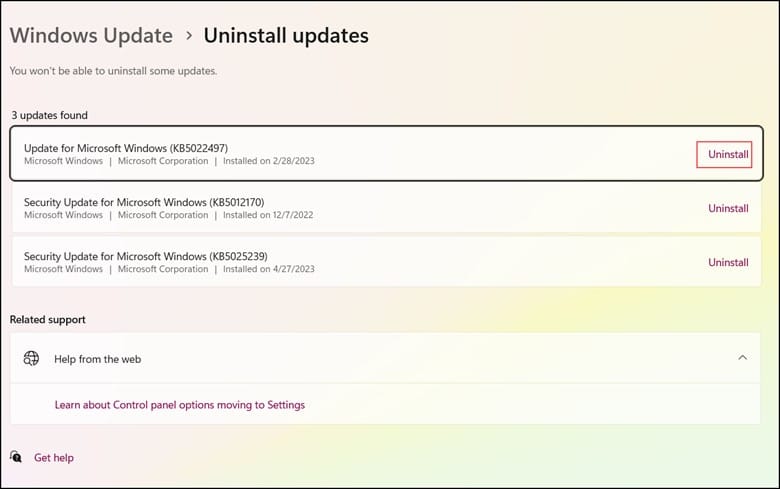
- Follow the onscreen instructions to remove the recently installed update.
10) Reset Windows 11
Before resetting Windows, ensures that you have the necessary installation files and data.
It can be a useful troubleshooting step when other methods have failed to resolve the system issue.
Resetting Windows is a process that reinstalls the operating System and restores your computer to its original factory settings.
To reset your PC, follow these steps:
- First, open Settings by pressing Windows + I key on your keyboard.
- Next click on “Windows Update” and click on “Advance options”.
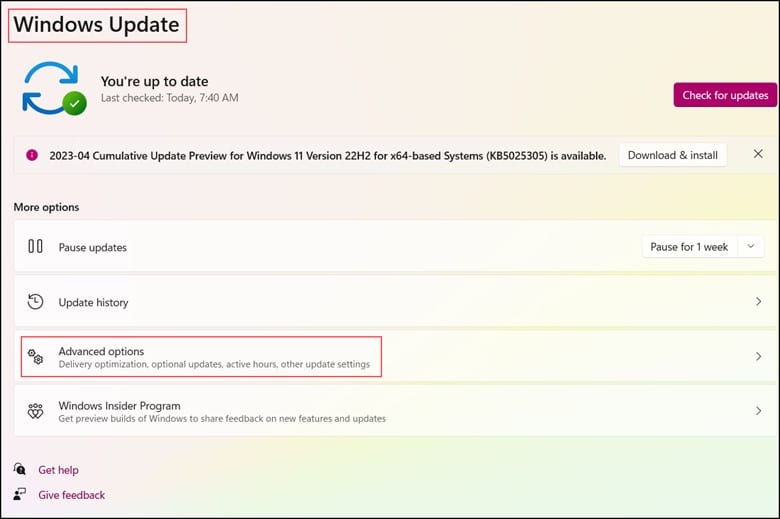
- Then, click on “Recovery” and click on “Reset PC” under the “Recovery options.”
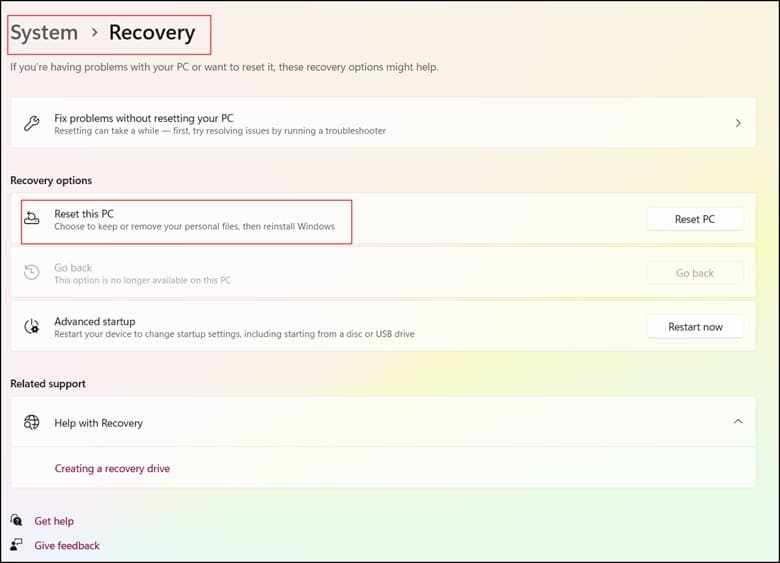
- Then, from the “Reset this PC” window, click on “Keep my files.”
- Then, click on “Local reinstall” and click on “Next.”
- Lastly, click on “Reset,” and your PC will restart to begin the resetting process.
Frequently Asked Questions(FAQs)
- Why Is Windows 11 Unable To Access The Boot Device?
The Windows 11 unable to access boot device error can occur when the Windows MBR is corrupted or damaged due to MBR overwrite, malware attack, or disk failure.
- What Is The Reason Behind The Blue Screen With Inaccessible Boot Device?
Generally, the Inaccessible Boot Device error occurs due to corrupt device drivers, a problematic Windows update, corrupt system files, or a faulty hard drive.
- What Is The Function Of TheBoot Device?
Without a boot device, the machine cannot start since boot devices are the types of hardware that can read the software needed to start a computer.
Bottomline
Now that you are successful enough in resolving the inaccessible boot device issue in Windows 11, I am sure your computer is back in working condition.
Update us with your inputs or comments, if any.
Leave a Reply