Are you facing issues while installing Java updates on your Windows 10? Many users have reported that the Java error code 1603 appears for them, preventing the Java update installation on their Windows 10 PC. If you are also facing this error, don’t worry, as in this article I have discussed how you can fix this issue.
What Causes The Java Error Code 1603 On Windows 10?
Contents
This error can appear because of several factors. Here I have discussed the potential causes of this error:
- Installing the wrong Java version: If you are trying to install the wrong Java version on your platform, like installing the 64bit version installer version on a 32bit system, then such errors can get triggered.
- The installer doesn’t have sufficient permissions: Many times Windows can block installers from working if they lack the required permissions for it.
- Antivirus: The antivirus software installed on your PC can be preventing the Java update installer from working correctly.
- Software Running Java can interfere with the update: It is possible that the other software running Java may prevent the Java update.
- The earlier version of Java becomes corrupted: If the earlier installed version of Java turns corrupted, it may prevent the update installer from implementing the update.
How To Fix Java Error Code 1603 On Windows 10?
Now that you know the several factors involved in this error, it is time to troubleshoot it. Follow the troubleshooting methods given here to fix this issue.
Solution 1: Make Sure To Install The Right Java version
The very first thing you need to do is check whether the download Java version is compatible with your Windows 10. For Windows 10, there are two Java versions, 32bit and 64bit. The 32-bit version is for the Windows 10 32 bit users and the same for the 64-bit version.
You cannot install a 64bit Java version on a 32 bit Windows 10, otherwise, it can trigger the Java update error 1603 on your PC. To check the Windows 10 version installed on your computer, follow the steps given below:
- Right-click on My Computer.
- Select the Properties option from the right-click context menu.
- In the Device Specifications section, look for the System type.
- Check whether it is 64 bit or 32 bit.
Download the correct Java update installer and run it. This should be the Java error 1603 fix if the issue was caused by the wrong Java update version.
Solution 2: Run The Java Installer As Administrator
It is possible that the Java installer does not have the required permissions for it to install the update. This can lead to Java install errors, including the Java error code 1603. Running the Java installer with administrative privileges should fix this error in such a case.
To run the Java installer with administrative privileges, follow the steps given below:
- Download the correct Java update installer.
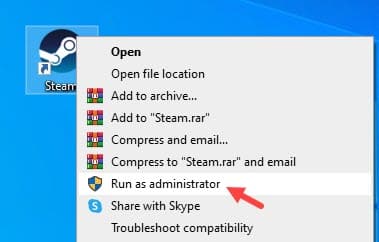
- Right-click on the installer and select the Run as administrator option.
- Confirm that you want to start it as an administrator in the UAC prompt.

Check if the installation stops again and shows the Java update error 1603.
Solution 3: Uninstall Old Java Versions
One effective fix for this issue is to uninstall the old Java versions and then running the new update installer. This freshly installs Java, rather than updating it. To uninstall the old Java versions, follow the steps given below:
- Press the Windows + R keys to open the Run utility.
- Type appwiz.cpl and press Enter to open the Programs and Features panel.
- Locate the older Java versions among the other apps listed there. Look for programs named J2SE, Java 2, Java SE, or Java Runtime Environment.
- Right-click on them and select the Uninstall option.
- Restart your PC.
- Now, install the latest Java version.
The installation should finish without errors. However, if the Java error code 1603 still appears, try the next solution.
Solution 4: Disable Java Content From Java Control Panel
The next thing you can do is disable the Java content from Java Control Panel. Disabling Java content has worked for many if uninstalling the older Java versions doesn’t work. To install Java content, follow the steps given below:
- Close the Java installer.
- Type Control Panel on the Windows Search bar and select the top result.
- After Control Panel opens, change the View by option to Large Icons.
- Locate the Java option and click on it. This will open the Java control panel.
- Select the Security tab and uncheck the Enable Java content in the browser option.
- Click on Apply and OK to save the changes.
- Start the Java update installer and follow the on-screen instructions.
- After the Java update has been successfully installed, reopen the Java control panel and check the Enable Java content in the browser option.
Solution 5: Disable Antivirus
If still, the Java installation errors remain, try disabling the antivirus on your PC. Antiviruses are well known for hitting false positives, like Avast can sometimes prevent applications from running on your PC.
This can also be a case of false positives hit by your antivirus. Try disabling the antivirus and check whether the error code 1603 appears again.
To disable the Windows Security on your Windows 10, follow the steps given below:
- Type Windows Security on your Start menu and select the top result.
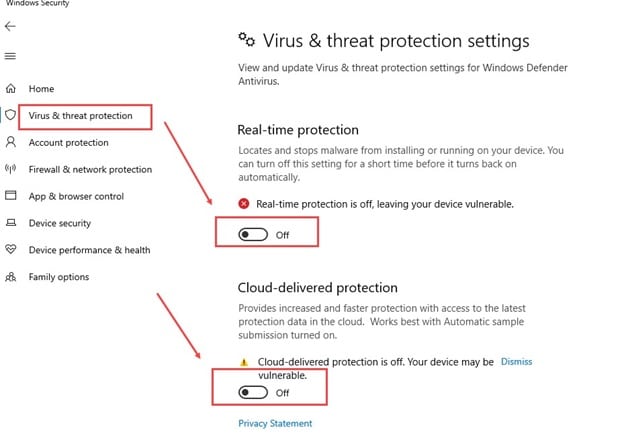
- Click on the Virus and threat protection option.
- Select the Manage Settings option in the Virus and Threat protection settings.
- Check the Real-time protection option. Now the Windows Security has been disabled.

Try running the Java installer and remember to run it with administrative privileges.
Solution 6: Rename The Oracle Folder
If none of the above solutions work, try renaming the Oracle folder on your system drive and then install the Java update. This workaround has worked for some users and may also for you. To do it, follow the steps given below:
- Press the Windows + E keys. This will open the Windows File Explorer.
- Navigate to the following folder:
C:\ProgramData\
Here C: is the System drive. - Locate the Oracle folder.
- Right-click on the Oracle folder and select the Rename option.
- Change its name, like Oracle.old, or anything you wish.
- Try installing the Java update.
Wrapping Up
So, there you have it. Now you know how to fix the Java error code 1603. The above solutions should help you fix this issue. If you have any questions regarding this topic, ask them in the comment section below.
Leave a Reply