If you have ever used Windows 7 or earlier versions of Windows, then you will know that to mount an ISO file or IMG file took a lot of effort. Since Windows 8 came out, Microsoft simplified the mount files feature by giving Windows 8 the native ability to mount ISO and IMG without the need for any 3rd party apps.
Windows 10 has inherited that feature from Windows 8 and hopefully, the next Windows edition will also do so. In this article, we have discussed how to mount IMG file on Windows 10 to clear any doubts about this among users.
Also, check out this article on how to fix KMODE exception not handled error.
What Are ISO And IMG Files?
Contents
IMG and ISO are files in disk image formats that store data like an optical disk such as a CD or DVD, which it has captured. They are mainly used to backup optical discs or to burn a large amount of data on an optical disk.
You will find that most of the OS that are downloadable, like Windows or Linux, are distributed as ISO files. Using ISO files to distribute large files has become common as it is a convenient way to puts all the files together as one downloadable file.
Mount IMG File On Windows 10
In Windows 8 and 10, the OS creates a virtual drive that then mounts the IMG file and provides access to the users as if they have inserted a physical disc in the optical drive. Just by double-clicking on the ISO and IMG files, you can mount the disk image on Windows 10.
However, if your computer has any 3rd party extracting apps, then Windows may have set it as default to open ISO files. In such a case, the ISO file won’t mount after double-clicking, but rather the app set as its default will open.
This is a mild issue and can be fixed with the following methods.
Method 1: Open With Windows Explorer
When in Windows 10 IMG file doesn’t mount after double-clicking, but rather another app opens, try opening it with Windows Explorer. To do it, follow the steps given below:
- Navigate to the IMG file and right-click on it.
- Click on the Open with another app option.
- Select the Windows Explorer option. The IMG file should be mount now without any issue.
You will need to repeat these steps each time if you want to mount the image file. Doing this each time is a hassle, so check out the next method to fix it permanently.
Method 2: Make Windows Explorer Default App To Open ISO Files
The fastest way for ISO mount in Windows 10 is by permanently setting Windows Explorer for opening image files. To do this, follow the steps given below:
- Right-click on the search icon and select the Settings option. The Settings app will open on your screen.
- Select the Apps option and then click on the Default apps option.
- Next, click on the Choose default apps by file type option.
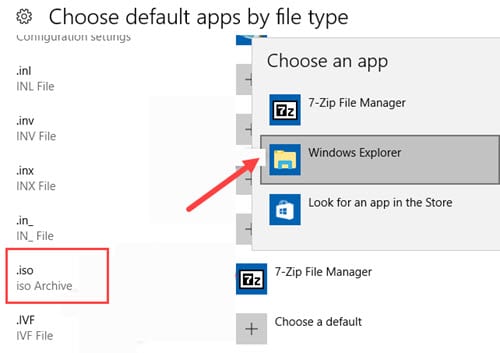
- Scroll down and locate the ISO and click on the Choose a default option beside it.
- Select the Windows Explorer option as the default app.

Method 3: Use PowerShell To Mount
You can also use PowerShell to mount the image files. To do it, follow the steps given below:
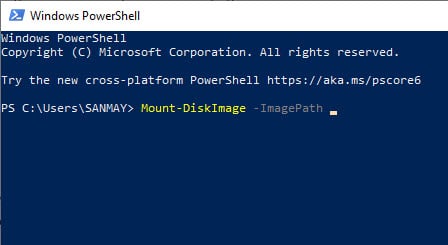
- Right-click on the Search icon and select the Windows PowerShell option. This will open the PowerShell prompt on your screen.
- Type Mount-DiskImage -ImagePath “Full path to your ISO file” and press Enter. Remember to enter the actual path of the ISO file.

How To Unmount Image File in Windows 10?
To unmount image file, follow the steps given below:
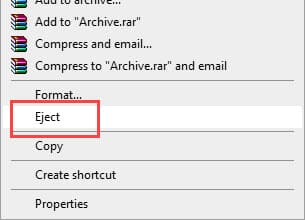
- Open My PC and right-click on the virtual drive that is mounted.
- Select the Eject option from the pop-up menu. The image file will be unmounted.

Wrapping Up
So, there you have it. Now you know how to mount IMG file on Windows 10. One thing you should keep in mind that Windows 10 can only mount IMG files which are stored on NTFS partition and the device must be connected to the PC. It cannot mount an ISO file from a shared network. You must download it to your PC, then mount it. If you have any doubts or questions regarding this topic, then feel free to comment about it below.
Leave a Reply