The MsMpEng.exe has been reported many times over the years for consuming high CPU, even up to 90%. Those who are ignorant of the function of MsMpEng.exe may even call it a virus. However, MsMpEng is an Antimalware Service executable that is a core process of Windows Defender. It scans your PC for spyware, malware, other trojan programs and removes them from your PC.
This process is required to maintain the safety of your system from such malicious things. But, if the process is suddenly consuming most of the CPU resources, it cannot be overlooked. In this article, I have discussed how to fix the MsMpEng.exe high CPU consumption issue.
Also check out this article if Windows Driver Foundation is consuming high CPU resources.
How To Fix MsMpEng.Exe High CPU Consumption?
Contents
The MsMpEng executable is a required process if you want to keep Windows Defender protecting your PC. There are a few methods that I have mentioned here that can work around this issue. If those don’t work, then you will have to disable the Windows Defender and sue another Antivirus for system protection.
Solution 1: Limit CPU Usage
The easiest fix to this issue will be to limit the CPU usage of the MsMpEng process from the Task Manager. This doesn’t tackle the cause of the issue but manages the effects of it. To do it, follow the steps given below:
- Press the Ctrl + Shift + Esc keys to open the Task Manager.
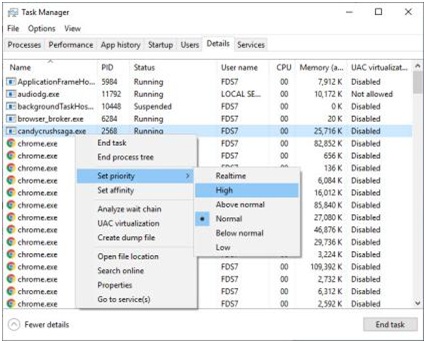
- Click on the Details tab and locate the MsMpEng.exe process.
- Right-click on it and move the mouse cursor on the Set priority option. This will open a side menu. From here you can set the priority of the process, depending on this the system will allocate the resources for it.
- Select the Low option, allowing the process only the bare minimum system resources.
- Close Task Manager.
After you have completed the above steps, the MsMpEng.exe should no longer consume high CPU usage. But, if you don’t want to limit the priority of the process, try the other solutions given below.
Solution 2: Exclude The Windows Defender Directory From Scan
The MsMpEng.exe high disk usage issue can happen if Windows Defender starts to scan its own directories. This seems to create a conflict in the scanning process and force MsMpEng.exe high CPU consumption. Excluding the Windows Defender directory from scanning can fix this issue. To do it, follow the steps given below:
- Type Windows Security in the search bar and select the top result.
- Click on the Virus and Threat option.
- Select the Manage Settings option in the Virus and Threat settings section.
- Scroll down and select the Add or remove exclusions option in the Exclusion section.
- Click on the Add an exclusion option. A small window will appear.
- Select the Folder option.
- Navigate to the following path and add it to the exclusion list by clicking on the Select Folder option.
C:\Program files\Windows Defender - Close Windows Defender.
Solution 3: Schedule Windows Defender For Scanning In Free Time
Another workaround you can use is to schedule the Windows Defender to scan your PC only at specific intervals when you are not using the PC. The MsMpEng.exe will still likely consume high system resources, but at least it won’t interfere while you are working. To do it, follow the steps given below:
- Type Task Scheduler in the Start menu and select the top result. This will open the Task Scheduler.
- On the left panel, navigate to the following path:
Library/Microsoft/Windows/Windows defender - After you have selected the Windows Defender folder, double-click on the Windows Defender Scheduled Scan from the middle window. This will open the properties window.
- Under the General tab, uncheck the Run with Highest Privileges box.
- Now, select the Conditions tab and uncheck all the boxes under the Idle, Power, and Network section.
- Click on the Triggers tab and click on the New option to create a new trigger.
- Set the trigger as you want to set the scheduled time and click on OK.
Read this article to learn more about using Task Scheduler.
Solution 4: Scan For Malware
One thing that can increase the MsMpEng.exe memory consumption is if the process itself is infected by malware. In such a scenario, you will need to scan your PC for malware. You will need to use 3rd party antimalware applications. Malwarebytes is a powerful anti-malware tool that you can use.
Solution 5: Disable Windows Defender
If none of the above solutions helped you fix this issue, the only thing left is to disable Windows Defender. To disable Windows Defender, follow the steps given below:
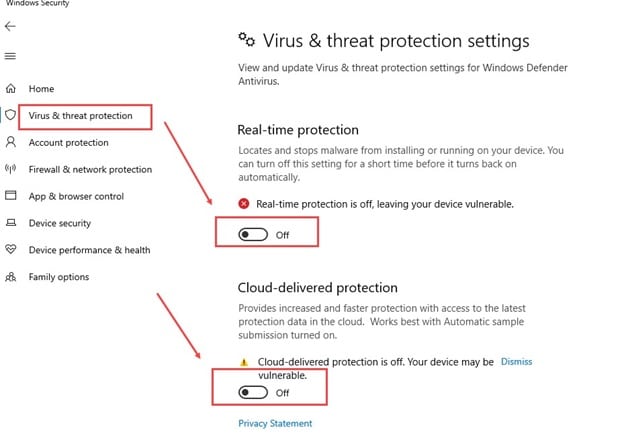
- Type Windows Security in the search bar and select the top result.
- Click on the Virus and Threat option.
- Select the Manage Settings option in the Virus and Threat settings section.
- Turn off the Real-time protection toggle.

If you want to completely disable the Windows Defender, you can do it from the Registry by following the steps given below:
- Press the Windows + R keys to open the Run utility.
- Type regedit and press Enter to open the Registry Editor.
- Navigate to the following registry key:
HKEY_LOCAL_MACHINE\SOFTWARE\Policies\Microsoft\Windows Defender - On the right panel, double-click on the DisableAntiSpyware value to edit it.
- Change the Value data to 1 and click on Ok to save the changes.
- Close Registry Editor and restart your PC.
Wrapping Up
So, there you have it. Now you know how to fix the MsMpEng.exe high CPU consumption issue. The above solutions should help you troubleshoot. If you have any questions regarding this topic, ask them in the comment section below.

Leave a Reply