Have you lost your files and want to restore them? If you have, here, we have discussed how to restore those files using the Windows 10 Previous Versions feature. The Previous Versions are copies of actual files, which your system saves as shadow copies.
In this article, we have discussed how you can restore Previous Versions on Windows 10. After reading this article, all your doubts about restoring previous versions of Windows 10 should get cleared.
Also, check out this article on how to fix folder access denied error in Windows 10.
How To Enable Windows 10 Previous Versions Feature?
Contents
To use the Previous Version features, you need to make a restore point or create shadow copies using task scheduler and commands or make a File history. We have shown all of those ways below separately. Read the methods carefully before executing them.
Method 1: Use File History To Enable Previous Versions
To use this method, follow the steps given below:
- First, connect an external drive to your PC.
- Open the Windows search bar and type Update and Security. Select the appropriate option.
- In the left panel, click on the Backup option.
- Next, click on the Add a drive option and select the drive that you want to use as a backup.
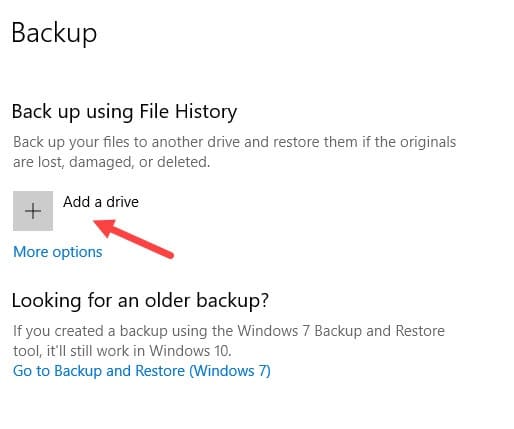
After completing the above steps, all the backup revisions of File History can now be restored using the Previous Versions feature in File Explorer.
Method 2: Use Restore Point To Enable Previous Versions
To use this method, follow the steps given below:
- In the Search bar, type Create a restore point and select the appropriate option. The System Properties will open on your screen.
- Click on the drive, which you want to use for restoring previous versions.
- Select the Configure option and check the Turn on system protection option.
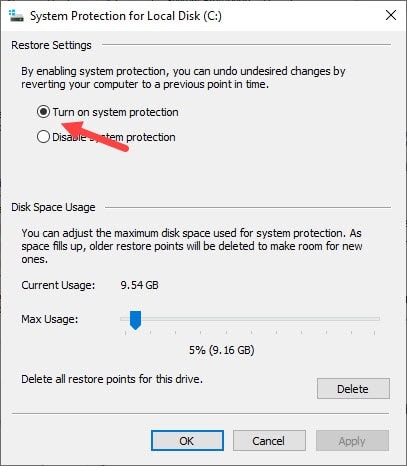
- Click on Apply and OK.
- In the System Protection tab, click on the Create
- Now, enter the description for the restore point like date and time and select the Create
Each time a new restore point gets created, you can use these snapshots to restore the previous version of files.
Method 3: Enable Previous Versions using Shadows Copies
To use this method, follow the steps given below:
- Open the Windows search bar and type Task Scheduler. Select the Top option.
- After the Task Scheduler app opens, right-click on the Task Scheduler Library
- Select the New folder option from the pop-up menu.
- Enter a distinct name as the folder will be used to keep tasks separated from the system tasks. Then, click on OK.
- Right-click on the folder that you just created and click on the Create Task option.
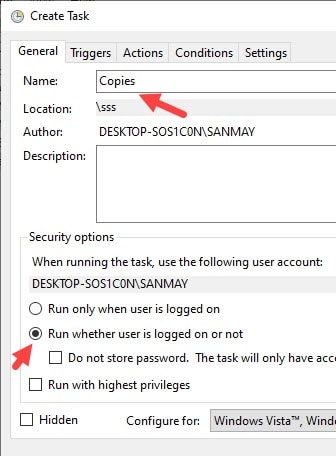
- Click on the General tab and enter any name for the task.
- Select the Run whether user is logged on or not option and uncheck the Do not store passwords option in the Security options section.
- Now, click on the Triggers tab and select the New option.
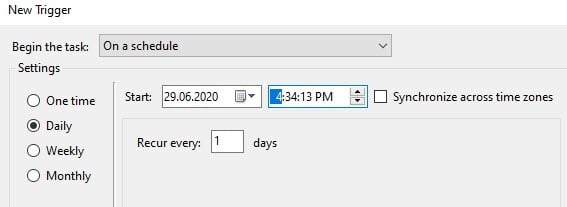
- Click on the Begin the task drop-down menu and select the On a schedule option.
- Set the start settings as you want, like select Daily if you want to run the task daily and set the start date and time. Click on OK.
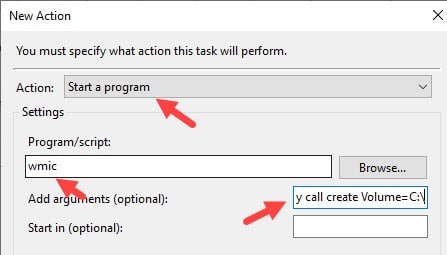
- Now, select the Actions tab and click on New.
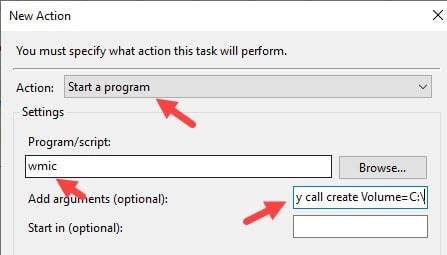
- Select the Start a program option in the Actions drop-down menu.
- Enter wmic in the Program/script section.
- Also, enter shadowcopy call create Volume=C:\ in the Add arguments (optional)
- Click on OK.
- Now, select the Settings tab and check Allow task to be run on demand box, Run task as soon as possible after a scheduled start is missed box, If the task fails restart every box.
- You may be required to register your Administrative username and password.
- Finally, click on OK.
After you have finished completing the above steps, the shadow copies will be created as per the schedule, which then can be used for restoring previous version of Windows 10.
How To Restore Previous Version Of Windows 10?
Now that you have enabled the Previous Versions feature, you can use them to restore any files that you lose. To do it, follow the steps given:
- Press the Windows + E keys to open the File Explorer.
- Right-click on the folder that had the file you want to restore and select the Properties option.
- Select the Previous Versions tab and in the File versions section, you will find the list of the different periods when the shadow copies were created.
- Select the shadow copy you want to restore from and click on the little arrow beside the Restore
- Click on the Restore to option and set the location where you want to restore.
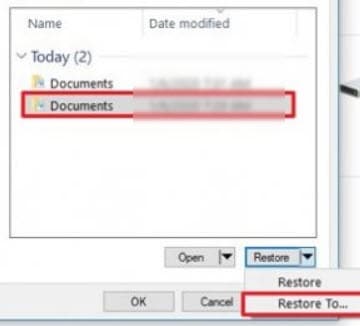
- Finally, click on the Select folder option to restore the files.
Now, you can check to see if the file you lost has been restored or not.
Wrapping Up
So, there you have it. Now you know how to use Windows 10 Previous Versions for restoring lost files in your PC. If you have questions related to this topic, ask them in the comment section below.
Leave a Reply