Windows 10 includes many security features in order to protect the system and the users’ privacy. The Windows Firewall is essential in this. Windows Firewall prevents any suspicious and malicious applications from accessing the internet.
It also stops your PC from connecting to any open or susceptible wireless network. Malicious applications can access the internet and hack into your system while susceptible networks are a hunting ground for data stealing.
If you are ever unable to connect to a network, then the security or firewall settings might be blocking the connection. In most cases, the Windows Firewall is doing it for a valid reason. However, sometimes the Windows firewall can have false positives. In this article, I have discussed what you need to do when Windows Firewall is blocking the connection of your PC.
What To Do When Windows Firewall Is Blocking The Connection?
Contents
When you find that your PC is unable to connect to the internet, you should try running the Windows Firewall Troubleshooter or the Windows Network Diagnostic troubleshooter. If the results of these troubleshooters provide the following message “Windows Firewall is preventing connections to your PC”, then the security or firewall settings might be blocking the connection.
In this case, you will have to change the Windows Firewall settings. I have given the steps to do so below.
Step 1: Open Windows 10 Firewall Settings
To change the Firewall settings you need to open it first. To open the Windows 10 Firewall settings, follow the steps given below:
- Type Control Panel in the Start menu and select the top result.
- Change the View by option to small icons.
- Locate and click on the Windows Defender Firewall option. This will open the Windows 10 Firewall settings.
From here on you will be able to change the notification settings, allow or block apps and features through the firewall, troubleshoot the network, and even turn off Windows Firewall.
Step 2: Allow An App Or Feature Through Firewall
If the Windows 10 firewall is preventing any apps or features from accessing the internet, you can manually allow it. To do it, follow the steps given below:
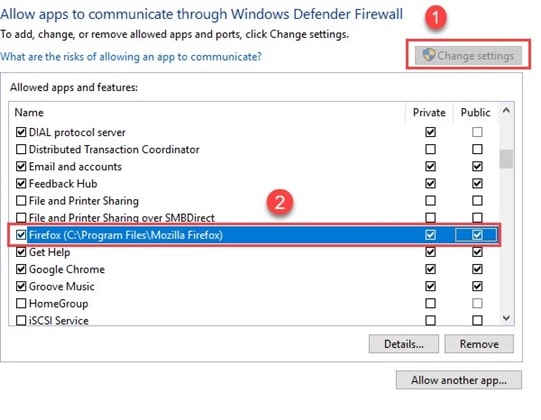
- Click on the Allow an app or feature through Windows Defender Firewall option in the Windows Defender Firewall settings you opened in step 1.
- Select the Change Settings option.
- Click on the Allow another app option.
- Browse to the application or feature you want to add and click on the Add option.
- Select the type of network it will be able to access. A private network will only allow the app to connect at home or office and a public network will allow the app to connect on any network.

Step 3: Disable Windows Defender Firewall
If allowing the app through the firewall doesn’t work, then you can disable the firewall. To disable the firewall, follow the steps given below:
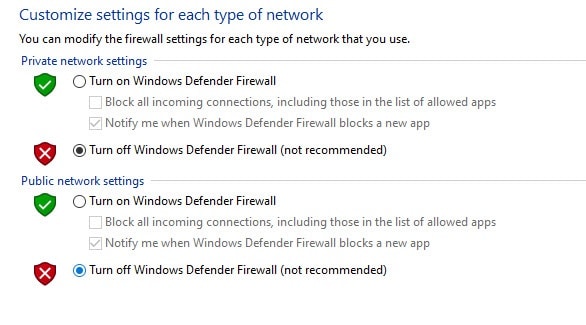
- In the Windows Defender Firewall settings click on the Turn Windows Defender Firewall on or off option.
- Check the Turn off Windows Defender Firewall (not recommended) option for private if you are facing issues connecting with home or office network. Check it in Public if you are facing trouble connecting to public hotspots.
- Click on OK to save the changes.

Wrapping Up
So, there you have it. Now you know what to do when security or firewall settings might be blocking the connection. If you have any questions regarding this article, ask them in the comment section below.
Leave a Reply