Windows has surely come a long way in the operating system world. With each version of Windows, Microsoft has tried to innovate and introduce new features, all of them leading to Windows 10. Windows 10 has become the most used desktop OS of the current time; however, it still has its issues.
One particular error that HP PC users tend to face is the selected boot image did not authenticate error. This error basically means that somehow the security protocol was violated after checking the firmware database or the boot device from which the operating system was loaded, is unable to provide the necessary information for the security to boot.
If you are facing this error, then don’t worry as in this article I have discussed how to troubleshoot it. After finishing reading this article, you will know what troubleshooting steps you ought to follow in order to fix this.
What Causes The Selected Boot Image Did Not Authenticate Error?
Contents
The selected boot device failed error generally appears for HP computers, as per the complaints I have seen. This error appears when the security protocol is violated, mentioned above. It can be caused by the following incidents:
- Missing Boot loader information: This error may occur if the boot loader information is missing.
- Boot order is changed: If your computer changes the boot order, then such an error can get triggered.
- Changes with the operating system: Recent changes in the operating system can also trigger this error.
- Installation of new devices: If you have recently installed any new devices, then that can also trigger this error.
How To Fix The Selected Boot Image Did Not Authenticate Error?
Now that you know the various causes of this error, it is time to troubleshoot it. Go through the following solutions and hopefully the error will get fixed for you.
Solution 1: Change The BIOS Settings
The first thing you can try is to change the BIOS settings. To be more specific, change from secure boot to legacy boot. Secure boot is what is triggering this error as security protocol gets violated and it doesn’t have the required information for allowing the PC to boot. But, if you are concerned that your PC is susceptible to malware and virus attacks and that’s what has triggered this error, then skip this solution.
To change from Secure boot to legacy boot, follow the steps given below:
- Enter BIOS in your HP monitor. If you don’t know the BIOS key, it should be mention in the manual.
- After you have entered the BIOS, select the System Configuration option.
- Next, select the Boot Option button.
- Select the Legacy Support option and press Enter.
- After that, select the Secure Boot option and press Enter, and select the Disabled option. Press Enter to confirm.
- Save the changes and restart the PC.
After the computer restarts, see whether the selected boot image failed to authenticate error reappears.
Solution 2: Hard Reset Your PC
The next thing you can try is hard resetting your PC. This will reset all your BIOS configuration, apart from the passwords. To do it, follow the steps given below:
- Shut down the PC and unplug from the power source. Next, remove the battery (if possible).
- Press and hold the power button for 30 seconds to drain the remaining power and reset the hardware.
- Plugin the power source and start the PC.
- Press the F2 key after powering it up. This will run the hardware diagnostics.
- Restart the PC. Check the test results.
Solution 3: Use Startup Repair
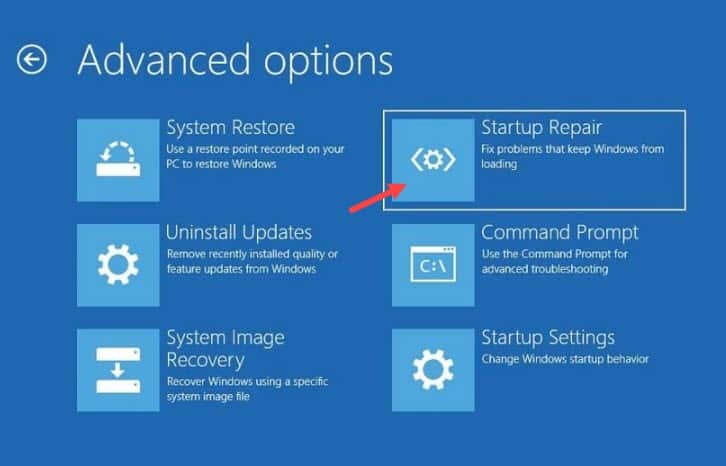
If none of the above solutions help you fix this issue, then you will have to try running startup repair. Startup repair is a tool that checks for issues occurring during the boot and fixes them. To run the Startup tool, follow the steps given below:
- Restart the PC 3 consecutive times to enter the Startup repair options on the 3rd restart.
- Click on the Troubleshoot option.
- Select the Advanced Options.
- Click on the Startup Repair option.
- Follow the on-screen instructions to complete the process.

Wrapping Up
So, there you have it. Now you know how to fix the selected boot image did not authenticate error. The above solutions should help you fix this issue. If you have any questions regarding this topic, ask them in the comment section.
Yes, I managed to solve!