Errors that arise during windows updates are very disturbing. One such instance is the “The installation failed in the safe_OS phase with an error during boot operation” error. In this article, we have given various troubleshooting methods that should help you fix this error.
Also, check out this article on what to do if your boot disk is not detected.
Why “The Installation Failed In The Safe_OS Phase” Error Arises?
Contents
This error shows that for some reason, the installation of the upgrade has failed in the safe OS phase. The safe OS phase is where your computer checks if the installation disk is encrypted or not.
The disk will we checked for any encryption by BitLocker, or other encrypting tools. If the disk is encrypted, then the installation won’t progress. This leads to the Safe_OS phase error.
You may also receive similar errors like:
- the installation failed in the safe_os phase with an error during migrate_data operation
- the installation failed in the first_boot phase with an error during migrate_data operation
These errors arise when the update gets stopped while migrating the user data.
All these are similar errors and can be fixed with the same troubleshooting methods given below.
Troubleshoot “The Installation Failed In The Safe_OS Phase With An Error During Boot Operation” Error
Some of the following troubleshooting methods have worked for us in fixing this error, while the others are known to have worked for others. These solutions should also work for you. Take care while trying out the solutions below, and read them carefully before implementing any changes.
Solution 1: Run The DISM And SFC Scans
These errors are commonly known to occur due to corrupted system files. The first thing you should do when you face any system files related errors is to run the DISM and SFC scans.
To run the DISM scan, follow the steps given below:
- Press the Windows + R keys to open the Run utility.
- Type cmd and press Ctrl + Shift + Enter to open an elevated Command Prompt.
- Now, type the following command:
DISM.exe /Online /Cleanup-image /Restorehealth and press Enter.
The scan may take some time. Do not close the command prompt before the scan finishes. - After the scan finishes, restart the computer.

Now, run the SFC scan. To do it, follow the steps given below:
- Open an elevated Command Prompt again.
- Type the following command:
sfc /scannow and press Enter.
This scan will also take some time, and don’t close it until its finished. - Finally, restart the computer.
Solution 2: Uninstall Wireless Drivers
If you are updating to Windows 10 from Windows 7 or 8.1, then the error may arise due to conflicting drivers. Particularly the wireless drivers of Windows 7 are known to not work in Windows 10. If this is the case, then uninstalling the wireless drivers before updating the Windows should fix it.
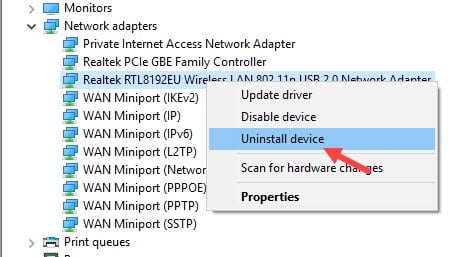
To uninstall the wireless drivers follow the steps given below:
- Open the Run utility again.
- Type devmgmt.msc and press Enter. The Device Manager will open on your screen.
- Locate your wireless drivers and right-click on them.
- Select the Uninstall option from the pop-up menu.
- Also, locate the Bluetooth adapter (if your PC has Bluetooth) and uninstall it.

Solution 3: Change Startup Type Of Some Services
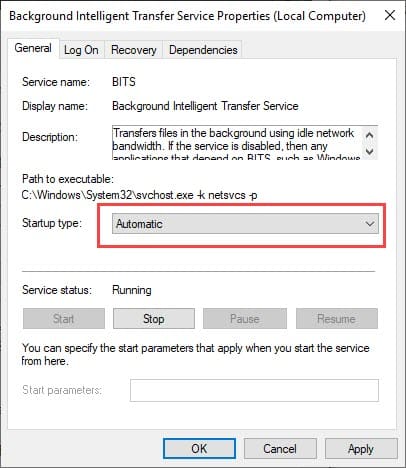
Another solution for this error is to change the startup type of BITS, Windows Update Service, and Cryptographic service to Automatic. This solution has worked for some users and may also work for you.
To change the startup type of the services, follow the steps given below:
- Open the Run utility again.
- Type services.msc and press Enter to open the services app.

- Locate the following services and do the steps 4-9 for each of them:
- BITS (Background Intelligent Transfer Service)
- Windows Update Service
- Cryptographic Service
- Right-click on the service and select the Properties option.
- In the General tab, click on the drop-down menu in the Startup type section.
- Select the Automatic (not Automatic Delayed Start) option.
- Finally, click on Apply and OK to save the changes.

Solution 4: Update Drivers
Outdated drivers are another known cause of this installation error. Updating the drivers have fixed this issue for some users. To update drivers, follow the steps given below:
- Open the Device Manager again, like in Solution 2.
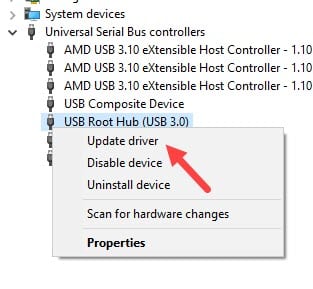
- Locate the outdated drivers that you want to update and right-click on it.
- Select the Update Driver option from the pop-up menu.

- Click on the Search automatically for updated driver software option and follow the further instructions given by the update wizard.
- After the update is finished, restart your computer.
Solution 5: Run Windows Update Troubleshooter
If still, the installation failed error persists during Windows update, then run the Windows update troubleshooter and see if it fixes this issue. To run the Windows update troubleshooter, follow the steps given below:
- Press the Windows + S keys on your keyboard to open the Windows search bar.
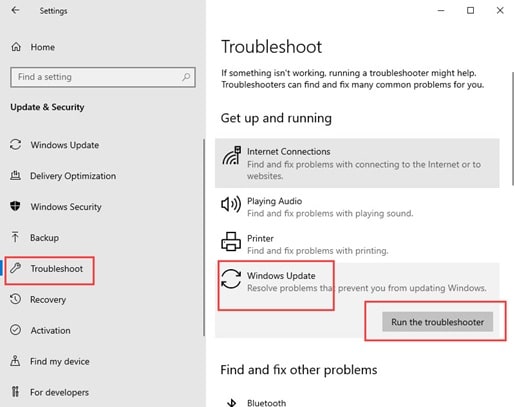
- Type Troubleshoot Settings and select the appropriate option.
- In the Getup and running section, click on the Windows Update option.
- Select the Run the Troubleshooter option.
- Follow the instructions on your screen and wait for the process to finish.

After the troubleshooter finishes running, check if the installation failed in the safe_os phase error persists or not.
Solution 6: Re-attach RAM Modules
Many users have also reported that removing and reattaching the RAM modules fixed this error for them. It also said that if you have more than 1 RAM module, then removing one of them allowed the installation to finish smoothly without any error.
Other users said that adding RAM modules let them complete the installation. You can try this method as a last solution and see if it works for you or not.
Wrapping Up
So, there you have it. Now you know about the installation failed in the safe_os phase with an error during boot operation error. Follow the solutions above carefully and you should be able to fix this issue. If you have any questions related to this article, then ask them in the comment section below.

Leave a Reply