Internet Explorer is the first major web browser developed by Microsoft. It has been with Windows since the year 1995 and after all these years it is still here. However, its importance has slowly deteriorated to such extent that most users don’t even acknowledge it as a viable browser nowadays.
With Microsoft focusing on Edge, it’s extremely unlikely that we will ever see another Explorer update in the future. Internet Explorer has become more of a space holder than anything in Windows 10. In this article we have discussed, how to uninstall Internet Explorer 11 in Windows 10.
However, removing Internet Explorer can affect other Windows Features that are linked with it. So, think carefully before uninstalling it.
Also, check out this article on how to disable hardware acceleration on Microsoft Edge.
How To Uninstall Internet Explorer 11?
Contents
Over the years, the ways to uninstall internet explorer has changed a lot. Currently, there are two ways to uninstall it is by using the Windows Features console and Windows PowerShell. Below we have given step by step instructions on how you can do it.
Method 1: Uninstall From Windows Features
Follow the steps given below to uninstall internet Explorer 11 using Windows features.
Step 1: Open The Programs And Features Console
To open the Programs and Features console, you need to open the Control Panel. To open the Control Panel, simply press the Windows key and type Control Panel in the search bar. In the search result select the top option. Now the control panel will open on your screen.
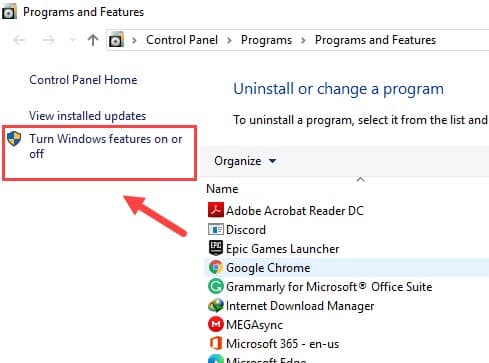
In the Control Panel, you will see the Programs option, click on it. Now on your screen, you will see the Programs and Feature option. Select the option to open the Programs and Features console. Here you can uninstall other apps, but not Internet Explorer 11.

Step 2: Open The Windows Features Console
In the Apps and Features console, you will notice the Turn Windows features on or off option on the left side of the screen. Select this option to open the Windows Features console.

Step 3: Uninstall Internet Explorer
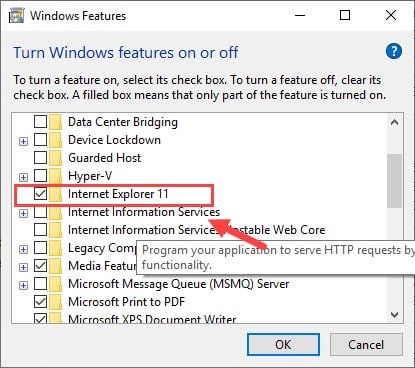
On the Windows Features console, locate the Internet Explorer 11 option. Uncheck the box before the Internet Explorer. You will be prompted with a warning dialog. Click on Yes if you still want to remove Internet Explorer.
Now, click on OK to save the changes. Windows will now uninstall Internet Explorer and take some time to make all the necessary changes that are required.

Step 4: Restart Your PC
After all the above steps are complete, you will be asked to restart the computer. Follow the instruction and restart now.
Method 2: Uninstall Using PowerShell
You can also use PowerShell to uninstall Internet Explorer from Windows 10. To do it, follow the steps given below:
- Right-click on the Windows key to open the Power users menu.
- Select the Windows PowerShell (Admin) option to open PowerShell with administrative privileges.
- Type the following command and press Enter:
Disable-WindowsOptionalFeature -FeatureName Internet-Explorer-Optional-amd64 –Online - Now, type Y and press Enter to uninstall Internet Explorer.

If later you want to reinstall Internet Explorer, then follow the above steps but enter the following command in step 3:
Enable-WindowsOptionalFeature -FeatureName Internet-Explorer-Optional-amd64 –Online
Wrapping Up
So, there you have it. Now you know how to uninstall Internet Explorer on Windows 10. Leave your comments below explaining why you want to uninstall Internet Explorer from your PC. Also, if you have any questions related to this topic, then ask them in the comment section.
Leave a Reply