Wireless connection has found its place in most homes. The accessibility of wireless allows users to connect to the internet quickly and easily. However, wireless networks also face many issues. Many users have reported that the Wi-Fi network is not showing up on their PC.
This is quite an inconvenient issue as we heavily depend on Wi-Fi for connecting to the internet. Fortunately, there are ways to fix this issue. In this article, I have discussed the troubleshooting procedure you need to follow in order to fix the wireless network not showing up issue.
Reasons Why Your Wireless Network Is Not Showing Up
Contents
There are numerous possibilities that can prevent your Wi-Fi from showing up. Here are some known issues that you may be facing:
- Corrupted or outdated network drivers: If you can’t see the Wi-Fi network, then it is likely due to corrupted or outdated network drivers.
- The router is at fault: Are you facing this issue on multiple devices? Wi-Fi not showing up on multiple devices at the same time can be due to a faulty router.
- Wi-Fi modem can be faulty or incorrect Wi-Fi settings: if your device is getting signals from other wireless networks but not yours, then it can be due to a faulty Wi-Fi modem, or incorrect Wi-Fi settings.
- Using incompatible network types: Each Wi-Fi connection can be set to transmit on a certain network channel. Not all devices support all channels. If your Wi-Fi is transmitting on a channel that your device is incompatible with, then your Wi-Fi network won’t show up.
- A problem from the ISP side: The issue can be the entire network connectivity and not limited to Wi-Fi. If the home network itself is unable to connect, then even after connecting to Wi-Fi you will not be able to connect to the internet.
What To Do When Wi-Fi Not Showing Up?
Now that you know the various causes that may be causing this issue for you, it is time to troubleshoot it. I have given the troubleshooting procedure below, after following it you should be able to fix this issue, or at least have an understanding of the issue.
Solution 1: Restart The Device
The first troubleshooting method is to restart the device. This age-old method still works amazingly well in fixing minor bugs and errors. This method is applicable for any device facing this issue, whether it be phone, desktop, or laptop. If a simple restart doesn’t fix this issue, then try the other solutions given below.
Solution 2: Troubleshoot Wi-Fi Network Drivers
Corrupted or problematic network drivers are known to cause many network-related errors. This can also be the case for this situation. Reinstall the network drivers and see if that fixes this issue. To reinstall the network drivers, follow the steps given below:
- Open the Run utility again.
- Type devmgmt.msc in the search box and press Enter to open the Device Manager.
- Expand the Network adapter tree.
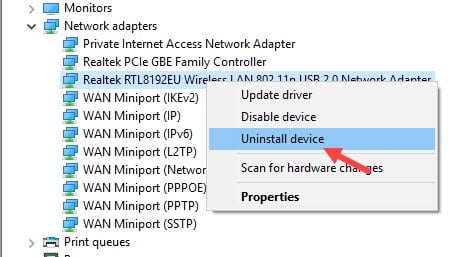
- Right-click on the Wi-Fi adapter causing this issue and select the Uninstall option.

- Follow the on-screen instructions to complete the process.
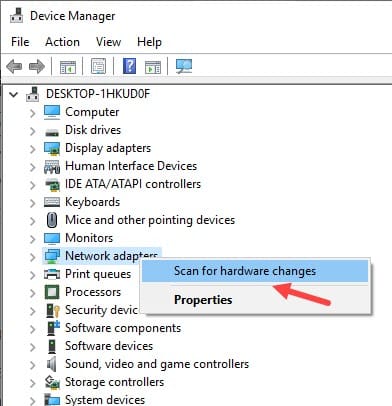
- Now, right-click on the Network Adapters option.
- Select the Scan for hardware changes option.
- Windows will now scan for the uninstalled network driver and reinstall it automatically.

Now, check if the issue persists. If yes, then try updating the Wi-Fi driver. To do it, follow the steps given below:
- Open the Device Manager again.
- Expand the Network adapter tree.
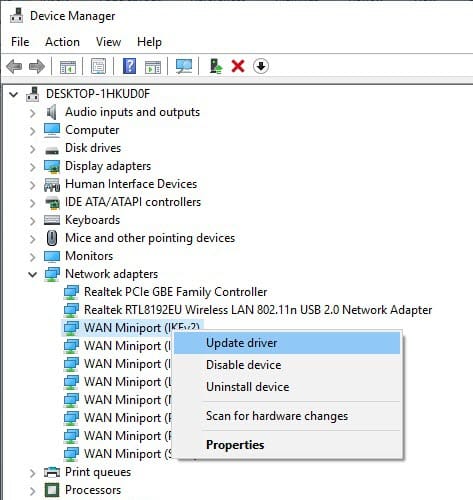
- Right-click on the adapter causing this issue for you and select the Update Driver option.
- Click on the Search automatically for drivers option.
- Follow the on-screen instructions to complete the process.

Solution 3: Enable Wi-Fi Network Adapter
You have likely already tried enabling Wi-Fi from the Settings a couple of times by now. Have you tried enabling it from the Network adapters? To do it, follow the steps given below:
- Press the Windows + R keys to open the Run utility.
- Type control.exe and press Enter to open the Control Panel.
- Change the View by option to Small icons.
- Click on the Network and Sharing Center option.
- On the left panel, click on the Change adapter settings option.
- Right-click on the Wi-Fi network adapter and select the Disable option from the right-click context menu.
- Now, again right-click on the Wi-Fi adapter and this time select the Enable option.
Now, check whether you can see the Wi-Fi network or not.
Solution 4: Enable The WLAN AutoConfig Service
WLAN AutoConfig Service is a built-in tool to detect wireless networks and to connect to them, as long as you have a wireless adapter installed on your computer. When the service gets disabled, you will end up face wireless network issues. To enable the WLAN AutoConfig service, follow the steps given below:
- Press the Windows+ R keys to open the Run Then, type services.msc and click on OK.
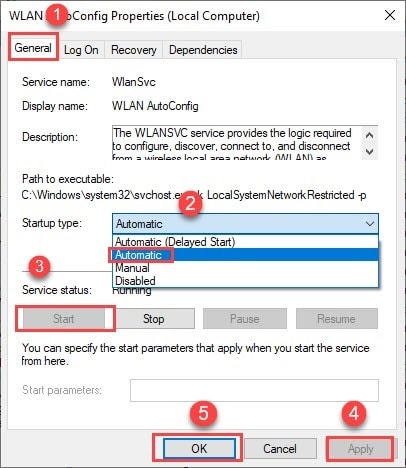
This will open the Services console for you. - Now, scroll down and navigate the WLAN AutoConfigservice, right-click on it and click on the Properties option from the pop-up menu.
- Under the General tab, beside the Startup type select Automatic.
- Then, click on the Start option.
- Finally, click on the Apply and OK options to save the changes.
- Now, restart your PC.

After the PC restarts, check whether the Wi-Fi network not showing up issue is fixed.
Solution 5: Remove Certain Registry Entries Using Command Prompt
Some users have reported that deleting certain registry entries fixes this issue. To delete these entries using the command prompt, follow the steps given below:
- Press the Windows + R keys to open the Run utility.
- Type cmd and press the Ctrl + Shift + Enter keys to open the Command Prompt.
- Now, type the following commands and press enter after finishing each one:
a) reg delete HKCRCLSID{988248f3-a1ad-49bf-9170-676cbbc36ba3} /va /f
b) netcfg -v -u dni_dne - After the commands are finished running, close the command prompt.
Solution 6: Power Cycle Your Modem
If your cable modem is facing issues maintaining a steady connection, then you can try power cycling it. To power cycle your Modem, follow the steps given below:
- Shut down your PC.
- Detach the power cord of your Modem and wait for 20 – 30 seconds.
- The modem may take a few minutes to run through all its self-checks before reconnecting to the internet. After the modem starts (the front lights should notify that) plug in the router and start your PC.
Now, check whether the internet connectivity on your PC is stable or not. Other than power cycling, check if the modem is overheating. Overheating is another cause of internet instability. In case it is overheating, turn off the modem for some time and let it cool down.
Solution 7: Reset Your Router
If you are facing connectivity issues over Wi-Fi, your router may be at fault. In some cases, resetting the router fixes the issue. Resetting the router clears the cache and fixes the connectivity issue. To reset your router, follow the steps given below:
- Locate the Reset button on your router. If you don’t know where to look, then read the router’s user manual. In the user’s manual, you will find the reset button of your router mentioned.
- After you have found the reset button, press and hold it for 15-20 seconds.
- Release the button and wait for 10 more seconds.
- Now, press the power button to turn on the router.

If the router doesn’t have a reset button, press the power button to turn it off and unplug the power cable. Wait for 20 seconds and plug the power cable and turn on the router.
Solution 8: Change The Network Frequency
There are two types of wireless frequencies, 2.4GHz, and 5GHz. Older routers used to have only one of the frequencies, but the newer models have both and allows the user to change it.
Not all devices support both the frequencies, the older devices will likely only support the 2.4GHz.
Try changing the frequency of the wireless network and see whether it fixes this issue. To configure your Wi-Fi into a different network frequency, check the instruction manual that came with the router.
Solution 9: Enable SSID Broadcast
The SSID or Service Set Identifier broadcast makes the Wi-Fi network visible to network adapters. If this is disabled, then the Wi-Fi network won’t show up.
The steps to enable the SSID broadcast differs for different router models. I have given the steps to enable SSID broadcast on a TP-link Wi-Fi router.
Check the steps and try to follow it, the interface may differ but the connotation should be the same.
- Open an internet browser on your PC and type the IP address of the router, written on your Wi-Fi router manual, in the address bar, and initiate the search.
- Enter the login credentials, you will also find it in the Wi-Fi router manual.
- Click on the Wireless option and select the Wireless Settings option.
- Now, locate the Enable SSID Broadcast box and check it.
- Save the new settings.
- Restart your PC and try reconnecting to the Wi-Fi.
Solution 10: Check For Device Interference
Try to keep the router away from other wireless devices. This can cause Electromagnetic interference.
Other than that, certain locations can also be responsible for electromagnetic interference. Here is a list of devices that you would want to keep your router away from:
- Microwave ovens
- Cordless phones
- Garage door openers
- Wireless toys
Here is a list of environments that can cause Electromagnetic interference:
- The areas near large transmission lines.
- Locations that generate static electricity.
- Places where the walls, decks, or doors have metal surfaces.
Solution 11: Contact The ISP
If the issue is with the net and not only the Wi-Fi network not showing up, then you should try contacting the ISP. The issue may be happening for all houses in your area, or it can be something else. If the above solutions don’t help, then this is the only thing you can do.
Solution 12: Check The Router
A broken or malfunctioning router seems a likely reason if this issue hasn’t been fixed until now. Try using another router and see if you are facing the same result.
If no, then the possibility of a broken router is pretty high. Take it to a servicing center and see what they tell you.
Wrapping Up
So, there you have it. Now you know how to fix the Wi-Fi network not showing up issue. The above solutions are quite in-depth and should be able to find the fault and fix it.
If you have any questions related to this article, ask them in the comment section below.
Leave a Reply