Windows 10 has an in-built Mail app that can be used to sync all the email accounts of the user. Over the years the app has developed well, but still it faces many bugs and errors. Many users have reported that Windows 10 Mail app is not working for them. If you are facing the same issue, don’t worry as in this article I have discussed what to do when the Mail app is not working in Windows 10.
Why Mail App Is Not Working In Windows 10?
Contents
There can be various reasons for the Mail app to not work in Windows 10. Here are some potential causes that can lead to Windows 10 mail not working:
- Privacy Settings: The Mail app can be blocked in the Privacy settings of Windows 10. The Mail app itself doesn’t have an option in the Privacy settings but blocking the Calendar app can cause lead to the same thing as both these apps are linked. Also, apps can be blocked access to emails, which will also prevent the Mail app from working correctly.
- The Sync of Email Feature Can Be Disabled: If syncing email is disabled in the Mail app, then you won’t be able to use it.
- Outdated Mail app: Outdated apps are known to cause various issues, and may even stop working. If your Mail app is outdated, then it can the cause of the app not working.
- Antivirus or Firewall: Antiviruses and firewalls are known to prevent apps from running correctly. It is also known to trigger issues with mail apps like Outlook [include link].
- Two-factor authentication is enabled: Two-factor authentication greatly ensures the safety of one’s email account. However, when you are adding an account with this feature enabled in Windows 10 Mail, it will need to set up an app password instead of using the Two-factor authentication. If the app password is not set, then Windows 10 Mail won’t work.
What To Do When Windows 10 Mail App Not Working?
Now that you know the potential causes of this issue, it is time to troubleshoot it. Here I have provided the troubleshooting procedure that you can follow in order to fix this issue.
Solution 1: Allow Apps To Access Calendar
Windows 10 has been ever concerned about protecting the privacy of the users. With each update, it introduces new protection mechanisms. One such feature introduced earlier is the ability to allow and deny applications from taking control of certain apps or features that can be a privacy breach. This includes access to your microphone to access the Calendar app.
In this case, the Calendar app is important as it is linked with the Windows 10 Mail app. If apps are denied access to the Calendar app, then the mail app may not work. Also, apps can be blocked access to emails, which will also prevent the Mail app from working correctly.
In this scenario, simply changing the Privacy settings to let apps access the Calendar app and Emails should fix it. To do it, follow the steps given below:
- Press the Windows + I keys to open the Settings app.
- Click on the Privacy option.
- Select the Email option from the left panel.
- In the Allow apps to access your email section, turn on the toggle.
- Scroll down to the Choose which apps can access your email section and make sure that the Mail and Calendar toggle is turned on.
- Select the Calendar option from the left panel now.
- In the Allow apps to access your calendar section, turn on the toggle.
- Scroll down to the Choose which apps can access your email section and make sure that the Mail and Calendar toggle is turned on.
- Close the Settings app.
Now, check if the issue with the Mail app is fixed or not. If the Mail app not working still, then try the next solution.
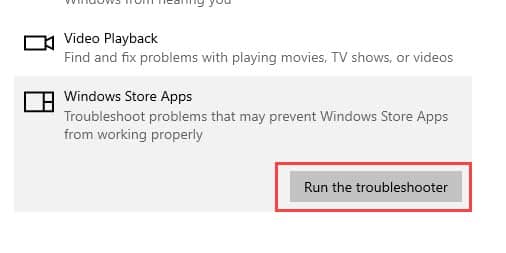
Solution 2: Run Windows Store Apps Troubleshooter
When you are facing any issues related to the Windows Store apps, one of the first things you can do is run the inbuilt Windows Store apps troubleshooter. Running this utility can potentially find the issue with the Mail app and fix it. To run it, follow the steps given below:
- Open the Settings app again.
- Click on the Update and Security option.
- Select the Troubleshoot option from the left panel.
- Click on the Additional troubleshooters option.
- In the Find and Fix other problems section, scroll down and click on the Windows Store apps option.
- Select the Run the troubleshooter option.
- Follow the on-screen instructions to complete the process.
- If an option with Apply Fix is provided, click on it to let the troubleshooter fix this issue.

After you have run the Windows Store app troubleshooter, check whether the issue persists.
Solution 3: Update The Mail And Calendar App
If you are using an outdated version of the Mail and Calendar app, then such issues can occur. Try updating the app and see whether it fixes this issue. To update the Mail and Calendar app, follow the steps given below:
- Type Microsoft Store in the Windows Search bar and select the top result. Make sure you are connected to the internet.
- Select the 3 dot icon located on the upper right corner of the screen to open the menu.
- Click on the Downloads and updates option from the menu.
- Locate the Mail and Calendar option in the downloads and updates section and click on it.
- Follow the on-screen instruction to update the Mail and Calendar app.
- If the installation doesn’t start after the update, click on the Get option to do it.
Solution 4: Disable 3rd Party Antiviruses
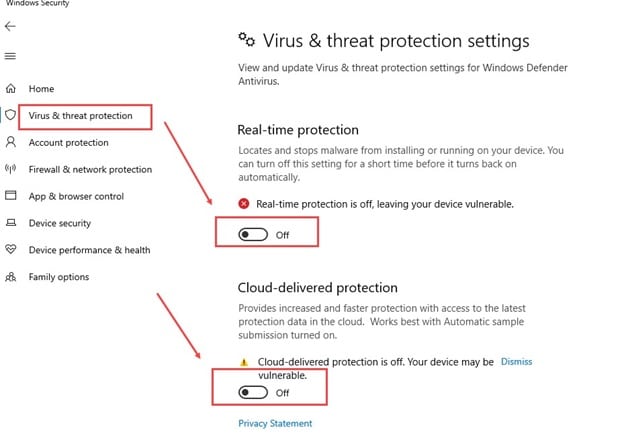
Antivirus software are known for preventing other apps from working correctly. 3rd party antivirus, in particular, can become overprotective and prevent even the Mail app to not work correctly. This can also be the case for you. Try disabling your antivirus and see whether the issue gets fixed. If you are not using any 3rd party antiviruses, try disabling Windows Security. To do it, follow the steps given below:
- Type Windows Security in the Windows search bar and select the top result.
- Select the Virus and Threat Protection option.
- Click on the Manage Settings option in the Virus and Threat protection settings section.
- Disable the Real-time protection toggle. This will disable the Windows Defender.

If disabling the antivirus doesn’t work, try to allow the Mail app through Firewall. This is explained in the next solution.
Solution 5: Allow The App Through Firewall
The issue can also be related to your Firewall and not the antivirus. When disabling the Antivirus doesn’t work, try allowing the app through the Firewall or disabling the Firewall. To do it, follow the steps given below:
- Type Control Panel in the Start menu and select the top result.
- Change the View by option to small icons.
- Locate and click on the Windows Defender Firewall option. This will open the Windows 10 Firewall settings.
- Click on the Allow an app or feature through Windows Defender Firewall option in the Windows Defender Firewall settings.
- Select the Change Settings option.
- Click on the Allow another app option.
- Browse to the application or feature you want to add and click on the Add option, in this case, it will be the Mail and Calendar app.
- Select the type of network it will be able to access. A private network will only allow the app to connect at home or office and a public network will allow the app to connect on any network.
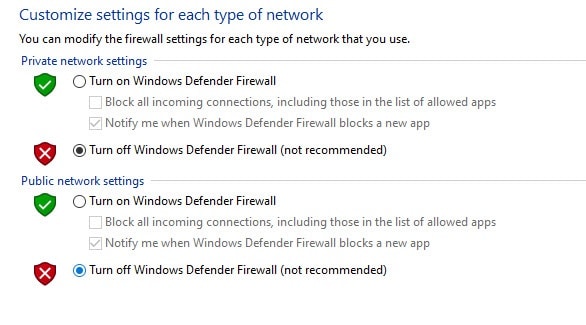
If that doesn’t work, or if the Firewall already allows the Mail and Calendar app through, try disabling it. To do that, follow the steps given below:
- In the Windows Defender Firewall settings click on the Turn Windows Defender Firewall on or off option.
- Check the Turn off Windows Defender Firewall (not recommended) option for private if you are facing issues connecting with your home or office network. Check it in Public if you are facing trouble connecting to public hotspots.
- Click on OK to save the changes.

Solution 6: Check The Advanced Mailbox Settings
Incorrect mailbox settings can prevent the Windows 10 Mail app from working correctly. Check the Advanced mailbox settings and correct any inaccuracies. To do that, follow the steps given below:
- Type Mail in the Windows Search bar and select the top result to open the Mail app.
- Locate the settings icon in the lower-left part of the screen. It is shaped like a cog.
- Click on the Settings icon and select the Manage Accounts option.
- Select the email account that is giving you this issue.
- Click on the Change mailbox sync settings option and select the Advanced mailbox settings option.
- Check whether the incoming and outgoing email server addresses and ports are correct.
- If your provider doesn’t require any authentication, uncheck the Outgoing server requires authentication box. You can find this information on your provider’s website, or you may have to contact them.
- Uncheck the Use the same name and password for sending email box if your provider needs a separate authentication for sending emails and provide the username and password.
Solution 7: Check Whether Two Factor Authentication Is Enabled On Your Account
Two-factor authentication greatly ensures the safety of one’s email account. However, when you are adding an account with this feature enabled in Windows 10 Mail, it will need to set up an app password instead of using the Two-factor authentication. If the app password is not set, then Windows 10 Mail won’t work.
If this is the case then you will have to create an app password for that email account as the Windows 10 Mail app doesn’t support it. To do that you will have to check the instructions provided by your email provider, either on their website or you may have to personally contact them.
Solution 8: Check The Sync Settings
Some users have reported that disabling the Sync settings in Windows 10 can fix this issue. To disable the Sync settings, follow the steps given below:
- Open the Settings app and select the Accounts option.
- Click on the Sync your Settings option in the left panel.
- Turn of the Sync settings toggle.
- Restart your PC.
If Sync was already disabled, try enabling it and restarting.
Solution 9: Run SFC And DISM
It is unlikely that corrupted system files are the cause of this issue, but it’s still a possibility. If none of the above solutions work for you, follow the steps given below to run the SFC and DISM scans:
- Press the Windows + R keys to open the Run utility.
- Type cmd and press Ctrl + Shift + Enter to open an elevated Command Prompt.
- Type the following command and press Enter:
sfc /scannow
- Wait for the scan to finish as it will take around 20-30 minutes. Do not close the Command Prompt prematurely.
- Restart the computer.
- Now, open the elevated command prompt again.
- Type the following commands and press Enter after finishing each one:
a) Dism /Online /Cleanup-Image /CheckHealth
b) Dism /Online /Cleanup-Image /ScanHealth
c) Dism /Online /Cleanup-Image /RestoreHealth - Wait for the commands to finish running and then restart the computer.
Wrapping Up
So, there you have it. Now you know what to do when Windows 10 Mail app not working. The above troubleshooting solutions should help you fix this issue. If you have any questions regarding this topic, ask them in the comment section below.

Leave a Reply