Internet connectivity issues are quite common with Windows 10. When one faces connectivity issues on Windows 10, they should always run the Network troubleshooter. The network troubleshooter checks for connectivity issues and then fixes them.
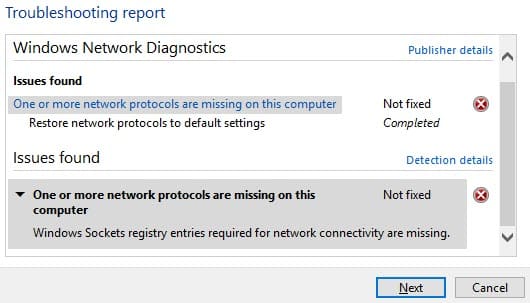
However, sometimes network troubleshooter may be unable to fix the connectivity issue and rather show the following error message “One or more network protocols are missing on this computer”. If Windows 10 missing network protocol error prevents you from accessing the internet, simply follow the troubleshooting given below to diagnose the issue.
What Are Network Protocols?
Contents
You may be wondering what these network protocols are and why them being missing is affecting your internet connectivity.
Network protocols are basically a set of rules, which are used by Windows for communication over the internet. These network protocols make sure that the data sent over the internet to another PC goes correctly. So, if the network protocols go missing, the internet connectivity will fail to work.
How To Fix Windows 10 Missing Network Protocol Error?
Here I have discussed the troubleshooting you need to follow in order to fix this error.
Solution 1: Reset TCP/IP
When you come across the internet protocols missing error, the first thing you must try is to reset the TCP/IP. To reset your TCP/IP stack, follow the steps given below:
- Right-click on the Start Menu and select the Run option. This will open the Run tool.
- Type cmd in the search box and press Ctrl + Shift + Enter to open the Command Prompt with administrative privileges.
- Now, type the following commands and press Enter after finishing each command to initiate it:
a) netsh int ip set dns
b) netsh winsock reset catalog
c) netsh int ipv4 reset reset.log
d) netsh int ipv6 reset reset.log - Close the command prompt.
- Restart your PC.
Try connecting with the internet and see whether the connection issue persists. If it does, try running the network troubleshooter again and check if it still shows the “One or more network protocols are missing on this computer” error message. If yes, try the next solution.
Solution 2: Reset Network Adapters
If the above solution doesn’t fix the error, try disabling the network adapter and re-enabling it. To disable the Network Adapter, follow the steps given below?
- Press the Windows key + R to open the Run utility again.
- Type ncpa.cpl and press Enter. This will open the Network Connections window.
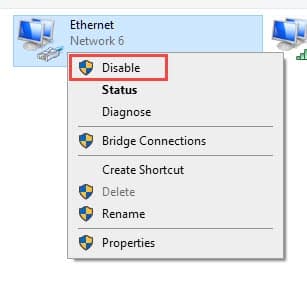
- Right-click on the network adapter in use and select the Disable option from the right-click context menu.
- Confirm the UAC prompt.
- After the adapter has been disabled, right-click on it again and select the Enable option.
- Now, check if the connectivity issues persist.
Solution 3: Troubleshoot Network Drivers
Some users have reported that updating and reinstalling the network drivers fixing the internet protocols missing error. To update the network drivers, follow the steps given below:
- Open the Run utility again.
- Type devmgmt.msc and press Enter to open the Device Manager.
- Expand the Network Adapters option.
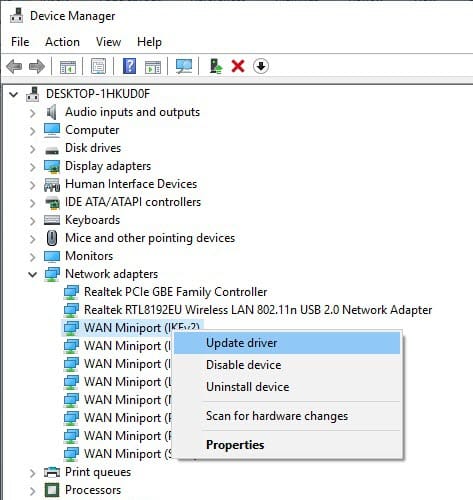
- Right-click on the Network drivers and select the Update Driver option.
- Select the Search automatically for the updated drivers option.
- Follow the on-screen instructions to complete the process.
- Restart your PC.
After your PC restarts, check if the Network connectivity issue remains or not. If the issue persists, try reinstalling the network drivers. To do that, follow the steps given below:
- Open Device Manager.
- Right-click on the network driver.
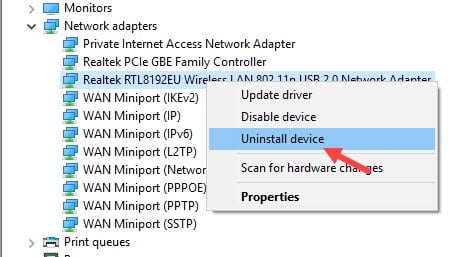
- Select the Uninstall Device option from the right-click context menu.
- Follow the on-screen instructions to complete the process.
- Restart your PC.
After your PC restarts, the network drivers should be reinstalled automatically by Windows. If it doesn’t then right-click on the Network Adapters option in the Device Manager and select the Scan for hardware changes option.
Solution 4: Disable NetBIOS
Next, try disabling the NetBIOS over TCP/IP from the network properties. To do that, follow the steps given below:
- Type Control Panel on the Start menu and select the top result.
- Change the View by settings to Large Icons.
- Click on the Network and Sharing Center option.
- Select the Change Adapter settings option from the left panel.
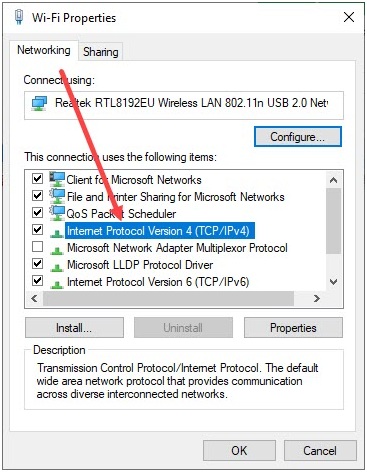
- Right-click on the network adapter and select the Properties option.
- In the This connection uses the following items section, click on the Internet Protocol Version 4 (TCP/IPv4) option.
- Select the Properties option.
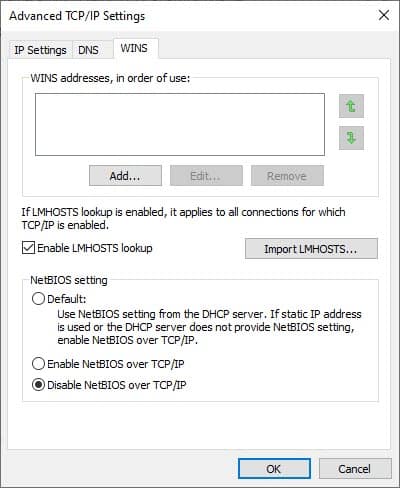
- Click on the Advanced option from the popped up window.
- Select the WINS tab.
- Check the Disable NetBIOS over TCP/IP option.
- Keep clicking on OK until you exit the network adapter properties.
- Check if running the network troubleshooter still shows the internet protocol missing
Solution 5: Flush The DNS
If the error persists, try flushing the DNS. To do it, follow the steps given below:
- Right-click on the Start Menu and select the Run option. This will open the Run tool.
- Type cmd in the search box and press Ctrl + Shift + Enter to open the Command Prompt with administrative privileges.
- Now, type the following commands and press Enter after finishing each command to initiate it:
a) ipconfig /flushdns
b) ipconfig /registerdns
c) ipconfig /release
d) ipconfig /renew - Close the Command Prompt and restart your PC.
Solution 6: Set To Automatically Obtain DNS
If the wrong DNS has been set in the network adapter’s properties, it can lead to this error. Enable automatic DNS obtaining option to fix this issue. To do that, follow the steps given below:
- Type Control Panel on the Start menu and select the top result.
- Change the View by settings to Large Icons.
- Click on the Network and Sharing Center option.
- Select the Change Adapter settings option from the left panel.
- Right-click on the network adapter and select the Properties option.
- In the This connection uses the following items section, click on the Internet Protocol Version 4 (TCP/IPv4) option.
- Select the Properties option.
- Check the Obtain an IP address automatically option.
- Click on OK to save the changes.
Solution 7: Use Netcfg -d Command Line
Some users were able to fix this issue by using the Netcfg -d command line. To use it, follow the steps given below:
- Right-click on the Start Menu and select the Run option. This will open the Run tool.
- Type cmd in the search box and press Ctrl + Shift + Enter to open the Command Prompt with administrative privileges.
- Now, type the following command and press Enter:
netcfg -d - Wait for the process to finish and close the Command Prompt.
- Restart your PC.
After your PC restarts, check if the Windows 10 missing network protocol error persists. You can also try running netsh int ipv4 install command line if this doesn’t work.
Wrapping Up
So, there you have it. Now you know how to fix the Windows 10 missing network protocol error. If you have any questions regarding this problem, ask them in the comment section below.
Leave a Reply