Over the years as newer versions of Windows were introduced, one of the most essential features was the faster boot time.
However, there have been many reports by users about how their Windows 10 slow boots to a black screen or how Windows 10 takes forever to load. Although slow boot time has been an issue for previous Windows versions also, it seems the problem has grown for Windows 10 users.
If you are also facing this issue, then don’t worry as in this article we will tell you, how you can solve Windows 10 slow boot time issue.
Why Is Windows 10 Boot Time Getting Slower?
Contents
So, the very first thing we need to see is what is causing the slow startup in Windows 10. There can be various reasons for this problem, let’s have a look into them:
- Unnecessary Startup programs are known to be a big reason for the Windows 10 slow startup issue for many users.
- If the ULPS (Ultra Low Power States) is enabled, then it can significantly slow down the Boot startup.
- Fragmented files in storage can cause your computer to slow down causing the slow startup issue.
- Corrupted system files are known to cause this type of startup issues.
- Various errors in your Hard disk can also cause slow down of startup.
- Outdated drivers can slow down your Windows boot time, especially if you have just updated from an older Windows version to Windows 10.
- Faulty DVD drives are also reported by users to cause this issue.
- HDDs are known to be slower at Startups compared to their counterpart SSDs, so this can also be linked to your problem.
Here Is How You Can Solve Windows 10 Slow Boot-Time
Now that we have seen the various issues for this problem, it’s time to solve them one at a time.
Solution 1: Disable Unnecessary Startup Programs
There are various programs that also gets started as your computer boots. These startup programs also increases the time taken to startup. Disabling the unnecessary startup programs can significantly reduce boot time for Windows.
To disable unnecessary startup programs, follow the steps given below:
- Press Ctrl + Shift + Esc keys to open Task Manager.
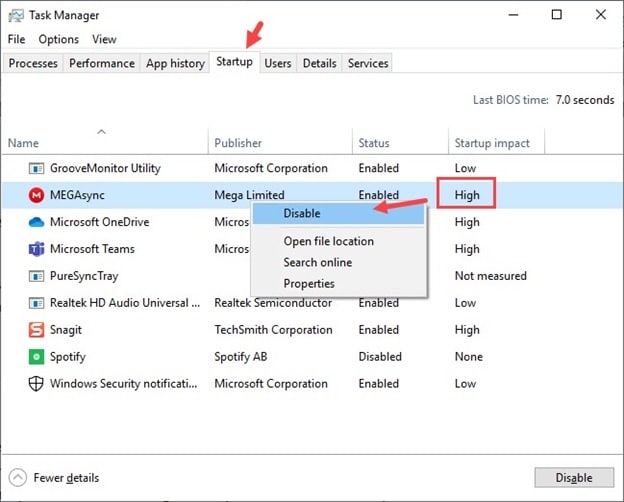
- Now, click on the Startup tab. Locate every program that has a high Startup impact.
- Right-click on these programs and click on the Disable option.
Caution: It is recommended to not disable your Antivirus.
Solution 2: Disable Ultra Low Power States
Ultra Low Power States or ULPS is a type of energy saver for your graphics card. When Windows shuts down, then the graphics card also gets turned off in a similar way. So when your Windows restarts, the graphics card also takes time to start again. This causes a significant increase in the boot-time.
To disable ULPS, follow the steps given below:
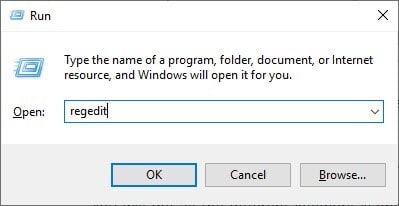
- Press Windows + R keys to open the Run utility. Type regedit and click on OK. This will open the Registry editor.
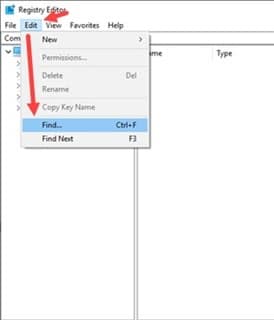
- Now, click on the Edit option and then on the Find option.
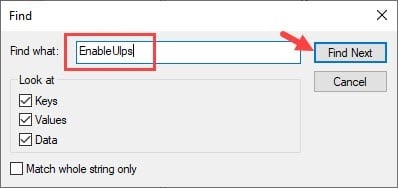
- Type EnableUlps and press Enter to initiate the Find utility.
- Now, locate EnableUlps and double-click on it.
- Finally, change its value to 0 and click on OK.
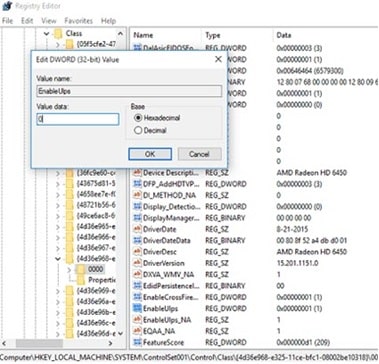
Restart your computer and check if the startup has become faster.
Solution 3: Defragment Your Drives
What is defragment you ask? Well, defragment is just a way to bring together all the fragmented files in your drives together and keeping them orderly, so that your hard disk’s read and write speed is increased.
If your files are fragmented, it can seriously slow down your hard disk. This will, in turn, slow down the boot speed of Windows.
To defrag your drives, follow the steps given below:
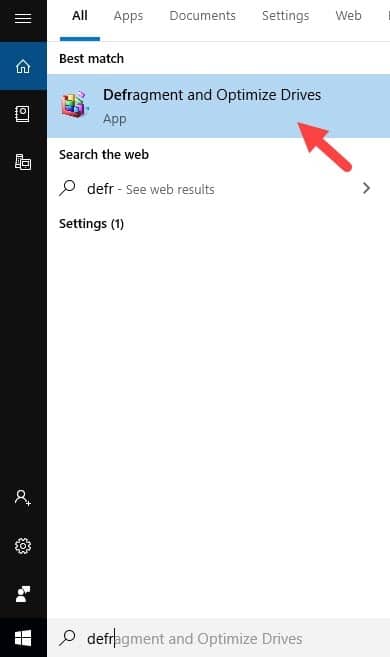
- Type Defragment and optimize drives in the Windows search bar and select it.
- Select the drive you want to defrag and then click on the Optimize option.
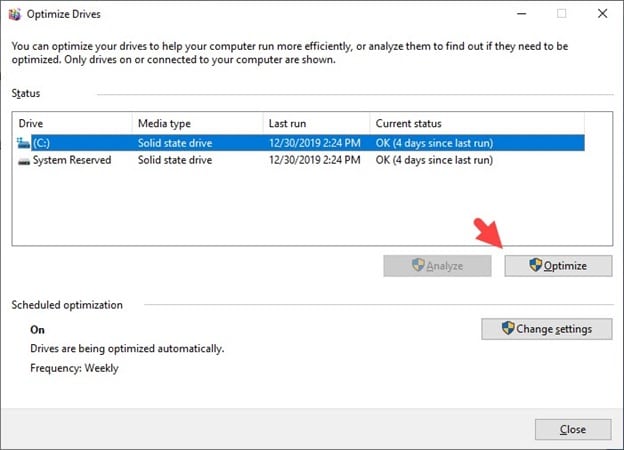
After the defragmentation is finished, try restarting and check the boot time taken by Windows.
Solution 4: Update Your Drivers
If you have recently updated your Windows from an earlier version to Windows 10, then the drivers are probably outdated and are not fully compatible with your Windows 10 which can cause your Windows to slow, including the boot time.
To update your drivers, follow the steps given below:
- Right-click on the Windows Start button in the lower-left corner and click on the Device manager option.
- Now, right-click on the outdated drivers and click on the Update option to update them
Once, the updates are finished check if the “Windows 10 slow boot” issue is resolved or not.
Solution 5: Remove Faulty DVD Writer
Some users have reported that their DVD writer was the cause behind the Windows 10 slow startup. This can be the case for your problem also.
If you are comfortable with handling PCs, then turn off your PC and open your PC cabinet to remove the DVD writer. If you are not comfortable at handling PCs, then take your PC to an expert repairing service.
Once, you have removed your DVD writer check if the boot time is faster.
Solution 6: Run SFC Scan
System File Checker or SFC is a built-in Windows service that can find corrupted system files in your computer and delete them.
Corrupted system files can create various problems, and can very likely be linked to your problem also.
To run the SFC scan, follow the given steps:
- In the Windows search bar, type Command Prompt.
- Right-click on the Command Prompt option and click on the Run as administrator option to open it in administrator mode.
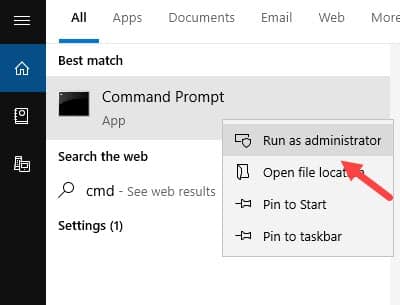
- First, type DISM.exe /Online /Cleanup-image /Restorehealth to run DISM so that a Windows image is created, thus protecting your data.

- Now, when the DISM command is complete, type sfc /scannow and press Enter to start the System File Checker.
After the scan finishes, restart your computer and check if the “Windows 10 slow boot” problem is resolved or not.
Solution 7: Run Check Disk Scan
If your hard disk has internal errors, then it can slow down your Windows and can also be the cause for the slow boot time of your PC.
To check if your hard disk has any errors, you can use the Check disk utility of the Windows 10 to detect and fix them.
Follow these steps to run the Check disk utility:
- Open This PC and right-click on the drive where the Windows is installed and select the Properties option.
- Select the Tools tab and then click on the Check option.
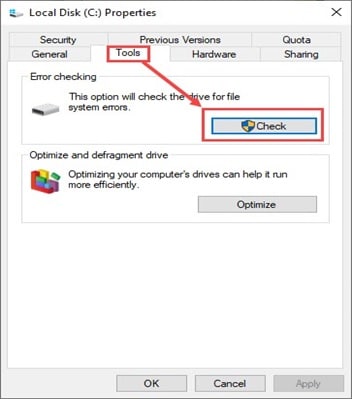
Wait until the Check disk utility is finished, and then restart your computer.
Solution 8: Increase Page File
Page file or virtual memory is used when your RAM gets overloaded to increase the performance of your computer. The virtual memory is taken from your hard disk. Various users have reported that increasing their Page file has helped significantly with their boot speed.
To increase your Page file, follow the given steps:
- Right-click on the Windows search button in the lower-left corner and select the Run option.
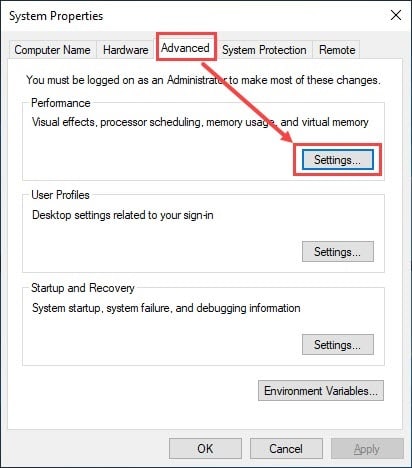
The Run utility will open on your screen. - Type sysdm.cpl and then press Enter. This will open the System Properties.
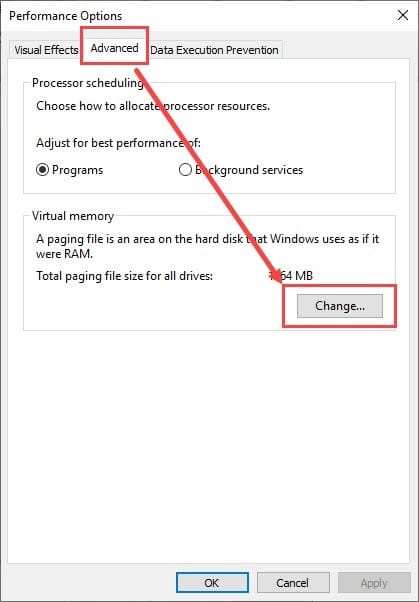
- Now, select the Advanced tab and click on the Settings option of the Performance section. This will open the Performance Options.
- Select the Advanced tab and click on the Change option in the Virtual memory section.
- Uncheck the Automatically manage paging file size for all drives option and check the Custom size option.
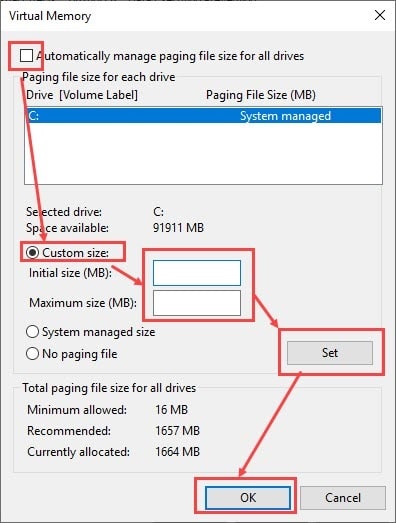
- Fill the Initial size and the Maximum size as the size of your RAM and as double the size of your RAM respectively (in MBs).
- Finally, click on the Set option and then press OK.
Restart to check if the “Windows 10 slow boot” issue has been fixed for you.
Solution 9: Upgrade To SSD
If you are using an HDD in your computer we would suggest upgrading to an SSD as it is very fast compared to HDDs, and the boot-time only takes a few seconds. If none of the above solutions have been able to fix the Windows 10 slow boot issue for you, then you should definitely try this.
Wrapping Up
Windows 10 slow boot time can really be troubling for users but fortunately, now you know different ways to increase the speed of the startup. Follow the solutions carefully and as always, feel free to share your thoughts on this article in the comment section below.

Leave a Reply