Today we are going to discuss an error that has troubled the users with printers for some time now. The error Windows cannot connect to the printer keeps appearing on the users’ screen, whenever the users try to print something.
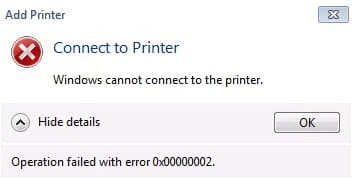
This error is causing serious problems, especially for office workers who are very dependent on printers. If you are also facing this error, then don’t worry as we have discussed below the various ways you can diagnose and troubleshoot this error.
Solving The Windows Cannot Connect To The Printer Error
Contents
This error can occur due to various different reasons. Now, it’s time to troubleshoot all the different causes of this error one by one.
Solution 1: Some Basic Troubleshooting
First, check if the printer is shown in the printer and scanner list on your computer. After doing this you will know if the printer has been recognized by the computer or not.
To check if the printer has been recognized by your computer, follow the steps given below:
- Right-click on the start button and click on the Settings option from the pop-up menu.
- Next, select the Devices option and then click on the Printers & scanners option.
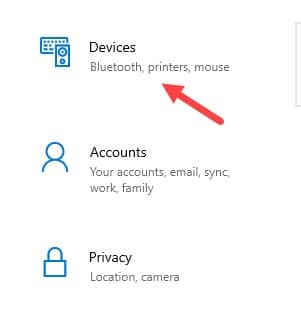
- Now, check for your printer in the Printers and scanners If it is not there, then the printer hasn’t been recognized.
Now, after you have checked if your printer is in the device list, check if the power switch of your printer is turned on. Also, make sure that the power cable of the printer is plugged into a power outlet and sufficient electricity is being provided from the outlet.
If you are using a shared network printer, then you also have to make sure that all the computers and routers involved in the network are on. If still, Windows cannot connect to the printer error arises, then try the following advanced solutions.
Solution 2: Add The Printer Device Manually
If your computer can’t find the printer automatically, then adding the device manually should fix this problem.
To add the printer device manually (for both wireless and local), follow the steps given below:
- Open the Printers & scanners option again.
- Click on the Add a printer or scanner option and select your printer device.
- Now, select the Add device option.
Your printer should now connect to the computer. However, if still Windows cannot connect to the printer error appears, then try the next solution.
Solution 3: Update The Printer Drivers
Outdated printer drivers are known to create connection problems like the one you are facing. Check if your printer drivers are up to date. If they are outdated, then updating them should fix this problem.
To update your printer drivers, follow the steps given below:
- Press the Windows + X keys on your keyboard and select the Device Manager option from the pop-up menu.
- Locate the printer drivers and right-click on them.
- Click on the Update driver option and then click on the Search automatically for updated driver software option.
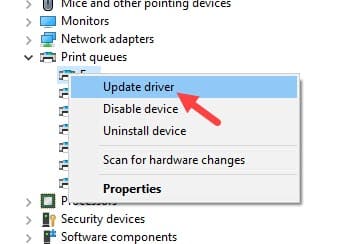
- Follow the instructions given on your screen to successfully update the drivers.
Check if still the computer can’t connect to the printer. Updating the printer drivers should fix this error.
Solution 4: Create A New Local Port
Many users have reported that adding a new local port can fix this problem. To add a new local port, follow the steps given below:
- Open the Printers & scanners option (follow Solution 1).
- Scroll down and click on the Print server properties under the Related settings.
- Select the Ports tab and then click on the Add Port option.
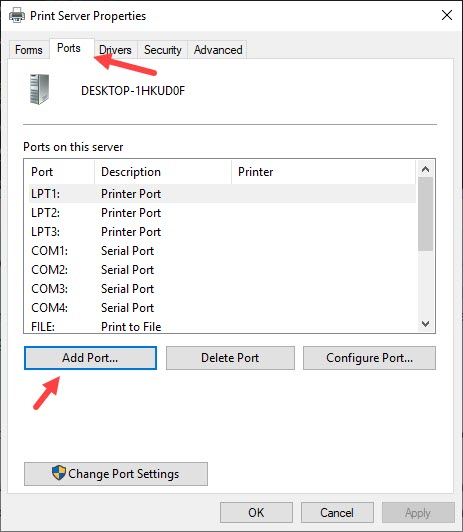
- Select the Local Port and click on the New Port option.
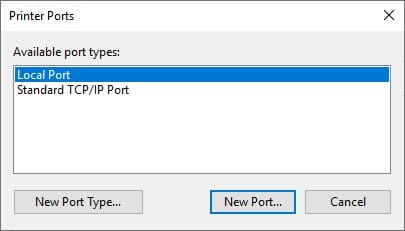
- Type the new port name in this format:
\\IP address or the Computer Name\Printer’s Name
(Example : \\196.148.1.110\HP SuperSeries P2386 HTS 9), where the 196.148.1.110 is the IP address and HP SuperSeries P2386 HTS 9 is the name of the printer.

- Click on OK to save the changes.
- Now, click on the printer model from the directory and then click on Next.
- Insert the disk (if any) that came with the printer and click on the Have Disk option.
- Now, browse to the location of the drivers in the disk and then click on OK.
- Type the name of the new printer and click on Next.
- You can print a test page to check the connection or just click on Finish.
If still the printer is not connected, then try the next solution.
Solution 5: Copy The Color Module File And Paste It
Some users have also reported that if the mscms.dll file, which is a color module, fails to reach the objective folder, then the computer can’t find the printer and thus this error arises. In this scenario, manually copying the file and pasting it in the objective folder should fix this problem.
To copy the mscms.dll file and paste it in the objective folder, follow the steps given below:
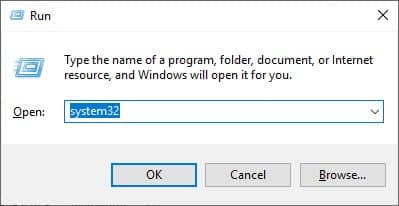
- Open the Run utility by pressing the Windows + R keys.
- Type system32 and press Enter.
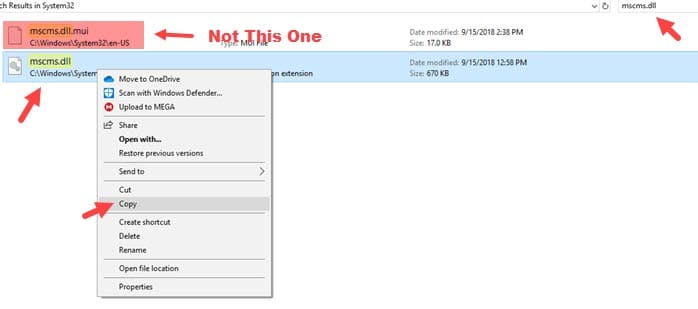
- Locate the search bar on the upper right side of your screen and type.
- Right-click on the mscms.dll file only and click on the Copy option from the pop-up menu.
- Now, navigate to the following location:
For 32 bit Windows: C:\windows\system32\spool\drivers\w32x86\3\
For 64 bit Windows: C:\windows\system32\spool\drivers\x64\3\ - Once, you have navigated to the above folder, press the Ctrl + V keys on your keyboard to paste the mscms.dll file.
Check if still the computer can’t find the printer. This solution should fix this error.
Solution 6: Run The Printer Troubleshooter
There is an in-built troubleshooter for printers in your Windows 10. The troubleshooter can fix this error automatically or at least it would report the issue causing this error. To run the printer troubleshooter, follow the steps given below:
- Type Troubleshoot Settings in the Windows search bar and select the appropriate option.
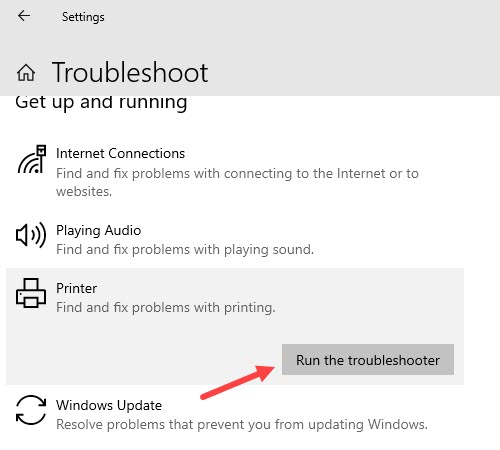
- Locate the Printer option in the Get up and running section and click on it.
- Click on the Run the troubleshooter option.
- Follow the instructions given by the troubleshooter to successfully fix the problem.
Solution 7: Remove Pre-existing Printer Driver Files From Registry
If there are pre-existing corrupted driver files in your registry, then also this problem can arise. In this case, you will have to delete the corrupted pre-existing driver files from the registry to fix this problem. To do that, follow the steps given below:
- Open the Run utility and type regedit and then click on OK. This will open the Registry Editor on your screen.
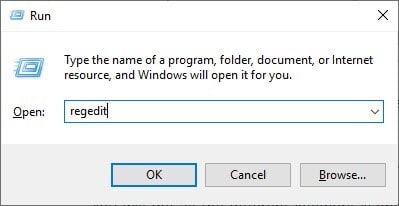
- Navigate to this following location in the Registry editor:
HKEY_LOCAL_MACHINE\SYSTEM\ControlSet001\Control\Print\Printers\*YOUR PRINTER’S NAME*\CopyFiles - Now, locate the ICM folder and delete it.
This solution should fix the Windows cannot connect to the printer error if it was caused by pre-existing corrupted driver files. However, if still you see the printer not connected to your computer, then try the next solution which should fix this error.
Solution 8: Clear Spooler Files And Restart The Service
If none of the above solutions worked for you, then try clearing the spooler files and restarting the spooler service. The spooler is the service that manages all the printers connected to your computer.
Clearing the spooler files and restarting it should reset the service. If the spooler service was causing this issue for you, then this should fix it. To clear the spooler files and restart the service, follow the steps given below:
- First, make sure you are logged in your computer as an administrator because the following steps will require admin privileges to access it.
- Now, open the Run utility again. Type services.msc and press Enter.
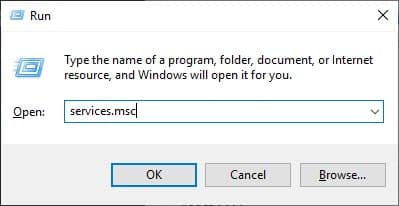
- Scroll down and locate the Print Spooler service and double click on it.
- In the General tab, click on the Stop option and then click on Apply and OK to save the changes.
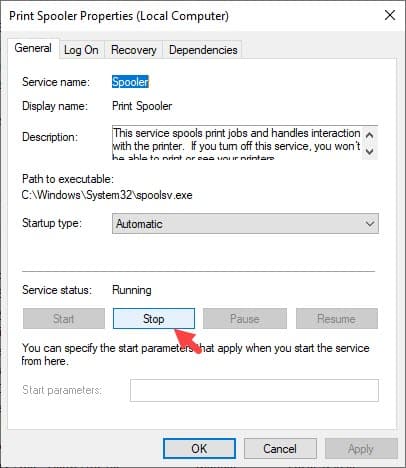
- Now, in the Windows search bar and type: %WINDIR%system32spoolprinters and select the appropriate option.
- Delete everything in this folder.
- Now, open the properties of the Print Spooler service again.
- In the General tab, change the Startup Type to Automatic using the drop-down menu and then click on the Start option.
- Finally, click on Apply and OK to save the changes made.
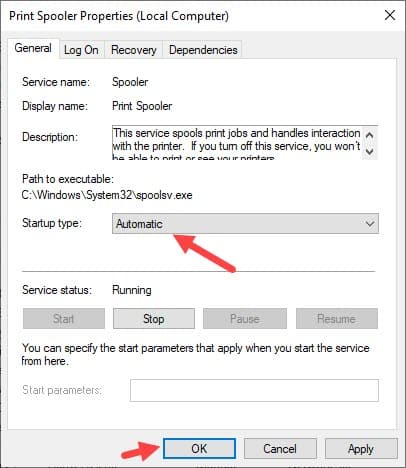
Now, check if the Windows cannot connect to the printer error has resolved.
Solution 9: Contact The Service Center
If clearing the spooler files and restarting the spooler service also didn’t work, then you should contact the printer’s manufacturer’s service center to repair this issue as most likely this error is due to some internal issue of the printer.
Wrapping Up
So, there you have it. Now, you know what to do when you face the Windows cannot connect to the printer error. One or a combination of a few above solutions should fix this error so read and execute them carefully. As always, feel free to share your thoughts on this article in the comment section below.
Leave a Reply