Does your device display have a yellow screen tint? No, it is likely that the issue is real, and your eyes are not playing games with you. Having display color issues are quite common, especially if you have recently tinkered with the display settings.
In many cases, the issue signifies a hardware problem, however before you decide to scrap the display or call for technical help, try the troubleshooting mentioned here first.
Why Does My Screen Look Yellow?
Contents
When you find a screen tint, it can be a hardware issue, meaning an issue with the display, or it can simply be due to incorrect color combination settings. Other than that, the graphics drivers can get corrupted and show the wrong colors. Whichever the case, below I have discussed how to get rid of yellow tint on monitor.
How To Get Rid Of Yellow Screen Tint On Monitor?
Here I have discussed the methods you can use to get rid of yellowish tint from your screen if the issue is not a hardware one. Follow the solutions given till the end and then see whether the issue fixes.
Solution 1: Switch Off The Night Light Settings
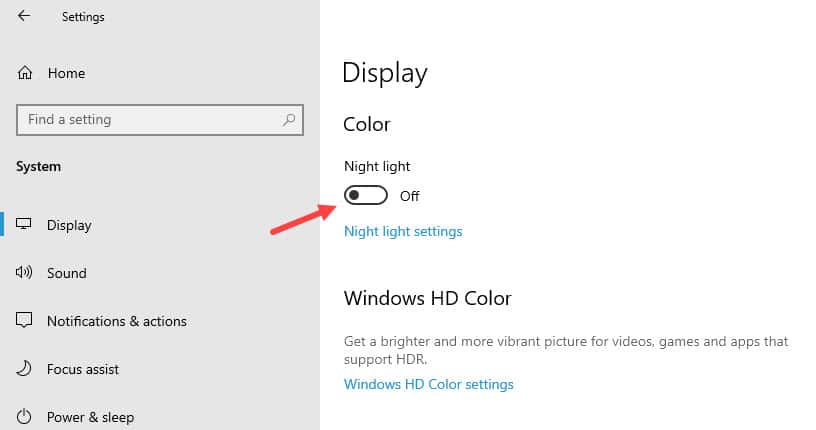
The first thing you can check is whether the Night light settings are enabled. Many have reported that the Night light settings were triggering the yellowish tint. To disable the Night light feature on Windows 10, follow the steps given below:
- Press the Windows + I keys to open the Settings app.
- Select the System option.
- Click on the Display option from the left panel.
- In the Color section, disable the Night light toggle.

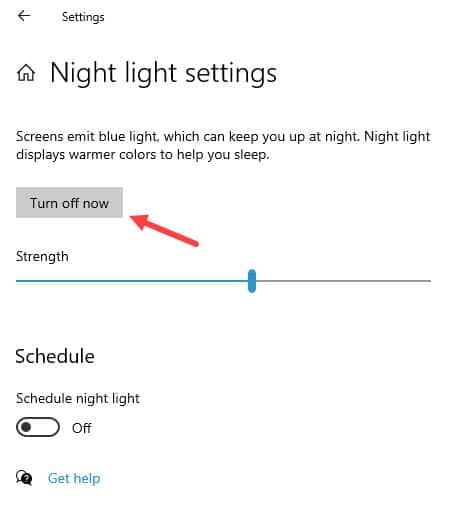
- Next, click on the Night light settings option.
- You will either see Turn off now or Turn on now option with the strength slider and schedule toggle. Click on the Turn off now option if available to stop night light.

After your PC restarts, check if the issue has been fixed or not.
Solution 2: Troubleshoot Graphics Driver
If switching off the Night light settings doesn’t fix this issue, the graphics drivers can be corrupted. Try updating the graphics drivers and if that doesn’t work, reinstall the driver. To update the graphics driver, follow the steps given below:
- Press the Windows + R keys to open the Run utility.
- Type devmgmt.msc and press Enter to open the Device Manager.
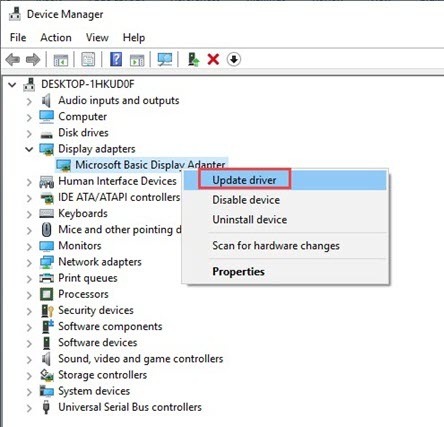
- Expand the Display Adapters and right-click on the graphics driver.
- Select the Update Driver option from the right-click context menu.
- Click on the Search automatically for drivers option.
- Follow the on-screen instructions to complete the process.
- Restart your PC.
After the graphics drivers are updated, check if the yellowish tint remains or not. If no, then follow the steps given below:
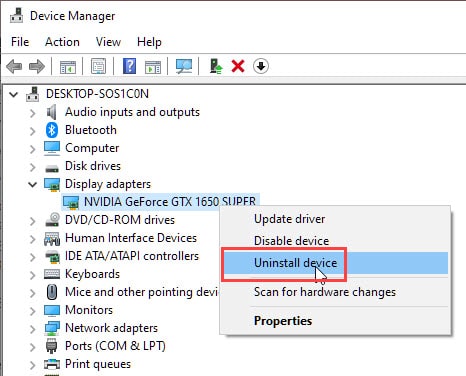
- Open the Device Manager again.
- Expand the Display Adapters and right-click on the graphics driver.
- Right-click on the Uninstall Device option.
- Follow the on-screen applications to complete the process.
- Restart your PC.

After your PC restarts, visit the manufacturer’s website and download the latest graphics drivers. Install them and check if the yellow tint gets removed.
Solution 3: Add A Different Color Profile
Some users were able to fix this issue by adding a different color profile. To do it, follow the steps given below:
- Type Control Panel in the Windows search bar and select the top result.
- Change the View by option to Large Icons.
- Locate the Color Management option and click on it.
- Make sure the correct Device CDU is selected from the drop-down menu.
- Check the Use my settings for this device box.
- Click on Add. It will open the Associate Color Profile window.
- Double click on the sRGB virtual device model profile option in the WCS Device Profiles section.
- Now the sRGB virtual device model profile option will appear among the Profiles.
- Select it and click on the Set as Default Profile option.
- Close the Color Management window.
- Restart your PC.
Check if the yellow tint is still present on your screen.
Solution 4: Tweak The Color Settings
If setting a different color profile doesn’t fix the yellow tint on your screen, try tweaking the colors manually from the graphics control panel. Right-click on the desktop and select the graphics control panel option in the right-click context menu. In the Display section of the control panel, select the Color or Color enhancement option.
Various bars will appear on your screen. Try playing with them a little and see if the tint reduces. Find the best color settings for you and click on Apply and OK to save the changes.
Solution 5: Check The Monitors OSD Color Settings
If changing the color settings from the graphics control panel doesn’t solve the yellowish tint, try changing the colors from your monitor’s menu. Open the menu option and move to the Colors section. Try tweaking the settings to reduce the yellow tint.
Solution 6: Take To A Service Centre
If none of the above solutions are able to fix this issue, it is likely a hardware issue. If you have recently bought the display or laptop, and returning is still possible, I would suggest you return or replace it. Otherwise, you will have to take it to a service center and have them fix the issue for you.
Wrapping Up
So, there you have it. Now you know how to get rid of yellow screen tint or what needs to be done if you can’t fix it yourself. If you have any questions regarding this topic, ask them in the comment section below.

Leave a Reply