Virtual drives are useful for various purposes. Virtual Machines are run off of such virtual drives, which provide a safe sandboxed environment for the software.
But keeping virtual drive after its purpose has been fulfilled is just a waste of space.
After the virtual drive has served its purpose, many users don’t know how to remove virtual drives. We have come across many users asking “how do I delete a virtual drive in Windows 10?” on various forums. In this article, we have addressed that question and written in detail on how you can delete virtual drives from your system.
After reading this article, all your doubts on how to remove virtual drives should be gone.
Also, check out this article if you want to rename a drive in Windows 10.
How Do I Delete A Virtual Drive In Windows 10?
Contents
To delete a virtual drive, you can use 2 different methods. You can use the Disk Management Console, Diskpart, or do it from the properties of the drive. We have given all the methods below, so choose whichever one you prefer.
Method 1: Use Disk Management Console
The Disk Management console is a tool that is used to manage all the drives that are installed on your PC. This includes hard drives, optical disks, and flash drives. This tool can also partition and format drives or assign different letters for them. And also it can delete virtual drives.
To use the Disk Management console for deleting virtual drives, follow the steps given below:
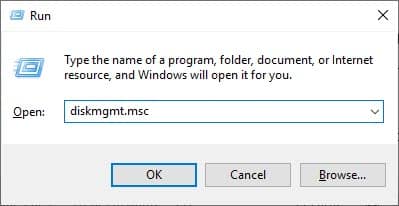
- Press the Windows + R keys on your keyboard to open the Run utility.
- Type diskmgmt.msc and press Enter. This will open the Disk Management console on your screen.

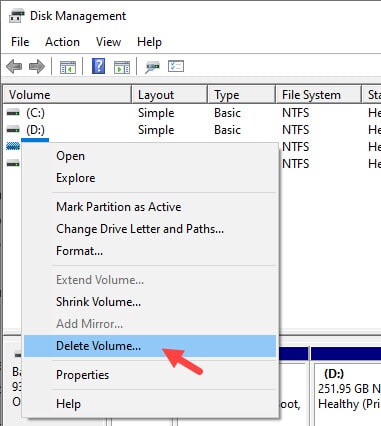
- Locate the virtual disk among those listed in the Volume section and right-click on it.
- Now, select the Delete Volume option from the pop-up menu. When a dialogue pops up asking if you want to back up the data stored in it. If you forgot to back up the data, then click on No go back it up. If you have the data backed up or if you don’t want to back up, then click on Yes.

- Wait for the volume to be deleted.
- Now, to completely detach the Virtual disk, right-click on the disk again and select the Detach VHD option.
- If you want to delete the virtual hard disk file after removing the disk, then check that box. Finally, click on OK.
This method is fairly simple and you shouldn’t face any issue while doing this method. However, if you don’t like this method then you can check out the next one, which has been done using the Diskpart.
Method 2: Use Diskpart
Diskpart is a command line disk partitioning utility. Like the Disk Management console, Diskpart also can be used to manage partitions of hard drives and flash drives. It can also perform functions like creating, deleting, and merging partitions. You can also delete the virtual drive with Diskpart.
To delete Virtual Drive using Diskpart follow the steps given below:
- Open the Run utility again.
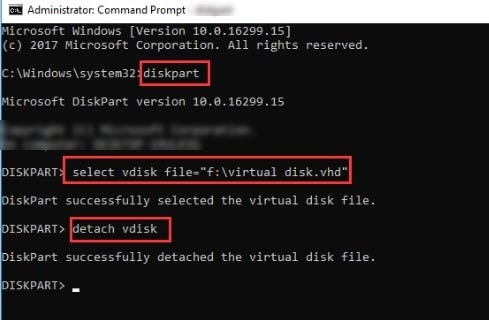
- Type cmd and press Ctrl + Shift + Enter to open an elevated Command Prompt.
- Enter the following commands in the Command Prompt:
a) diskpart , press Enter
b) select vdisk file=“f:\virtual disk.vhd”, press Enter (the “f” represent the name of the virtual disk)
c) detach vdisk , press Enter.

- After the above steps are finished, close the Command Prompt.
Method 3: Delete From This PC
Another method you can use to remove the virtual drive is from the properties of This PC. To do it, follow the steps given below:
- Open This PC and right-click on the virtual drive.
- Next, select the Properties option.
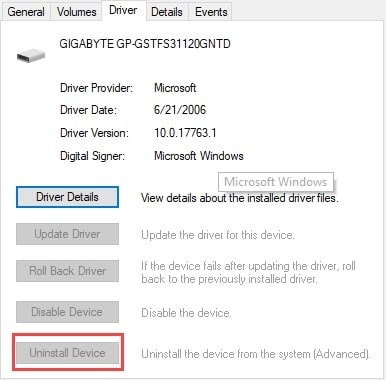
- Click on the Hardware tab and select the virtual disk that you want to remove and then click on the Properties option.
- Now, select the Driver tab and click on the Uninstall Device option.

- Finally, restart your computer.
Wrapping Up
So, there you have it. Now the question “How do I delete a virtual drive in Windows 10” should be answered. If you have any questions related to this topic, then feel free to ask them in the comment section.
Leave a Reply