Google Chrome is one of the most used internet browsers. It has earned this by providing regular updates to fix issues like bugs or errors and adding new features for better user experience. Google Chrome automatically updates on Windows 10, which is very convenient for most users.
But, some users prefer to check out the details of the new update before updating Chrome. This allows them to avoid unnecessary errors that some new updates may trigger. In this article, I have discussed how to turn off Chrome auto update in Windows 10.
Turn Off Chrome Auto Update
Contents
Updating Chrome is important to keep your browser safe. But sometimes a new update can make changes in functionalities, like removing certain old features that you may not be up to. Because of this, you can stop Chrome from updating automatically and update manually.
To disable Chrome auto update, I have discussed 3 methods below. Read and execute them carefully to turn off Chrome auto update.
Method 1: Rename The Chrome Update File
The auto-updating procedure on Chrome is performed by the Google Update application, which is based on the open-source Omaha project. To stop Chrome from updating automatically, you must rename the Google Update application in the Chrome folder. This will trigger an error whenever Chrome tries auto-updating. To do it, follow the steps given below:
- Press the Windows + E keys to open the Windows Explorer.
- Navigate to the following location:
C:\Program Files(x86)\Google\, where C is the system drive. - Open the Update folder.
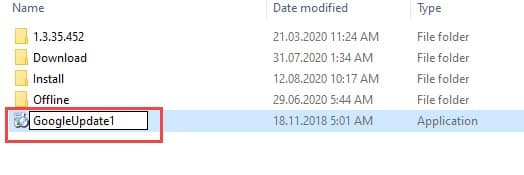
- Right-click on the GoogleUpdate application and select the Rename option.
- Rename it to GoogleUpdate1.

- Now, open Chrome and type the following address and press Enter:
chrome://settings/help - Now, you will see an error that stops Chrome from checking for updates.
Method 2: Disable Chrome Auto Update From Windows System Configuration
Another way to disable the Chrome auto update is by disabling the Google update services from the Windows System Configuration. To do it, follow the steps given below:
- Press the Windows + R keys to open the Run utility.
- Type msconfig and press Enter to open the System Configuration dialog.
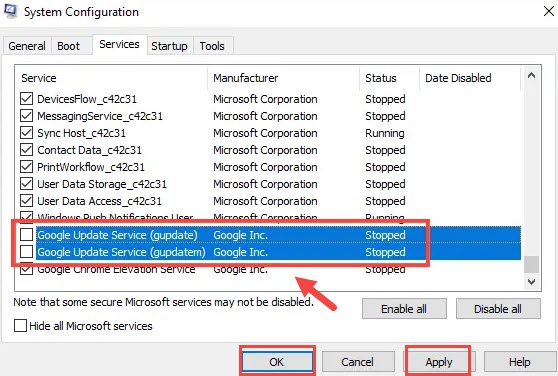
- Locate and uncheck the Google Update Service (gupdate) and Google Update Service (gupdatem) boxes from the services list.

- Click on Apply and OK to save the changes.
- Finally, restart your computer.
Method 3: Disable Chrome Auto Update Form Registry Editor
You can also stop Chrome from updating automatically by changing certain Registry keys. Editing the Registry can be risky as all the Windows settings are stored there. Backup the Registry keys before executing the following steps:
- Open the Run utility again.
- Type regedit and press Enter to open the Registry Editor.
- Navigate to the following key:
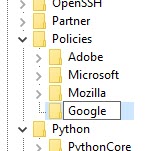
Computer\HKEY_LOCAL_MACHINE\SOFTWARE\Policies - Right-click on the Policies key and select the New option to create a new subkey. Name the new subkey Google.

- Again, right-click on the Google key and create another subkey. Name it Update.
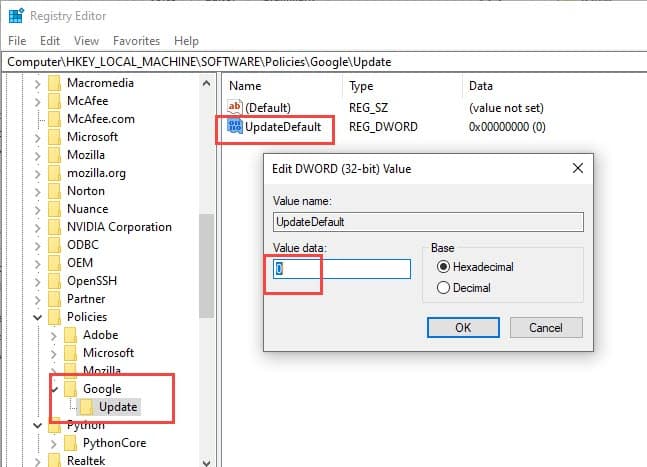
- Select the Update key and right-click on the white part of the right panel and select New>DWORD (32-bit) Value.
- Name the new value UpdateDefault.
- Double-click on it and set the value 0.

- Click on Ok to save the changes and close the Registry Editor.
This should disable the auto update feature of Chrome.
Wrapping Up
So, there you have it. Now you know how to turn off Chrome auto update. If you have any questions related to this topic, ask them in the comment section below.
Method “Method 3: Disable Chrome Auto Update Form Registry Editor” is the best solution regarding this issue, but it’s a little hard for novices. Thank you.