Microsoft Teams is a communication and collaboration platform with a business-oriented setting, where employees of a particular company can chat, share files, and conduct video meetings. Recently many users have reported that the camera on Microsoft teams is not working. This prevents users from holding video meetings.
We understand how important this situation can be, and that is why in this article I have discussed how to enable camera on Microsoft Teams and what to do when it is not working.
Also, read this article to learn about Microsoft Reward Points and how to earn them fast.
How To Enable Camera On Microsoft Teams?
Contents
If Microsoft Teams has access to your camera, then you do not need anything else to enable it. You can check whether you have selected the correct camera from the settings of Teams. To do it, follow the steps given below:
- Launch Microsoft Teams.
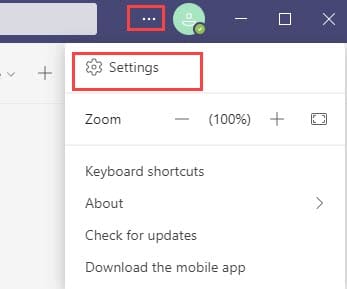
- Click on the 3 dot button beside your profile circle to open the menu.
- Select the Settings option from the popup menu.
- Click on the Devices option on the left panel.
- In the Camera section, click on the drop-down menu and select the camera you are using.
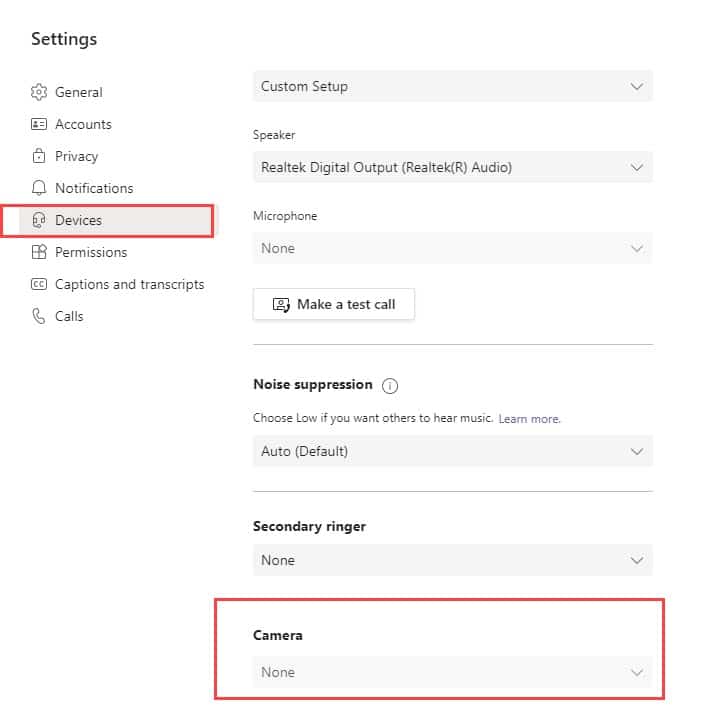
This is how to enable camera on Microsoft Teams. Now, conduct a video call on Teams to check whether the camera is working or not. If you find the camera drop-down menu in the settings is greyed out, or if even after selecting your camera it does not work, then you need to do some troubleshooting.
Why Is Microsoft Teams Camera Not Working?
There can be various reasons why Microsoft Teams camera is not working. Here are some of those reasons:
- The obvious reason is that the camera is broken that’s why it is not working.
- Microsoft Teams may not have permission to access the camera.
- The camera driver can be corrupted or outdated and thus stopped working for Teams.
- Your antivirus can block Teams from using the Camera.
- The Microsoft Teams app can be outdated or corrupted, thus causing this issue.
Now that you know the various reasons why the camera won’t turn on, it is time to troubleshoot this issue.
Troubleshooting Microsoft Teams Camera Not Working Issue
Here I have mentioned the troubleshooting procedures that you need to go through in order to fix this issue. Follow the solutions given below carefully and read the steps properly before executing them.
Solution 1: Check If The Camera Is Broken
The first thing you should check is whether the camera is broken or not. Try running another application that requires the use of your camera and see if it is working. For example: run the Camera app from the Start menu. If the camera is working for other apps, then skip to the next solution.
However, if you find that the camera is still not working, then try plugging the camera to another PC.
Now, check whether the camera is working on that PC or not. If possible, plug in a new working camera to your PC and see if that is working.
In both situations, you should get a clear picture of whether the camera is broken or not. If you find that the camera is not broken, then move on to the other solutions given below.
Solution 2: Update Microsoft Teams
Check if your Microsoft Teams is outdated. If yes, then you may have found the cause of the problem. Update Teams and see if it fixes the camera issue. To update Teams, follow the steps given below:
- Open Microsoft Teams.
- Click on the Profile circle to open the menu.
- Select the Check for updates option.
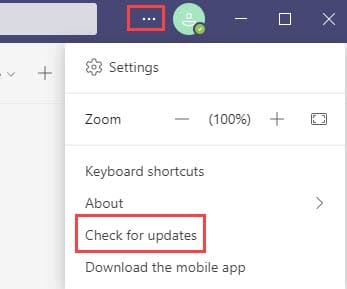
- If any update is available, then Teams will download and install it automatically.
- Close Teams after the update is complete and relaunch it.
- Check if the Camera is working now or not.
Solution 3: Enable Access To Camera From Privacy Settings
Windows has privacy settings that stop any application from accessing important information, like location, access to the camera, access to the microphone, and many other options, without the user’s discretion.
For Teams to access your camera, you need to enable it from the privacy settings first. To enable the camera in privacy settings, follow the steps given below:
- Right-click on the Start menu and select the Settings option.
- Select the Privacy option.
- Scroll down to the App permissions section and select the Camera option.
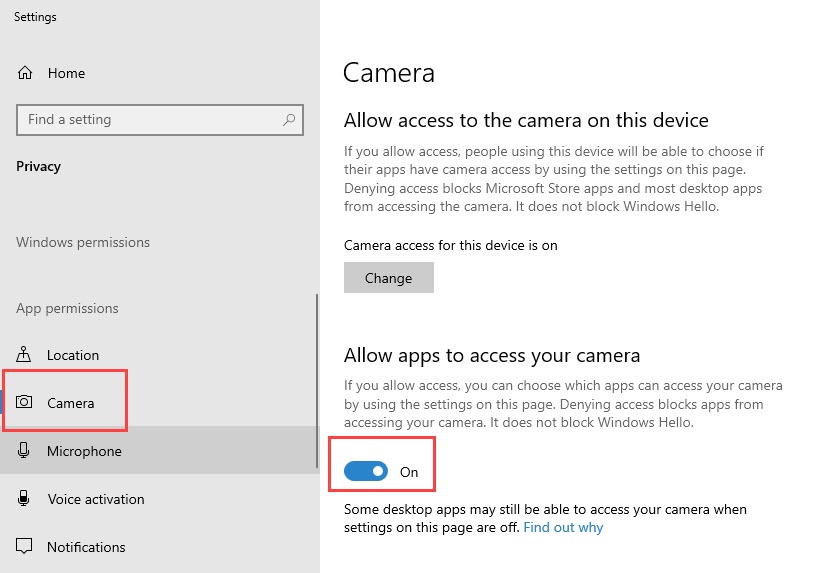
- Click on the Change option and turn on the Camera access for this device toggle in the Allow access to the camera on this device section.
- Next, turn on the toggle in the Allow apps to access your camera option.
- Keep scrolling down until you reach Microsoft Teams and turn on the toggle beside it.
Now, launch Teams and check if still, the camera won’t turn on.
Solution 4: Allow Access To Camera In Your Antivirus
Some antiviruses, like Kaspersky, can prevent other apps from accessing the camera. This might be the reason why Microsoft Teams camera is not working. If you have Kaspersky, follow the steps given below to provide other apps access to the camera:
- Open Kaspersky and click on the Privacy Protection option.
- Disable the Webcam Protection toggle.
- Close Kaspersky.
Now you should be able to use the camera on Teams.
Read this article to learn how to completely uninstall AVG from your PC.
Solution 5: Troubleshoot Webcam Drivers
Outdated or corrupted webcam drivers can also be the cause of this issue. If your Webcam driver is outdated, then follow the steps given below to update it:
- Press the Windows + R keys to open the Run utility.
- Type devmgmt.msc and press Enter to open the Device Manager.
- Expand the Imaging devices option and right-click on your webcam driver.
- Select the Update driver option from the pop-up menu.
- Click on the Search automatically for drivers option.
- Follow the on-screen instructions to complete the process.
If you had recently updated the webcam driver, then try rollbacking the update and see if that fixes this issue. To roll back the update, follow the steps given below:
- Open the Device Manager again.
- Right-click on the Webcam driver and select the Properties option.
- Click on the Driver tab and select the Roll Back Driver option.
- Follow the on-screen instructions to complete the process.
If rollbacking the driver also did not work, then try reinstalling the driver. To uninstall the webcam driver, follow the steps given below:
- Open the Device Manager again.
- Right-click on the Webcam driver and select the Uninstall Device option.
- Follow the on-screen instructions to complete the process.
After the driver uninstalls, restart the computer. When the computer restarts, Windows will automatically install the webcam driver. Now, check if this fixed the camera not working issue in Microsoft Teams.
Solution 6: Reinstall Microsoft Teams
If none of the above solution work and the webcam is not broken, then the only alternative left is to reinstall Teams. To uninstall Microsoft Teams, follow the steps given below:
- Open the Run utility again.
- Type appwiz.cpl and press Enter to open the Programs and Features panel.
- Locate Microsoft Teams among the other listed apps and right-click on it.
- Select the Uninstall option.
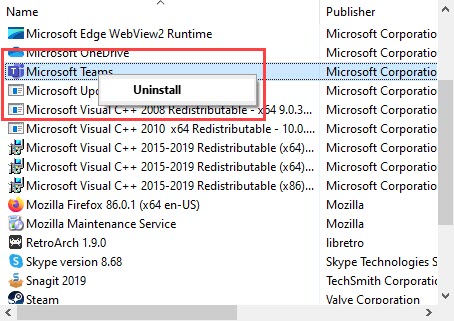
- Follow the on-screen instructions to complete the process.
After Teams uninstalls, visit their official website and download it again. After you have downloaded the app, install it.
Wrapping Up
So, there you have it. Now you know how to enable camera on Microsoft Teams and what to do if Microsoft Teams camera is not working. If you have any further questions related to this article, ask them in the comment section below.
Leave a Reply