Windows 10 is the most popular desktop OS in the world, overtaking the predecessor Windows 7 by the end of 2018. Now, Windows 10 has also become the most used desktop OS. Apart from all this success, Windows 10 also has plenty of bugs and errors. One issue that has been prevalent for Windows users is the memory leak problem.
A memory leak occurs due to faulty memory allocation as RAM remains unreleased. This can be quite troubling as Windows will consume much higher system resources than normal because of this. In this article, I have discussed how to fix Windows 10 memory leak. After following the troubleshooting methods given in this article, the issue of memory leak in Windows 10 should get fixed for you.
What Causes A Memory Leak And Why It Is Bad?
Contents
As mentioned above, memory leaks occur due to faulty memory allocation as RAM remains unreleased. In other words, the system fails to use the memory, even it is not in use because some process or application failed to release the block of RAM to the system’s memory manager after it was done with it.
This is terrible as your system now has to run other processes with less memory. Here are all the problems you will face because of memory leak in Windows 10:
- Memory leak will lead to less free memory for idle tasks.
- It will slow down your system as less memory is available for allocation to all the running processes.
- Some applications can fail to run properly or even crash as they won’t have sufficient memory to remain open.
- This will strain your system resources and if it happens for a long period, it can potentially harm your PC’s hardware.
How To Check For Memory Leaks On Windows 10?
When your Windows 10 leaks memory, you will see signs like system slowing down, or basically any of the problems mentioned above. However, these issues can occur due to other reasons also. To confirm whether it is a memory leak, you can use the following methods.
- Resource Monitor tool.
- Memory Diagnostic tool.
- RaMMap tool.
Using The Resource Monitor To Detect Memory Leak
To use the Resource Monitor for detecting memory leak in Windows 10, follow the steps given below:
- Press the Windows + R keys to open the Run utility.
- Type resmon in the search box and press Enter to open the Resource Monitor.
- Select the Memory tab and monitor the Standby bar (blue bar) to check for a memory leak.
Using The Memory Diagnostic Tool To Detect Memory Leak
To run the Memory Diagnostic tool, follow the steps given below:
- Open the Run utility.
- Type mdsched.exe and press Enter.
- Select the Restart now option.
Your computer will restart and the Memory Diagnostic tool will run at boot, thoroughly checking your memory for issues.
Using The RaMMAp Tool To Detect Memory Leak
RaMMap is a Microsoft tool that can be used to check how your Windows is assigning the RAM and cache. You can click on this link and download the tool. After downloading it, right-click on the tool and select the Run as administrator option. Now it will check your PC for lost memory.
How To Fix Windows 10 Memory Leak?
Now that you know what causes the Windows 10 memory leak and how you can check it, it’s time to learn how to troubleshoot it. It is extremely important that you fix the memory leak as quickly as possible, otherwise, it can damage your PC. Here is how to fix memory leak in Windows 10.
Solution 1: Close Processes That Are Consuming Too Much Memory
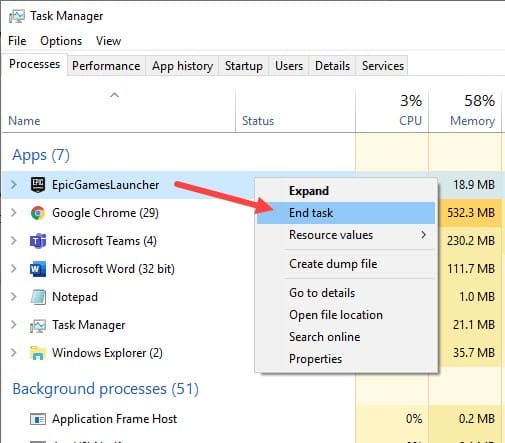
The first thing you can try is to close the applications or system processes that are consuming more memory than they should. This can be done using the Task Manager. To use the Task Manager for closing down processes, follow the steps given below:
- Press the Ctrl + Shift + Esc to open the Task Manager.
- Select the Processes tab.
- Locate all the applications or system processes that are hogging more memory than they should and right-click on them.
- Select the End Task option from the right-click context menu to close these processes.

Solution 2: Update Drivers
Outdated drivers are known to be responsible for various issues and Windows 10 memory leak is one of them. It is best to always keep to the drivers updated. To update your drivers, follow the steps given below:
- Open the Run utility by pressing the Windows + R keys.
- Type devmgmt.msc and press Enter. This will open the Device Manager.
- Locate the outdated drivers and right-click on them.
- Select the Update Driver option from the right-click context menu.
- Click on the Search automatically for drivers
- Follow the on-screen instructions to complete the process.
After updating the drivers, restart your computer. Now check whether Windows 10 memory leak persists.
Solution 3: Run The Memory Diagnostic Scan
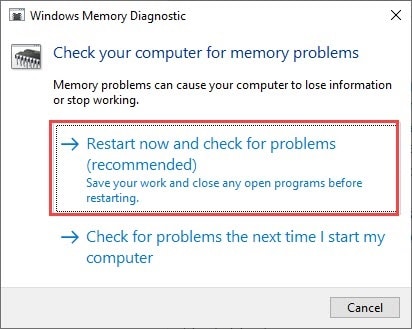
The Memory diagnostic tool can not only be used to find the memory leak issue but also to fix it. Follow the steps given below to run the Memory Diagnostic tool:
- Open the Run utility.
- Type mdsched.exe and press Enter.
- Select the Restart now and check for problems (recommended) option.

- After your computer reboots into the Memory diagnostic tool menu, you can perform a basic scan.
- Also, you can select the Advanced options like the Pass count or Test mix.
- Press the F10 key to start the tool.
Now the memory diagnostic tool will run. It will locate and fix the bad sectors in the memory and should also fix the Windows 10 memory leak issue.
Solution 4: Check For Malware
Hidden malware are known for causing a plethora of PC related problems, including memory leak. Malware tends to hide in your PC by disguising as other apps and cause an improper memory allocation issue.
To get rid of malware, you need a strong antivirus. Malwarebytes is one of the best anti-malware software. You download and run it in your PC to get rid of all hidden malware.
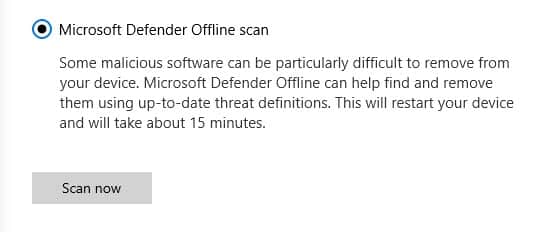
Other than that, if you don’t want to the hassle of installing 3rd party antivirus, you run the Microsoft offline scan on the native Windows Defender. The offline scan is quite powerful and should get rid of all the hidden malware in your PC. To run the Windows Defender, follow the steps given below:
- Type Windows Security in the Start menu and select the top result.
- Click on the Virus and Threat protection option.
- Select the Scan options.
- Scroll down and select the Microsoft Defender Offline Scan option and click on the Scan now option.

- Windows will start the scan and restart after it is finished. This scan will take some time, so remember to do it when you have time in your hands.
Solution 5: Defrag Your Hard Disk
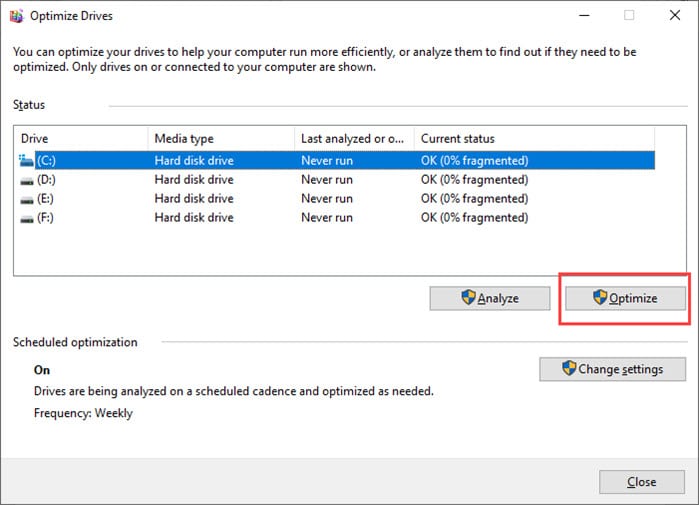
Your hard disk is generally defragged by Windows 10 automatically. However, you can still do it manually in order to fix the memory leak issue as quickly as possible. To defrag manually on Windows 10, follow the steps given below:
- Open My Computer from the desktop.
- Right-click on the System drive.
- Select the Properties option from the right-click context menu.
- Click on the Tools tab and select the Optimize option in the optimize and defragment drive section.
- Follow the on-screen instructions to complete the process.

Solution 6: Try A Registry Tweak
Many users have reported that clearing the PageFile.sys that Windows uses as virtual memory, fixes the memory leak issue. You can clear it from the Windows Registry. Before you try this solution, you need to back up the registry keys.
Having a backup of registry keys will help you if you make any mistake following the steps given below. Windows Registry has all the settings of Windows, so even a simple mistake can lead to your system crashing.
To clear the PafeFile.sys by tweaking the Registry keys, follow the steps given below:
- Open the Run utility.
- Type regedit and press Enter to open the Registry Editor.
- Navigate to the following Registry key:
Computer\HKEY_LOCAL_MACHINE\SYSTEM\CurrentControlSet\Control\Session Manager\Memory Management - On the right-panel, double-click on the ClearPageFileAtShutdown value.
- Change the value data to 1 and click on OK.
- Restart your PC.
After your PC restarts, the memory leak issue should be fixed.
Wrapping Up
So, there you have it. Now you know how to fix Windows 10 memory leak. The above solutions should help you fix this issue. If you have any more questions regarding this article, ask them in the comment section below.
Leave a Reply