Google Chrome has been the most popular internet browser for some time. With its inbuilt Google services access, easy to navigate UI and ability to set themes and backgrounds surely makes it apparent why it is so popular.
However, not everything is perfect with Chrome. Google Chrome is well known for hogging memory. Running it on low end PCs has always been an issue. Yes, it has become better over the years and now it uses less memory than even Firefox.
But still the amount of memory it hogs remains quite high. Here I have discussed how to reduce Chrome memory usage.
How To Reduce Chrome Memory Usage?
Contents
Chrome’s memory usage is one of its big issues that’s keeping many users away from it. Even with all the positives of using Chrome, many are simply unable to use it due to its memory hogging issues. Here are some methods to limit Chrome memory usage.
Method 1: Update Chrome
As I mentioned earlier, Chrome has become much better with memory utilization over the years. Keeping Chrome updated to the latest version will allow you to use the best version of Chrome and will reduce Chrome memory usage.
Chrome is generally set on auto update, but there are ways to disable its updates. To update Chrome manually, follow the steps given below:
- Open Chrome.
- Click on the 3 dot button located on the upper right-corner of the screen.
- Move the cursor to the Help option. A side menu will appear.
- Click on the About Chrome option.
- Chrome will now check for updates and should automatically download and install it.
Method 2: Open Limited Number Of Tabs
Opening many tabs on Chrome will force it to hog more memory. If you have opened many tabs, close the ones that are not in use or unnecessarily open to reduce Chrome memory usage. You can also set web pages as bookmarks to quickly open them, rather than keeping open a million tabs at the same time. The moment you close tabs, you will notice a drop in Chrome’s memory usage.
If closing and opening tabs is too much work for you, there is an alternative. Chrome has an extension named the Great Suspender. This extension can suspend all tabs leaving the one in use. When you want to restore the suspended app, it can be done with a simple click.
Method 3: Enable Hardware Acceleration
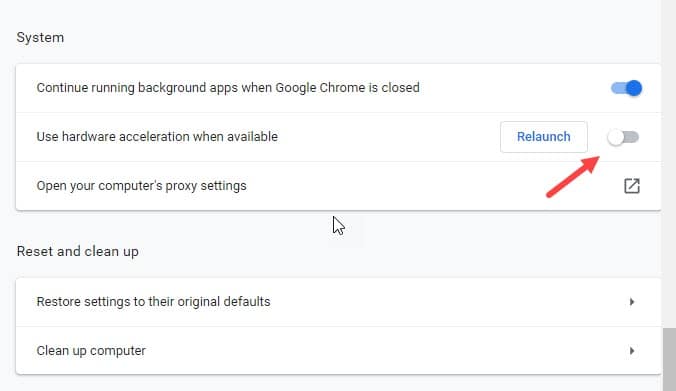
One of Chrome’s features is Hardware acceleration, which allows the GPU rendering. This somewhat takes off the load from the CPU and it can limit Chrome memory usage. Normally, this feature is enabled by default on Google Chrome, but it is also known to be the cause of many minor bugs and issues on Chrome.
If it is disabled on your Chrome, here is how you can enable it again:
- Open Chrome and click on the 3 dot button, located on the upper right corner of the screen.
- Select the Settings option from the menu.
- Scroll down and select the advanced option. This will unlock further options.
- Keep scrolling down until you reach the System section.
- Check the Use Hardware acceleration when available toggle.
- Restart Chrome.

After Chrome restarts, use Chrome for some time and check its memory usage from time to time.
Method 4: Open Chrome In Safe Mode
Google Chrome comes with a Safe Mode feature, which is the incognito mode. The Safe Mode feature is great for making Chrome reduce memory usage. Open Chrome in Safe Mode and disable all installed extensions in Chrome. Extensions always active in Chrome can lead to high memory consumption. Running Chrome in Safe Mode will prevent and should reduce Chrome’s memory usage.
Method 5: Remove Unwanted Extensions
Running Chrome in Safe Mode may seem to be a quick fix, but the fact that it disables all extensions, can make it hard for the user to surf comfortably on Chrome. Rather than starting Chrome in Safe Mode, you can simply remove the unwanted, memory hogging extension. To remove extensions on Chrome, follow the steps given below:
- Open Chrome and click on the 3 dot button, located on the upper right corner of the screen.
- Move the mouse cursor to the More tools option. A side menu will appear on your screen.
- Click on the Extensions option. All the extensions installed on your Chrome will be on your screen.
- Select the Remove option on the extension you want to delete and confirm the delete prompt.

After the unwanted extensions are removed from your Chrome, check Chrome’s memory consumption.
Method 6: Create A New Profile
Creating a new profile and deleting the existing one will give you a fresh start on Chrome and make it consume less memory. Also, creating a new profile by deleting the existing one will also delete all your autofill data on Chrome, like saved bookmarks, passwords, etc. So, make sure you back them up before following these steps:
- Press the Ctrl + Shift + Esc keys to open the Task Manager.
- In the Processes tab, locate Chrome and right-click on it.
- Select the End Task option. This will close all Chrome background processes.
- Now, navigate to the path mentioned below:
C:\Users\<username>\AppData\Local\Google\Chrome\User Data\Default
Select the folder with the account’s username in place of looking for <username> - Press the Ctrl + A keys to select all the files in the Default folder.
- Press Shift + Del key and confirm the prompt.
- Open Google Chrome. Chrome will ask you to setup a new profile.
- Follow the instructions given on your screen to create a new profile on Chrome.
Surf on Chrome and check if the memory consumption has reduced.
Method 7: Restore Chrome’s Default Settings
If none of the above solutions work, try restoring Chrome’s default settings to reduce Chrome memory usage. To restore Chrome’s default settings, follow the steps given below:
- Open Chrome Settings.
- Scroll down and click on the Advanced options.
- Locate the Reset and Clean up section and click on the Restore settings to their original defaults option.
- Select the Reset settings option from the prompt.
- Restart Chrome.

After Chrome restarts, check Chrome’s memory usage.
Method 8: Check For Malware
Normally, Chrome should not be consuming extremely high numbers of memory. Yes, Chrome does consume a large chunk of the memory, but it is generally bearable. There is always a possibility that your PC is infected with malware and that is what’s causing Chrome to consume more memory than it should. To check for it, run the clean up tool in Chrome. Here are the steps for doing it:
- Open Chrome and click on the 3 dot button, located on the upper right corner of the screen.
- Select the Settings option from the menu.
- Scroll down and select the advanced option. This will unlock further options.
- Locate the Reset and Clean up section and click on the Clean up computer option.
- Select the Find option in the Find harmful software section.
- Wait for Chrome to check for harmful software. Follow the instructions given on your screen to deal with the software.

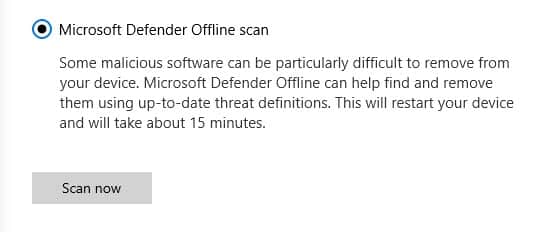
You can also use other 3rd party tools to detect malware on your PC. Malwarebytes is one such tool that is quite effective. If you don’t want to use any 3rd party tool, then you can run the Microsoft Defender Offline tool. To run the Microsoft Defender Offline scan, follow the steps given below:
- Type Windows Security on your Start menu.
- Select the top result.
- Click on the Virus and threat protection option.
- Select the Scan options in the Current threats section.
- Scroll down and check the Microsoft Defender Offline scan option.
- Click on the Scan now option.
- Microsoft Defender will start scanning your PC. It will approximately take around 15-20 minutes. Your PC will automatically restart after the scan is finished.

Wrapping Up
So, there you have it. Now you know how to reduce Chrome memory usage. If you are having too much issue using Chrome, I will recommend you shift to another browser, Edge seems a great option after it shifted to Chromium. Shifting from Chrome to Edge, you will be familiar with the UI and as Edge uses extremely low memory, you won’t have any issues with it.
Leave a Reply