Windows 10 has always been very conscious of user security. It provides multiple methods using which you can protect your PC.
Let it be setting up a normal password, an image password, or a PIN. Creating a PIN is a very secure way of protecting your PC, however, not many users prefer using it.
Normally, it is the users’ choice for setting up a password of the type they prefer or not to set up a password at all. But recently many users are facing a bug where Windows 10 keeps asking for PIN.
If the user hasn’t set up a PIN, Windows almost forces them to make one. This can be extremely annoying especially to those that dislike setting PIN as password protection.
In this article, I have discussed the troubleshooting procedure that can fix this issue.
What To Do When Windows 10 Keeps Asking For PIN?
Contents
Generally, this issue occurs due to a bug. However, it can also happen due to incorrect settings. Here I have discussed the troubleshooting procedure you should follow to fix this issue. Read and execute the instructions given below carefully to avoid making any mistakes.
Solution 1: Dismiss PIN
If you are facing a prompt to setup Pin while your PC is starting up, then it can be fixed by dismissing the PIN setup. To do it, follow the steps given below:
- When the PIN screen appears instead of the password screen during startup, click on the Next option.
- Now, select the Cancel option. The following message should appear “Did you mean to cancel PIN?”.
- Click on the I’ll set up a PIN later option. You should now log in to your desktop.
- Type Windows Security in the Start menu and select the top result.
- Click on the Account Protection option.
- Select the Setup option.
- Now, click on the Dismiss option.
This should fix this issue for you. If it doesn’t, then follow the next solution.
Solution 2: Disable PIN In Windows 10 Using Settings App
You can disable PIN in Windows 10, which should fix this issue. To disable PIN in Windows 10 using the Settings app, follow the steps given below:
- Right-click on the Start menu and select the Settings option from the pop-up menu.
- Click on the Accounts option.
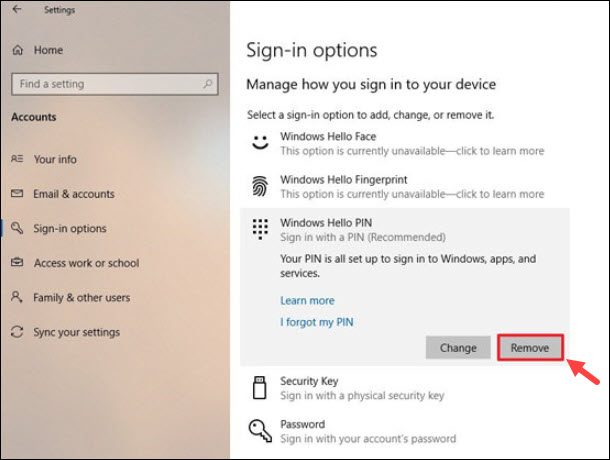
- Select the Sign-in option and click on the PIN option.
- As you already have a PIN created, you should see the Remove option. Follow the on-screen instructions to complete the process.

Solution 3: Disable PIN From Group Policy
If the above solution doesn’t fix this issue for you, then in Windows 10 disable PIN prompt from the Group Policy. To do it, follow the steps given below:
- Press the Windows + R keys to open the Run utility.
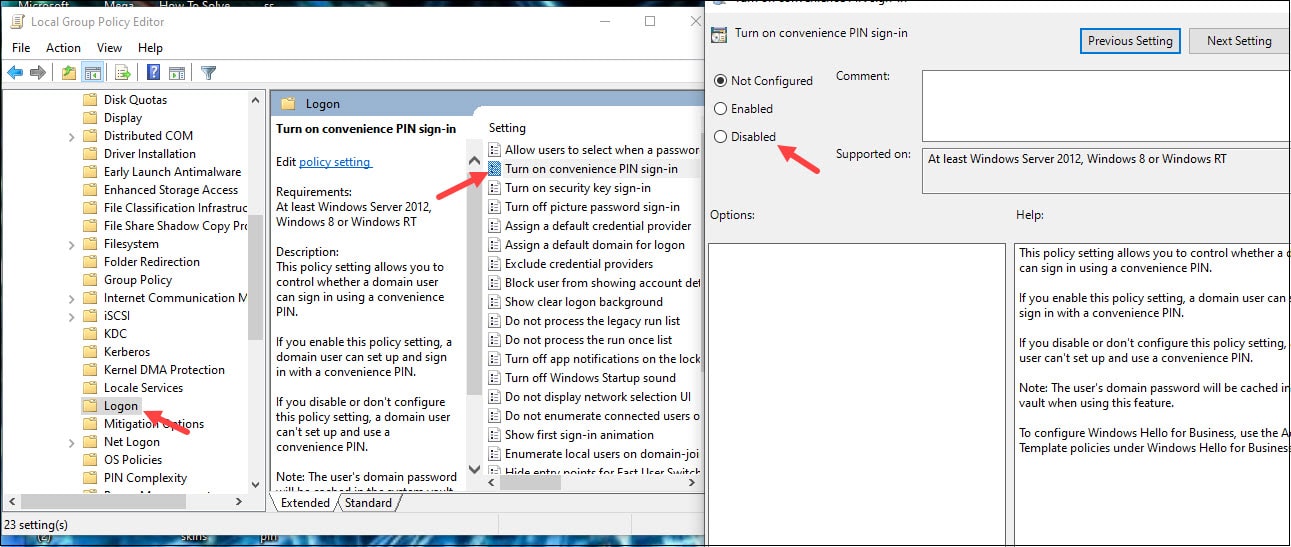
- Type gpedit.msc and press Enter to open Group Policy editor.
- Navigate to the following policy folder in the left panel:
Computer Configuration >> Administrative Templates >> System >> Logon - Now, locate the entry named Turn on convenience PIN sign-in on the right panel and double click on it.
- Check the Disabled circle on the new window.
- Click on Apply and OK to save the changes.
- Close the Group Policy Editor and restart your PC.

Check whether still you are being asked to enter a PIN during sign in. If yes, then try the next solution.
Solution 4: Select The Correct Option On Login Screen
Did you used to login with a password and suddenly now you have to enter a PIN? It may be possible that you have the wrong sign-in option selected on the login screen. You will likely notice that there are two icons on the login screen. If there are no icons, then click on Sign-in and now you should be able to see them.
Click on the right icon. This right icon is for the password whereas the left icon is for the PIN. Selecting the right icon will take you to the password screen, away from the PIN. Many users tend to overlook this simple thing and because of this Windows 10 Security asks for the PIN during sign in.
Solution 5: Create A Local Account
Windows security asking for PIN is mostly reported by users that have linked Microsoft accounts and used to log in through those. If you are one of them, then try creating a new local account. Creating a local account and signing through it has resolved this issue for some. Here is a complete guide on how to create a local account.
Solution 6: Create PINs With Letters
This is not a solution but a workaround that some of you may be interested in. If none of the above solutions have worked and you dislike using a PIN from your heart, you can use letters in the PIN to have the exact same password. By default, a PIN is set to be numbered but it can be changed using the steps given below:
- Right-click on the Start menu and select the Settings option from the pop-up menu.
- Click on the Accounts option.
- Select the Sign-in option and click on the PIN option.
- Click on the Windows Hello Pin option and select Add.
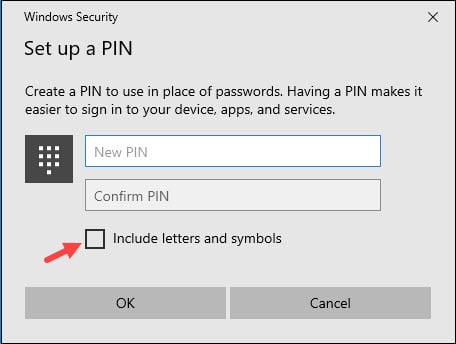
- Now, check the Include letters and symbols box.
- Type in the PIN and click on OK to save the changes.

Wrapping Up
So, there you have it. The above troubleshooting methods should fix this issue for you.
You can also try the workarounds mentioned at the end of the article if the other solutions don’t work. If you have any questions related to this topic, ask them in the comment section below.
Leave a Reply