Before the 1903 Windows 10 update (May 2019 update) users could choose whether to set up a local account or Microsoft account during the initial setup. In Windows 10 initial setup local account can no longer be created on the go. Before, Windows 10 used to provide both the options together and let the user choose.
But since the 1903 update, Windows 10 only asks the user to create a Microsoft account during the out-of-box-experience setup. However, it doesn’t mean that users cannot create a Windows 10 local account during the initial setup. The option has simply been hidden as Microsoft pushes the user to create a Microsoft account.
In this article, I have discussed how to create a local account in Windows 10 during the initial setup.
Also checkout:
Why Create Local Account Option Was Removed From The Initial Setup?
Contents
Microsoft used to provide both the options before, but the key target was always to make the user set up their Microsoft account. After the 1903 update, Microsoft simply wants the user to connect with a Microsoft account as it is much more beneficial to them. Over the years Microsoft has integrated all its apps with the same account, providing a much better and clean experience on its platform.
Creating a Microsoft account is definitely more beneficial. But if you prefer the old way of using the simple offline account, then below is the method you can use to set up the local account during the initial setup.
How To Create A Windows 10 Local Account During Initial Setup?
In Windows 10 initial setup local account option may have disappeared, but it hasn’t been removed. There is a workaround that users can use to set up an offline account in Windows 10 during the initial setup. In Windows 10 setup offline account during the initial setup using the following steps:
Note: I have considered that you are already on creating an account page during the initial setup. This means that you have already gone through the required steps to perform a clean install.
- The first thing you need to do is disconnect from the internet. Remove the Ethernet cable or turn off the Wi-Fi adapter, whichever source of internet you are using. Once you have disconnected from the internet, follow the rest of the steps.
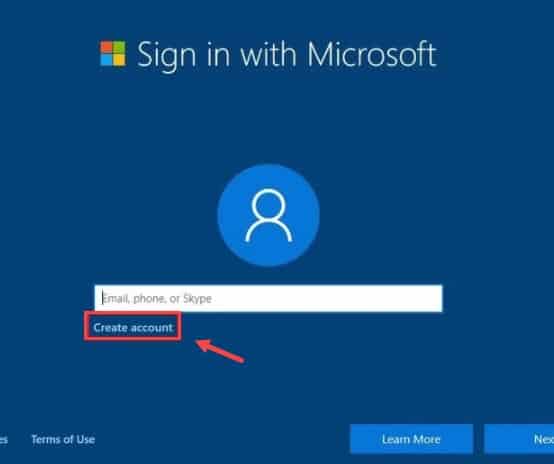
- Click on the Next option in the “Sign in with Microsoft” page.
- Next, select the Create account option.
- The “Something went wrong” error message will appear on your screen.
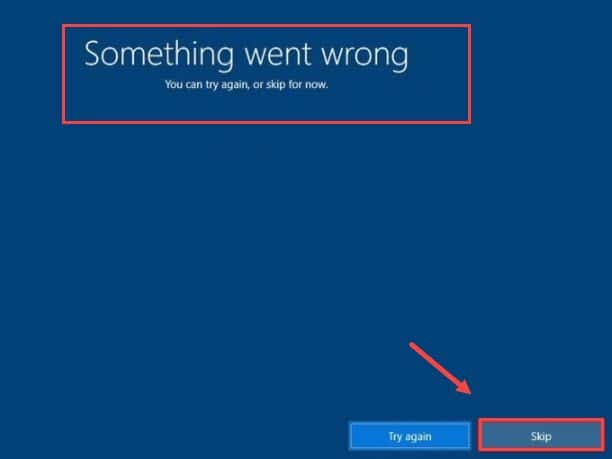
- Now, select the Skip option. You will now be able to create a local account.
- Enter the name of the local account and click on Next.
- Write your preferred password and click on Next. Then confirm your password and again click on Next.
- Select a security question and enter the answer. Click on Next.
- Follow the rest of the instructions on your screen to set up the local account.
How To Create A Windows 10 Local Account After Installation?
If you didn’t use the above methods to create a local account during the initial setup, then you can follow the steps given below to create it after the installation is finished.
- Right-click on the Start menu and select the Settings option from the pop-up menu.
- Click on the Accounts option and select the Family and other users option.
- In the Other users section, click on the Add someone else to this PC option.
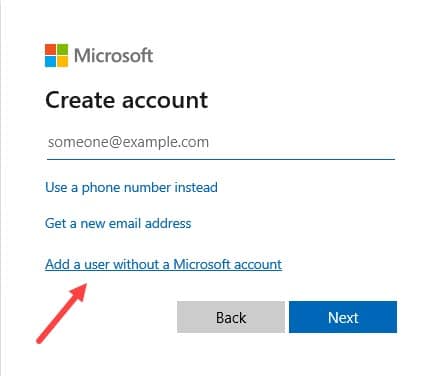
- Click on the I don’t have this person’s sign-in information option.
- Next, click on the Add a user without a Microsoft account.
- Enter the login details and click on Next.
- Follow the rest of the on-screen instructions to set up the local account.
How To Create A Microsoft Account After Installation?
If you created the local account rather than the Microsoft account during the initial setups, then you may be wondering how to create a Microsoft account now. Here are the steps to create a Microsoft account after the installation:
- Open the Accounts settings again.
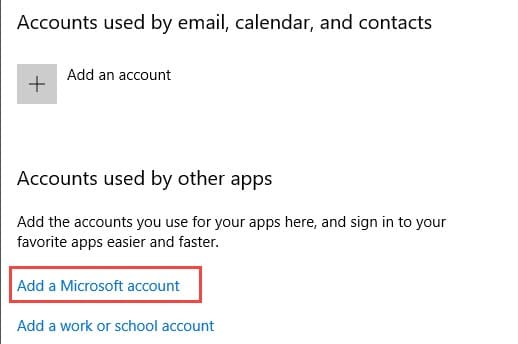
- Select the Email & accounts option.
- Click on the Add a Microsoft account option.
- After the Microsoft dialogue opens, click on the Create One!

- Now, fill the account details and follow the rest of the instructions on your screen to create the Microsoft account.
Wrapping Up
So, there you have it. Now you know how to create a Windows 10 local account during the initial setup. If you have any questions regarding this topic, then ask them in the comment section.
Leave a Reply