Skype has maintained its position as one of the most used video conferencing and calling apps.
However, Skype has its fair share of bugs and errors. One issue that is frequently reported by Skype users is the audio not working.
If your Skype audio is not working, then don’t worry as in this article I have discussed how to fix Skype audio issues.
Why Skype Audio Is Not Working?
Contents
Skype has many sound-related issues that get frequently reported. Issues like Skype not ringing when someone calls or Skype no sound in call or audio distorted.
There can be various reasons for Skype audio not working. Here are some of the reasons that can be behind this issue:
- In Skype no sound in call issue can occur if the output audio device is not set properly.
- Corrupted or outdated audio drivers can also be a cause of this issue.
- If certain audio services don’t work in your Windows 10, then such an issue can arise.
- Skype can be outdated or corrupted, leading to this issue.
- It can also be a hardware issue, like a broken speaker or headphone.
- Issues with the internet connection can lead to Skype audio becoming distorted or even not work.
As you can see, there can be plenty of causes for Skype sound not working on Windows 10.
Below I have mentioned many troubleshooting procedures that you need to go through in order to pin the cause of this issue and fix it.
How To Fix Skype Audio Issues On Windows 10?
Here are the troubleshooting procedures that you must undertake in order to fix issues with your Skype audio. Remember to read carefully before executing the following solutions.
Solution 1: Check If The Proper Audio Output Device Is Set In Skype
The first thing you need to check is whether the proper audio output device is set on Skype.
Incorrect audio device configuration is the most common cause of this issue.
If the output audio device is set incorrectly, then you will be unable to listen to the audio.
To change the audio output device in Skype, follow the steps given below:
- Launch Skype on your PC.
- Click on the 3 dots and select Settings.
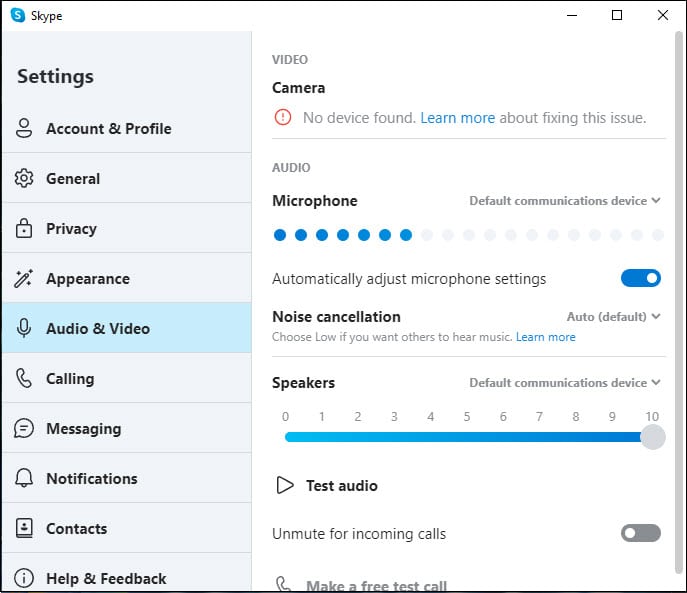
- On the left panel, select the Audio & Video option.
- In the right panel, check whether the Microphone and Speaker device are set properly. Also, check the volume slider.
- If you find an incorrect audio device, then click on the drop-down menu beside it. Select the correct device.
- Click on the Save option to save the changes.
- Restart Skype.
Now, check if the Skype audio is working again.
Solution 2: Change The Default Audio Devices Of Your PC
If setting the audio device on Skype didn’t fix the issue, then check the default audio devices of your PC.
Sometimes the default output audio device of your PC can be different from the one you selected on Skype.
If you find the default audio device of your PC is incorrect, then change it.
I have already given a detailed explanation on how to change audio devices on Windows 10 so you can check that out for the step by step.
Solution 3: Run The Audio Troubleshooter
Windows 10 has an in-built audio troubleshooter that can be used to check any audio-related issue in your PC.
Running the audio troubleshooter can provide insight on this issue and may even fix it. To run the audio troubleshooter in Windows 10, follow the steps given below:
- Type Troubleshoot Settings in the Windows search bar and select the top result.
- Next, click on the Additional troubleshooters option.
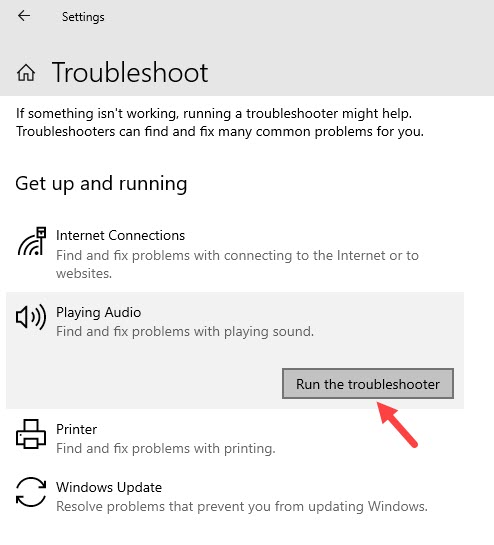
- In the Get up and running section click on the Playing Audio option.
- Select the Run the troubleshooter option.
- Follow the on-screen instructions to complete the process.
Solution 4: Troubleshoot The Audio Drivers
Another common cause for audio-related issues on Windows 10 is the corrupted or outdated audio drivers.
If your audio drivers are outdated, then start by updating it. To update the audio drivers, follow the steps given below:
- Press the Windows + R keys to open the Run utility.
- Type devmgmt.msc and press Enter to open the Device Manager.
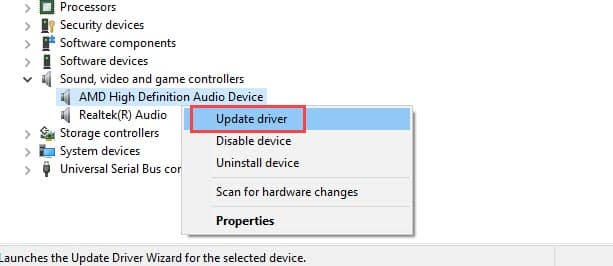
- Expand the Sound, video, and game controllers section.
- Right-click on the sound driver.
- Select the Update driver option from the right-click context menu.
- Click on the Search automatically for drivers option and follow the instructions on your screen to finish the process.
- After the update is complete, restart the computer.
Check whether the Skype audio is still not working. If yes, then try uninstalling and reinstalling the audio drivers.
To uninstall the audio drivers, follow the steps given below:
- Open the Device Manager again.
- Right-click on the audio driver and select the Uninstall device option.
- Follow the instructions on your screen to finish uninstalling.
- Finally, restart your PC.
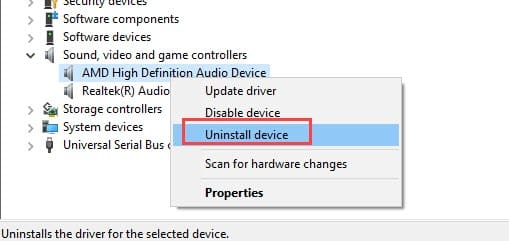
After you restart your PC, Windows will automatically install the default audio driver.
This should fix the Skype audio issue is it was caused by corrupted audio drivers.
Solution 5: Change The Windows Audio Service Properties
Windows audio service is responsible for all the sounds output.
If for some reason this service has disabled, you will find issues like Skype audio not working.
To change the Windows Audio service, follow the steps given below:
- Open the Run utility again.
- Type services.msc and press Enter to open the Services app.
- Scroll down and locate the Windows Audio option.
- Double-click on the Windows Audio service to open its properties.
- In the General tab, change the Startup type to Automatic.
- Select the Start option and click on Apply and OK to save the changes.
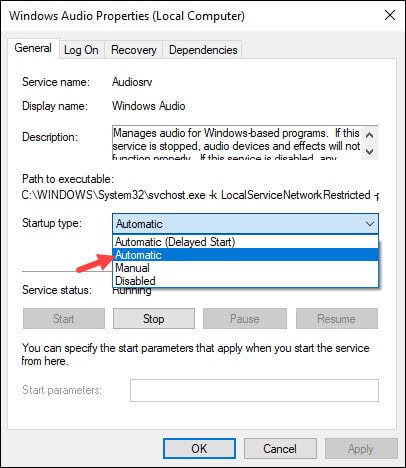
If the Startup type of Windows Audio Service was already set to Automatic, then try restarting the service. To do it, follow the steps given below:
- Open the Services app again and navigate to the Windows Audio service.
- Right-click on the service and select the Restart option.
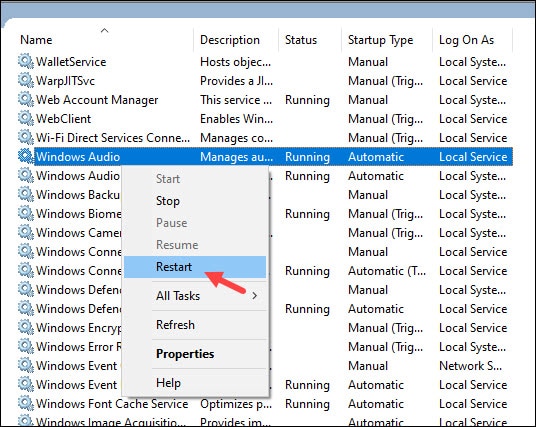
Now, check if still the Skype sound is not working on Windows 10. This solution should fix the issue if it was due to disabled audio service.
Solution 6: Check The Network Connection
Skype is an online messaging and video chatting app. The performance of the app is directly dependent on your internet connection.
If you have a bad or slow internet connection, then it can cause the distorted audio issue or other Skype audio-related issues.
Check your internet speed by clicking on this link and if you find any issue, contact your ISP and ask them to fix it.
Solution 7: Change The DNS Server
If you are facing internet issues, which is causing the Skype audio not working issue.
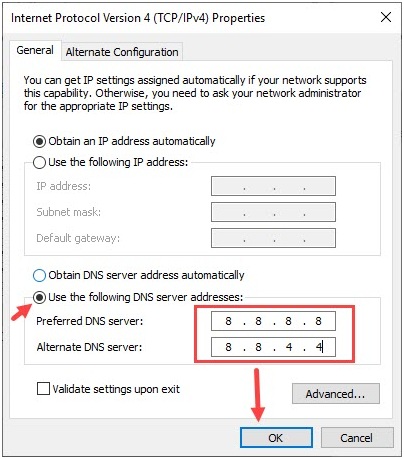
Then, you can try changing the DNS server and see if that works. To change the DNS server, follow the steps given below:
- Open the Run utility again.
- Type ncpa.cpl and press Enter to open the Network Connections panel.
- Right-click on your network adapter and select the Properties option.
- In the Networking tab, select the Internet Protocol option. Version 4 (TCP/IPv4) option in the This connection uses the following items option.
- Click on the Properties option after you have selected it.
- In the General tab, check the Use the following DNS server addresses circle and fill the information as mentioned below:
Preferred DNS server: 8.8.8.8
Alternate DNS server: 8.8.4.4 - Click on OK to save the changes.
Solution 8: Reinstall Skype
If none of the above solutions work, then try uninstalling and reinstalling Skype. To uninstall Skype, follow the steps given below:
- Open Run utility again.
- Type appwiz.cpl and press Enter to open the Programs and Features panel.
- Locate Skype among the listed apps and right-click on it.
- Select the Uninstall option and follow the on-screen information to complete the process.
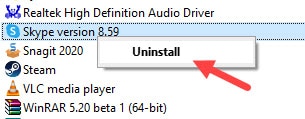
After you have uninstalled Skype, head over to their official website, and download the installer. Run it to install Skype.
Solution 9: Check The Speaker And Headphone
If nothing works, then the issue is likely with the audio speaker or your headphones.
Check if the audio issue is with the Skype only or for general in your PC.
If yes, then check if the speaker or headphones are broken or not.
If in Skype no sound in call is the issue, then ask the other person on the call to check their microphone also.
Wrapping Up
So, there you have it. Now you know what to do when Skype audio is not working.
One or combination of a few of the above solutions should fix this issue for you.
If you have any other questions related to this article, ask them in the comment section below.
Leave a Reply