Screen mirroring is a wonderful feature that allows you to project your small screen on a much bigger one if you have the necessary components for it.
Despite the correct settings still, many users have reported that the cast to the device is not working.
Here, I have provided you with some of the best fixes for this problem.
Let’s dive deep into the article without wasting any time further.
Also read: How To Get Chromecast Games For TV?
Why Is The Cast To Device Feature Not Working In Windows 11?
Contents
There are various reasons why the cast feature is not working in Windows 11.
Here are some of the causes:
- VPN is enabled.
- Outdated Graphic Or Display Drivers
- Device Incompatible With The Cast Feature
- Restrictions By Windows’s Real-Time Protection Feature
- Wireless Display Feature Is Disabled
- Network Discovery Is Not Enabled
- Outdated Network Drivers
- Defects In The Wireless Display
- Both Devices Are Connected To Different Wi-Fi
How To Fix Windows 11 Cast To Device Not Working?
You may encounter error messages like “contacting device or no device found”.
This indicates that your Windows PC cannot cast media on other devices.
Here are a few potential fixes for this problem.
Let’s get started!
1) Enable Wireless Display
If you want to cast onto your Windows 11 display, then you need to enable the Wireless display feature on your PC.
For some users, this feature may be pre-installed, whereas, for others, they need to install it manually.
This is how you have to do it:
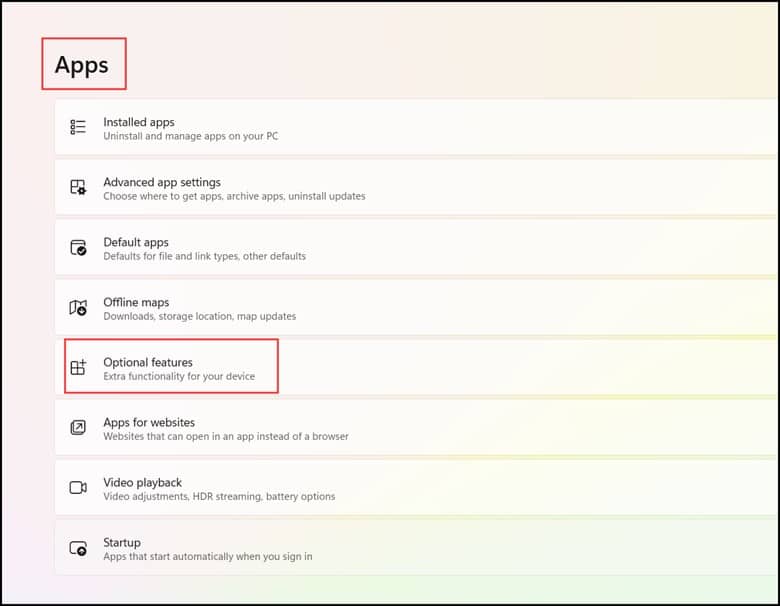
- First, open Settings and then select Apps.
- Next, click on Optional features.
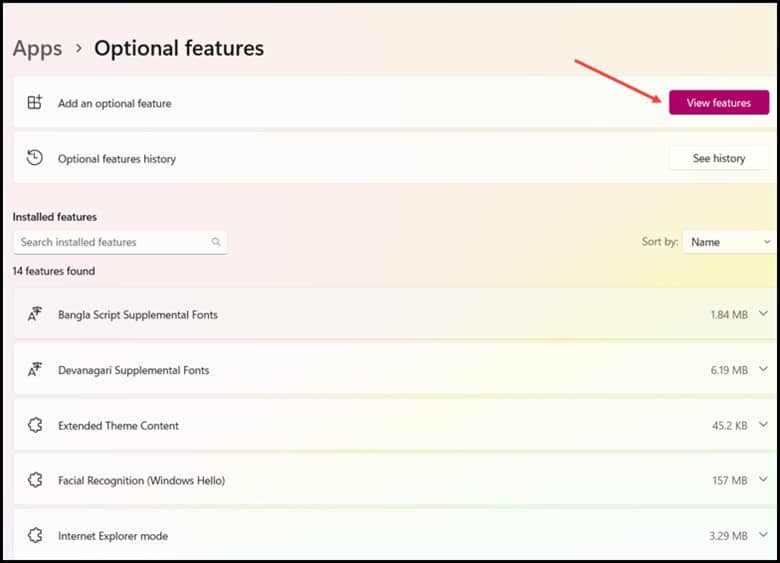
- Then, click on the View features button next to the Add an optional feature at the top.
- Now, search for the Wireless Display feature and check the box next to it and click on Next.
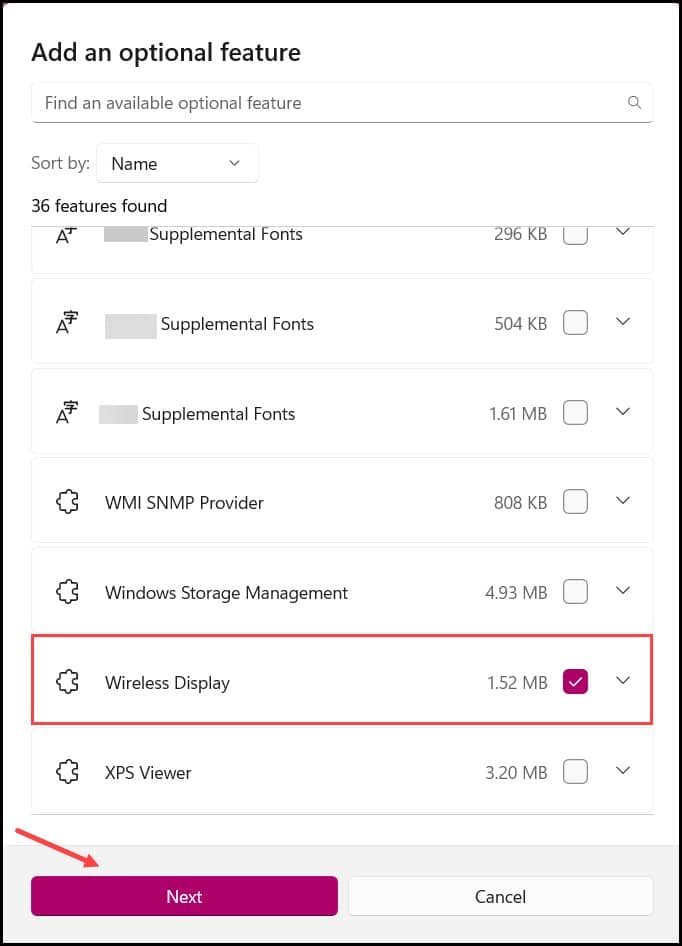
- Finally, on the next page, click on Install and allow the feature to get installed on your PC.
- Check whether the issue persists, if yes then go to the next solution.
2) Make Sure Your Windows System Is Compatible With The Cast Feature
If the Miracast feature is already present on your PC but it won’t run if the System’s hardware isn’t compatible.
If you can view this feature on your Windows 11 PC but can’t use it then follow the steps below to do the same:
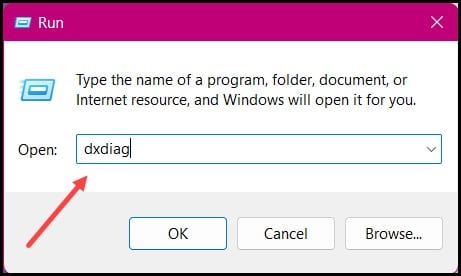
- First, you need to open the Run dialog box and then type “dxdiag” in the search box and press Enter.
- Once the DirectX Diagnostic Tool is opened, click on the Save All Information option at the bottom to save the diagnostic reports.
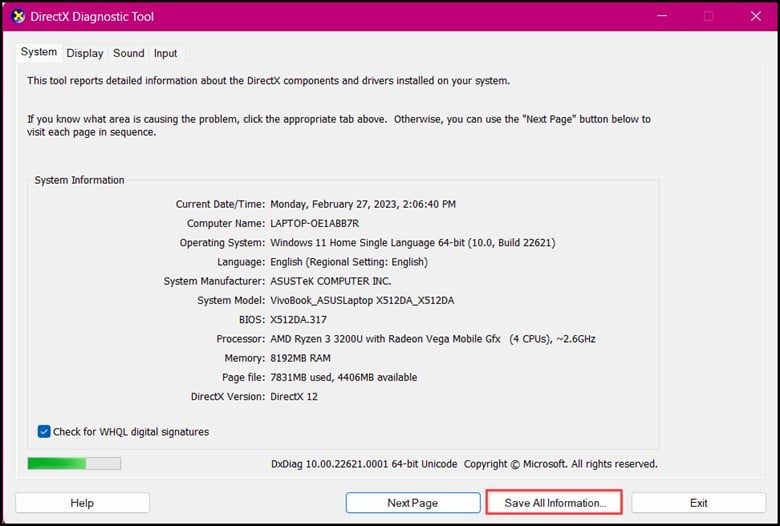
- After you have saved the file, open the DXDiag file on your computer and use the Ctrl + F in order to open the Find tool and type “Miracast” in it.
- Finally, check whether there’s an “Available with HDCP” message next to Miracast.
- Now, check for the issue. If the issue isn’t resolved then re-add your screen.
3) Re-Add Your Screen
If you encounter a connection error, then the casting process won’t work properly.
In this case, you need to remove your screen from the list of connected displays and then re-add it.
If re-adding the screen doesn’t solve the issue then check for necessary services.
4) Check Necessary Services
The Windows services automatically start when the computer is powered on.
So, it is important to check the necessary services and turn off the unnecessary services running in the background.
Follow the steps to do it:
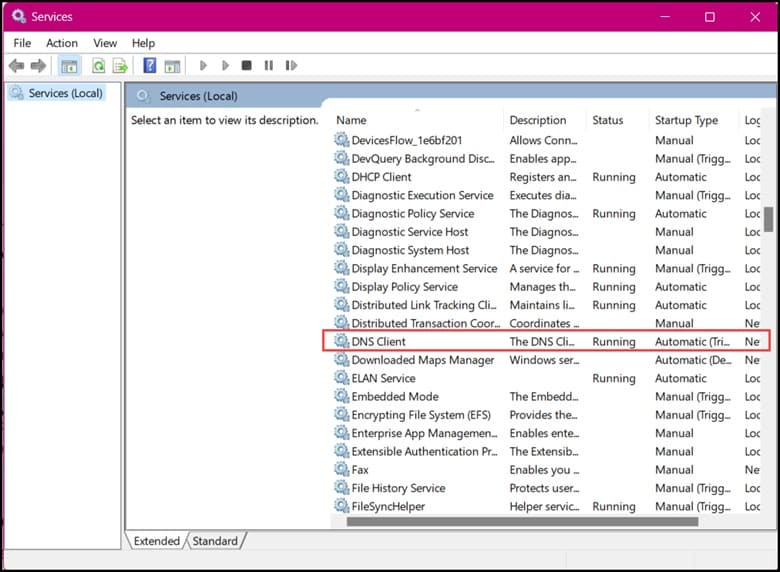
- First, you need to open the Run dialogue box and then type services. msc and click on OK.

- After the service tab opens up, look for the DNS Client service and then double-tap on it to open the Properties section.
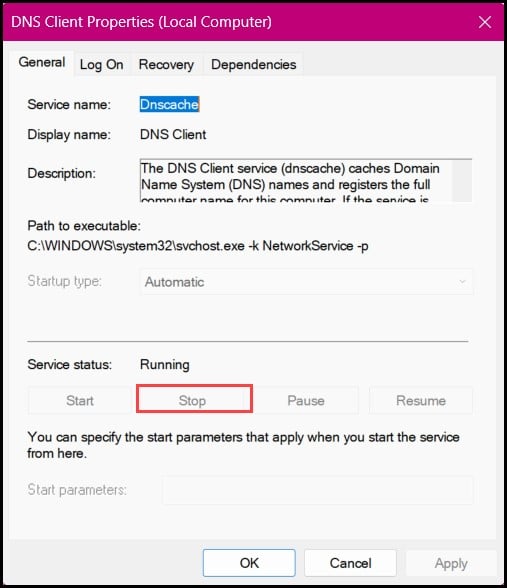
- Next, in the Properties section, click on the Stop option and then click on the Restart option.
- Now, you will have to do the same thing with the below-listed Windows services to make sure that they are functioning properly.
Function Discovery Resource Publication
SSDP Discovery
UPnP Device Host
- After you are done with reinstalling all the mentioned Windows services, confirm if the Cast To Device Feature is working or not. If it does not, troubleshoot the network adapters.
5) Troubleshoot Network Adapters
Troubleshooting the network adapters can also help in solving the cast of the device not working issue.
Here is how you can do it:
- First, open Settings and then click on System.
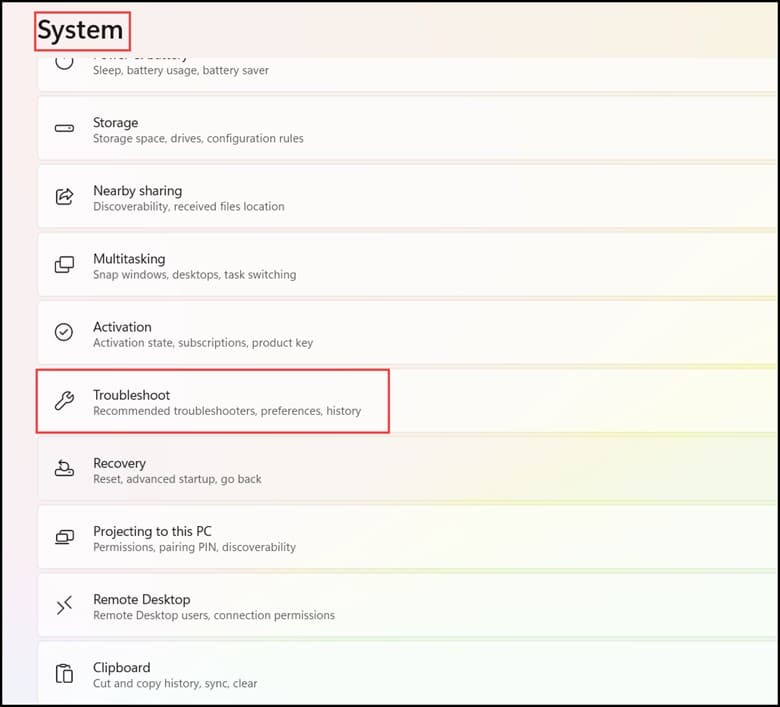
- Then, click on Troubleshoot and choose Other troubleshooters.
- Then, find the Network Adapter option and click on the Run button next to it.
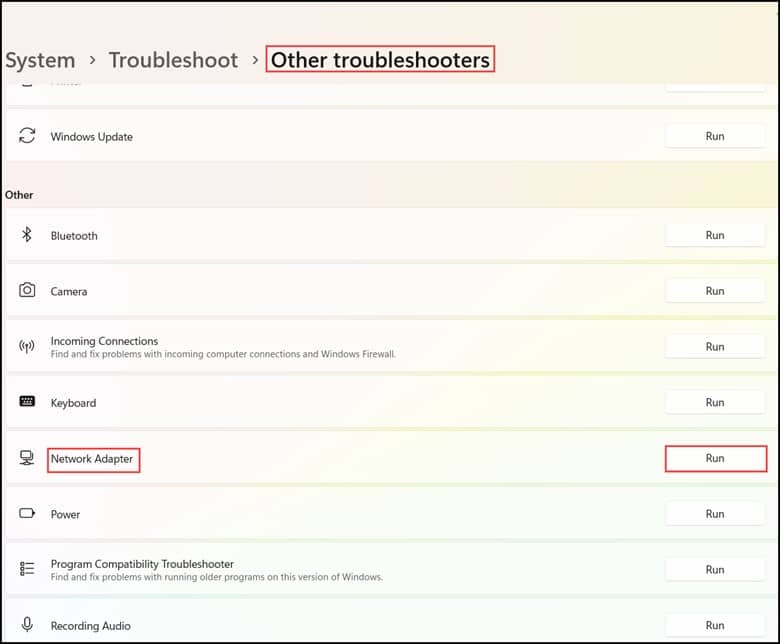
- Finally, follow the onscreen instructions to complete the troubleshooting process.
- Then, check whether the cast to device is working.
If not then update the Graphics driver.
6) Update Graphics Driver
Faulty or outdated Graphics Driver can cause problems while casting your PC’s screen.
Moreover, keeping the Graphics Driver up-to-date is equally essential for avoiding any other display issues.
Here is how you can do it:
- First, you need to open the Device Manager from the Search Menu.

- Next, expand the Display Adapters section and right-click on your Graphics Driver.
- Then, select the Update Driver option.

- In the new window that opens from there, you need to select the “Search Automatically for drivers” option.
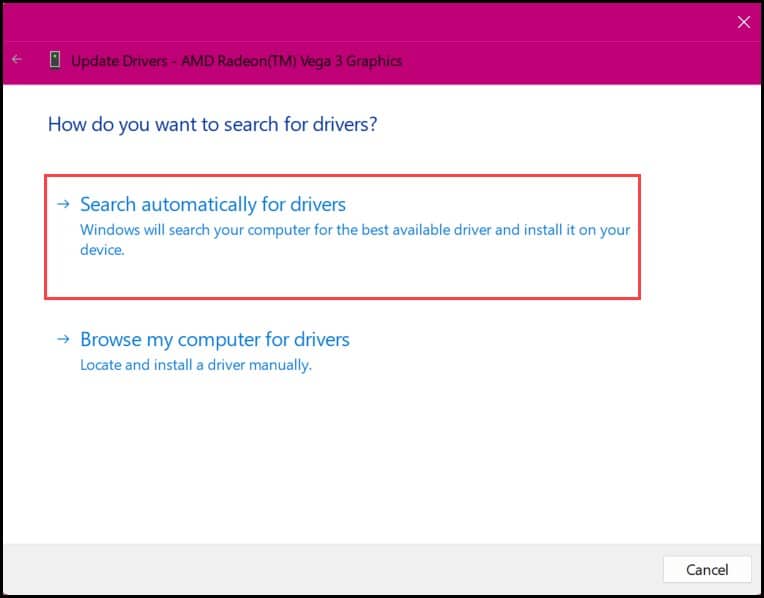
- Your PC will now start searching for new drivers, and if any new updates are available, it will install them automatically.
- Reboot your PC after the drivers are installed and then check whether the cast to the device is working.
- If it isn’t working yet then you need to troubleshoot hardware and devices.
7) Troubleshoot Hardware And Devices
Microsoft has an in-built troubleshooting tool with its Windows 11 OS that helps in fixing some of the common problems that users come across while using it.
Using a troubleshooter is easy if you follow the steps mentioned below:
- First, open the Run dialogue box and then type “msdt.exe-id DeviceDiagnostic”
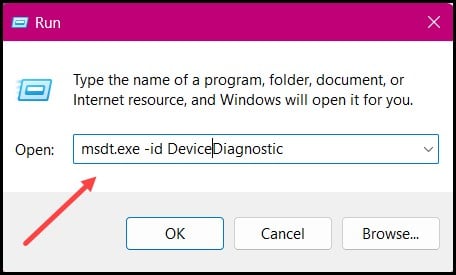
- Then, in the new window that opens up, you need to press the Next button.
- This particular step will help in running the troubleshooter on your PC and will also fix the issues which crop up during the process.
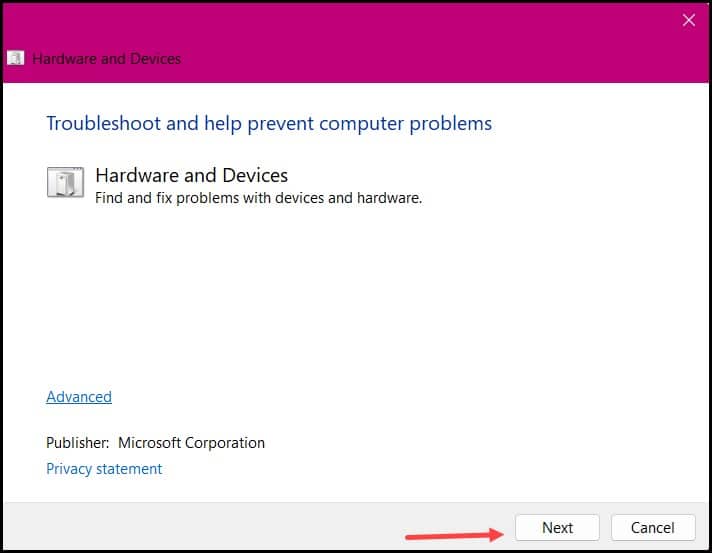
- After you finish the entire process, you start with the screen-sharing process, which should fix the issue.
Frequently Asked Questions (FAQs)
- Can Windows 11 Be Cast To Chromecast?
Yes, for streaming to Chromecast from your TV and Windows computer, it must be connected to the same wireless network.
- What To Do If My Cast Device Is Not Working?
If the cast device isn’t working, then unplug the power cable from the Chromecast device and wait for a few seconds before plugging it back.
Now, check whether your device now appears on the list of devices that you can cast.
- How Do I Cast Video From Windows 11 To TV?
For casting video from Windows 11 to TV follow the steps below:
- First, you need to turn on your TV or projector and turn on the Wi-Fi on your PC.
- Next, on the right side of the taskbar, select the Network icon followed by Cast.
- Then, you need to select your display or wireless adapter and follow the onscreen instructions on the screen.
Final Words
Get in touch with us in the comment section below in case of any doubts or queries.
Also, write to us about which method helped you in fixing your issue.
Leave a Reply