In Windows 10, the users can convert FAT32 to NTFS file systems without using any 3rd party applications. FAT32 is the old file system, which is still used for external storage devices like flash drives. The newer NTFS file system is much better than the older FAT32 system in many fields.
In this article, I have discussed how to convert FAT to NTFS in Windows 10 without using any 3rd party applications.
Also, check out:
Why Convert FAT32 To NTFS?
Contents
FAT32 formatted disks are very limited compared to NTFS formatted disks. The FAT32 hard disks can only have a maximum partition size of 32 GB and can only handle file sizes up to 4GB. In the current time, most files like films and games are much bigger than 4GB. Therefore, FAT32 is no longer a good formatted file system option.
The NTFS file system on the other hand can handle partitions up to 2 TB and files up to 16 TB, which is massive in comparison to FAT32. The NTFS file system also has many security features that FAT32 doesn’t have. In the current time, the NTFS file system is ideal.
How To Convert FAT To NTFS?
As mentioned above, you can convert FAT32 to NTFS in Windows 10 without using any 3rd party applications. Windows 10 has native support for file system conversion. You can use the command prompt or the format option to change FAT32 to NTFS.
How To Check The File System Of A Storage Device?
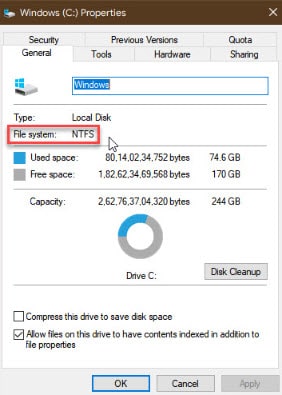
Before you try to change FAT32 to NTFS, you need to check whether the storage device in the FAT32 format or not. Checking the file system of a storage device is fairly easy. Simply, right-click on the storage device drive in My Computer and select the Properties option from the right-context menu. In the General tab, check the file system of the storage device.

Once, you have checked the file system of the storage device, you can decide whether to covert it or not.
Change FAT32 To NTFS Using Command Prompt
Using the command line interpreter is the best way to convert FAT to NTFS if you do not have enough space to back up the files in the storage device. To do this, follow the steps given below:
- Press the Windows + R keys to open the Run utility.
- Type cmd and press Ctrl + Shift + Enter to open an elevated command prompt.
- Now, type the following command to change FAT32 to NTFS:
convert <Drive Letter>: /FS:NTFS and press Enter.
Remember to enter the actual Drive letter of the storage device you want to convert. Example: convert G: /FS:NTFS, where H is the drive letter.

- Now the conversion should start. Wait until it finishes and then close the Command Prompt.
Change FAT32 To NTFS Using The Format Option
Another way to change the file system of a storage device is by using the Format option. However, using this method will delete everything from the storage device. This method is particularly useful when you want to convert empty storage devices or if you don’t care for the files in the storage device.
To do it, follow the steps given below:
- Plug the storage device in your PC and right-click on the drive.
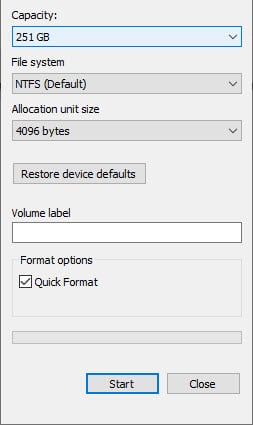
- Select the Format option from the right-context menu. This will open the Format dialog of the storage.
- Change the File system menu to the one you desire to convert to and check the Quick Format box.

- Finally, click on the Start option to begin the conversion.
Wrapping Up
So, there you have it. Now you know how to convert Fat32 to NTFS in Windows 10. If you have any questions related to this topic, ask them in the comment section below.
Leave a Reply