Recently, if you open Windows File Explorer and select any of your files, you will see a small preview thumbnail of the file on the right pane of your screen. This is the Preview Pane feature that was recently updated in the Windows Explorer.
Because of this new feature, you can see a small preview of your files as a thumbnail on the right pane of Windows Explorer. This feature is very useful in identifying your files faster, however, it has also been the central cause for many Windows File Explorer related issues.
In this article, we have discussed how to disable Preview Pane in Windows 10 for those users that are affected by the errors caused by it.
Why Remove Preview Pane In Windows 10?
Contents
The Windows 10 Preview Pane feature shows thumbnails of your locally stored files by using cache files stored in the installation directory. When a new file opens, a cache folder for the same file gets created, which is then used by Windows File Explorer to preview its contents as a thumbnail.
This feature sounds very useful, but it has been repeatedly reported to cause errors while opening files. This error is more common for Word and Excel files. Although, the Preview Pane feature is nice, its not worth to hamper your work for it. Also, removing Preview Pane makes the Windows File Explorer work faster.
Disable Preview Pane In Windows 10 With Some Simple Methods
If you have also decided that the Windows File Explorer Preview Pane feature is not worth the trouble it causes, then the next thing you should do is disable it. Below we have mentioned a few different methods you can use to remove Preview Pane in Windows 10.
Method 1: Hide Preview Pane Using A Shortcut
The easiest way to hide Preview Pane is by using the Alt + P shortcut. To use this shortcut first, open the Windows File Explorer by pressing the Windows + E keys. Next, press the Alt + P keys to hide the Preview Pane. Using this shortcut again will enable the Preview Pane feature.
Method 2: Hide Preview Pane From The View Tab
You can also enable or disable Preview Pane from the View tab in the ribbon menu. To do it, follow the steps given below:
- Open the Windows File Explorer again.
- Click on the View tab on the ribbon menu.
- There you will find the Preview Pane option.
- You can toggle it on or off by clicking on it.

Method 3: Disable Thumbnails From The Preview Pane
You can change the settings of Windows File Explorer to hide the thumbnails in the Preview Pane. To do it, follow the steps given below:
- Open Windows File Explorer again.
- Select the View tab from the ribbon menu.
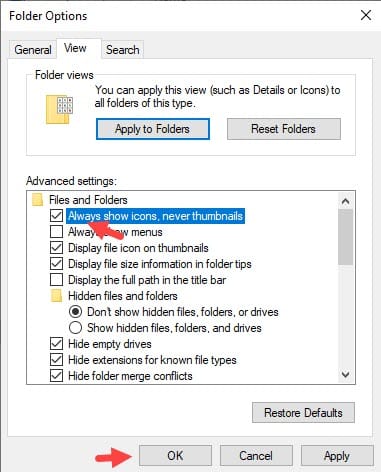
- Next, click on the Options button and select the Change folders and search options button. This will open the Folder Options on your screen.
- Select the View tab and in the Advanced settings section, check the Always show icons, never thumbnails box. Also, uncheck the Display file icon on thumbnails option.
- Finally, click on Apply and OK to save the changes.

Wrapping Up
So, there you have it. Now you know how to disable Preview Pane in Windows 10. Follow the above steps carefully and you shouldn’t face any issues while removing the Preview Pane feature from File Explorer. Also, if you have any questions related to this article, then ask them in the comment section below.
Leave a Reply